Discover how to ensure your data security on Google Workspace in just 5 easy steps. Prevent information leaks to external users automatically.

In the realm of IT administration, safeguarding data is paramount. However, the tasks designed to fortify data security can often seem like a monotonous maze, fraught with human errors and potential information breaches. This is where Zenphi comes into play, offering an efficient and effective solution. By simplifying data security processes, Zenphi ensures your company’s information remains secure and inaccessible to unauthorized eyes.
Let’s explore how you can seamlessly set up a workflow in Zenphi that notifies you whenever a user changes file permissions from internal-only to external sharing. This process involves five key steps: setting up the trigger to initiate the flow when such activity is detected, retrieving the parameters of the file that was shared, logging this information in a Google Sheet for easy tracking, checking if the file is located on a Shared Drive, and finally, notifying the owner about the potential leak.
Table of Contents
Set Up your Zenphi Account
Get your journey to higher data security underway by kicking off with a free Zenphi account. Register here and dive into the world of automated workflows or schedule a demo meeting to learn about how Zenphi could better your business. In Zenphi, each automated workflow is represented by a ‘flow,’ comprising a trigger and subsequent actions.
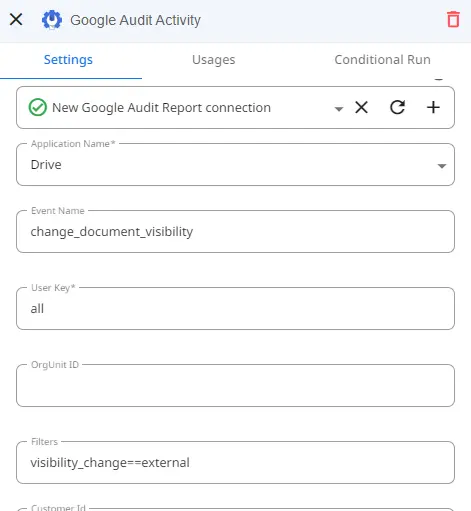
Step 1: Use “Google Audit Activity” Trigger
The first step to our flow will be to configure our “Google Audit Activity” Trigger.
In Zenphi, the trigger is the action that initiates the flow. In this specific case, the flow will begin whenever certain audit activity occurs. You will need to begin by setting up your connection to Google Audit Report, granting Zenphi permission to monitor the activity of your choosing.
Here we will set the Application Name to Google Drive and the Event Name to “change_document_visibility.” This will trigger our flow whenever a user changes the document visibility inside Google Drive. We’re able to filter out the changes made to document visibility depending on what we wish to avoid. In this example, we have used “visibility_change==external” to start the flow only when a document is now being shared externally.
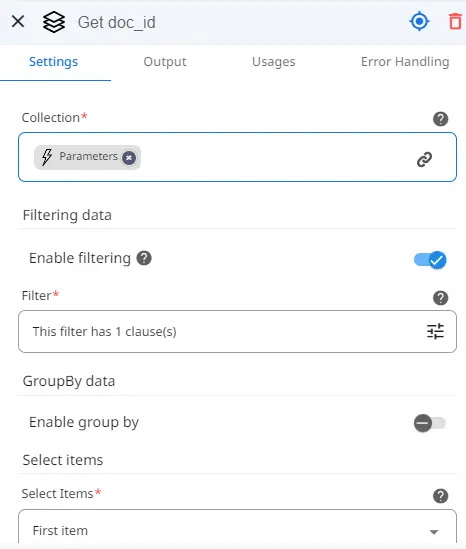
Step 2: Retrieve Document Parameters
Next, we will use a very powerful tool called “Query Collection.”
This action allows us to retrieve certain information from a selected collection.
We will use this action to retrieve 4 key elements:
- the ID of the file,
- the owner of the file,
- the title of the Google Doc,
- and lastly, the Shared Drive ID if it belongs to one.
Each of these elements will have its own Query Collection action assigned.
To set it up, we just need to indicate the collection we wish to filter, in this case, the Parameters coming from our trigger. This will allow us to see the information that the trigger provided.
However, we must filter the collection to retrieve the information for each key element we wish to retrieve. To do so, we will repeat the same process for each of the 5 Query Collections actions and simply change the name of the item we’re looking for inside of the Filter section. This will allow us to decide which records we want to obtain.
Step 3: Add The Document Information To Google Sheet
To keep better track of the files that have had their visibility changed from internally to externally, we will create a simple Google Sheet by using the “Add Row” action.
Simply set up your Google Sheet with a header for each column you wish to add. To use the action, set up the connection to your Google Sheet and then select the file you just created. Click on “Load Headers” to import the name of each column so you’re able to view where to insert each token from our previously created Query Collections.
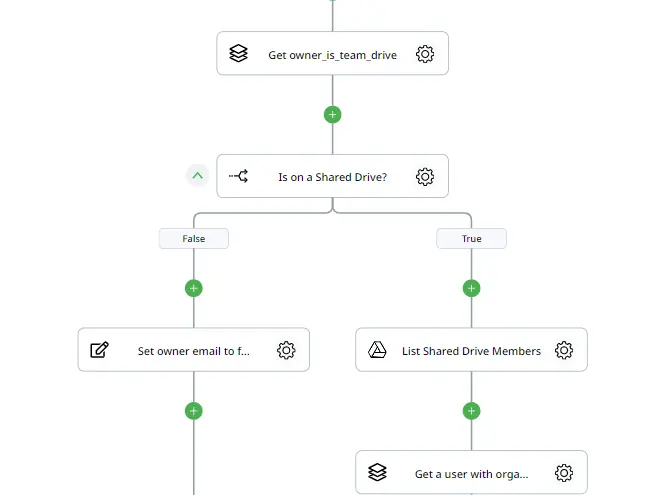
Step 4: Review If The File Is On Shared Drive
Since the last step of our flow consists of notifying the owner about the change in permissions to their file, we must keep in mind that this process is a bit different when the file is on a Shared Drive since there isn’t one designated owner.
To see if a file is on a Shared Drive, we will make use of “Query Collection” once again, using the same collection as before and filtering when the Item name is “owner_is_team_drive.”
Then, we will use a simple “If Condition” action which will follow the true branch only when the value returned from the previous action is true, indicating that the file is effectively on a Shared Drive. Shared Drives don’t have owners, but the most similar we can get to that is someone with an Organizer role inside the drive.
To get a user with this type of permissions, we will use the “List Shared Drive Members” action, using the id of the Shared Drive we created in Step 2 and making sure to execute as a Domain Admin. This will create a collection of members of the Shared Drive, which we will introduce into a Query Collection and filter by when the role is equal to Organizer.
Step 5: Notify The File Owner
Now that we have all the information of the file that is being shared externally and the owner or organizer of the file depending on the Drive it belongs to, we are now able to notify them that the File may be being leaked to people outside of the company who shouldn’t have access.
For this, we will use the “Send Email” action, where you have the ability to customize the email using all the previous information gathered using the Token Picker. You can share the Google Sheet with the user, use the Item id retrieved to generate the link to the file and much more.
Step 6: Customize And Test
And in just 5 easy steps, you have ensured that your files aren’t shared externally without the owner of the file being aware in a matter of seconds. The last step is to save and publish your flow which will ensure whenever this happens your Zenphi will be executed automatically. Start enhancing your company’s data security without having to sacrifice any of your time to do so.
If you have any questions or wish to set up a meeting to learn more about how Zenphi could help your business, you can schedule here.
Video Tutorial
Watch this YouTube video to recreate the same flow in Zenphi
Talk to us
Concerned about your Google Workspace security? Let us show you more use cases on how to automate Google admin tasks that would boost your data security!