AI Enablement For Sales Teams , AI-Powered Workflows For HR , Automating Marketing With AI , Google Sheets Automation , How-To , Operationalize AI For Business , Zenphi Use Cases By Industry Or Role
A step-by-step guide on how to send custom emails to your customers, employees and vendors using Gmail and Google Sheets (and — maybe — some trending hot features like generative AI) !
When Do You Need Google Mail Merge?
It is no surprise that mail merge using Gmail and Google Sheets can significantly enhance various business processes by offering a very flexible, budget-friendly and secure way to automate personalized communication and data management.
However, there are use cases that one would consider a better fit for this process, and use cases that are less likely to utilize this set up.
HR Processes Like Employee Onboarding
HR department is usually the one that uses mail merge for Google Sheets quite extensively — given that a company is a Google Workspace user, and looking for a Google Sheets automation tool.
The most relevant candidate for Google mail merge in this case is the onboarding process of new employees. HR managers want automated emails to be sent to new hires with personalized information such as start dates, orientation schedules, and documents to complete, all pulled from a Google Sheet where their data is stored.
Event Management
Non-professional event organizers, if they use Google Workspace internally, are also usually happy to unlock the full potential of the familiar environment, and utilize mail merge with Google Sheets, instead of overpaying for expensive event management subscriptions (that’s why we mentioned ‘non-professional organizers’ — companies who don’t consider events as their main business, and who host them as a supportive function). For example, using Google sheets mail merge, they can manage invitations, confirmations, and follow-up communications for events — all from a Google Sheet with attendee information.
Customer Support Management
Customer support teams within Google Workspace using companies leverage mail merge to send updates to customers about the status of their support tickets. Just like HR, and special event management, customer support function is not something leadership usually love overspending on. Therefore, teams are tasked with utilizing tools that they already have instead of purchasing additional subscriptions.
It is known that by integrating ticketing system data into Google Sheets, personalized emails can be automatically sent to inform customers about the progress of their requests, expected resolution times, and any required actions on their part. And it is considered by most top managers a bullet-proof budget-friendly solution.
Other Functions
Though Marketing and Sales teams can also utilize mail merge from Google Sheets, they are in general not the most common users of this setup. Why? In most cases, Sales & Marketing successfully secure budgets for elaborate personalized communication tools that allow to get detailed analytics on email engagement, open rate, forwards, bounces and other metrics.
How To Perform Mail Merge From Google Sheets In 4 Simple Steps Using Zenphi
Step 1: Set Up Your Zenphi Account
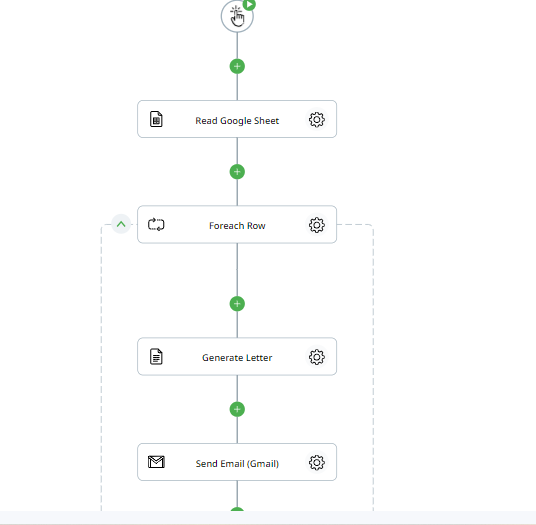
Let’s get started by setting up your Zenphi account. Click on the link to create your free account, and once you’re in, it’s time to build your first automated flow. In Zenphi, a ‘flow’ is the entire automated process. It consists of triggers (the magic button that starts the flow) and actions (the steps that make the magic happen). Our final flow will be a breeze to use, thanks to a manual trigger that lets you kick things off with just one click. We’ll break it down into three simple steps: reading the Google Sheets, generating personalized documents, and sending them to each user via email.
Step 2: Reading the Google Sheets
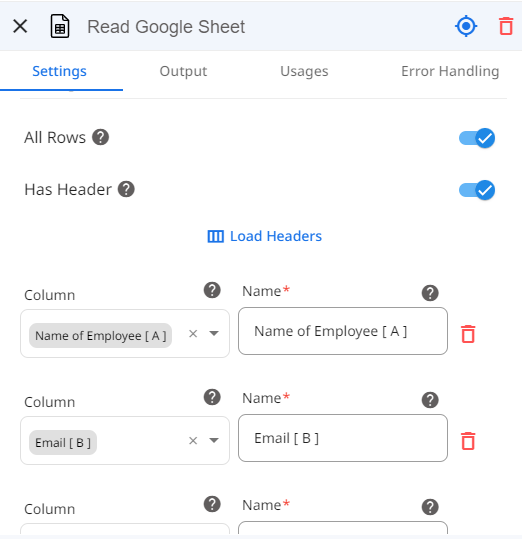
Now let’s dive into those Google Sheets and extract the information we need. With Zenphi’s Read Rows action, you can select the rows you want and even load headers for easy reference. Below you’ll see a sample of our spreadsheet used as well as how you’ll visualize the columns and their header names once loaded properly
After we have read the rows we will be able to use these values in the subsequent steps, enabling us to create personalized emails without the time hassle.
Step 3: Creating the Document
Now comes the interesting part! We’re going to create personalized PDFs for each recipient using Zenphi’s Generate Document Using Template action. This allows you to create custom documents using a previously created template.
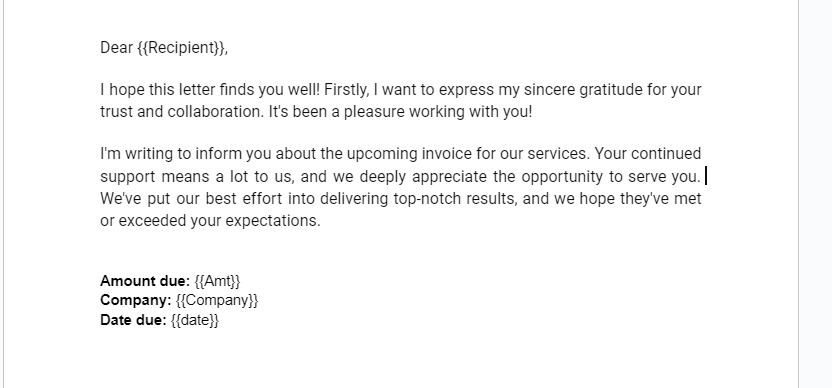
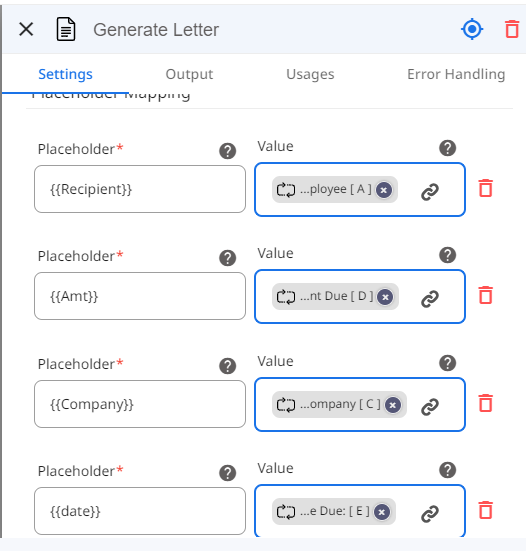
This template can include placeholders which will need to be indicated using 2 curly brackets as seen below in the example. Simply replace the placeholders with dynamic information from the Google Sheets using the Token Picker which is represented with a chain icon.
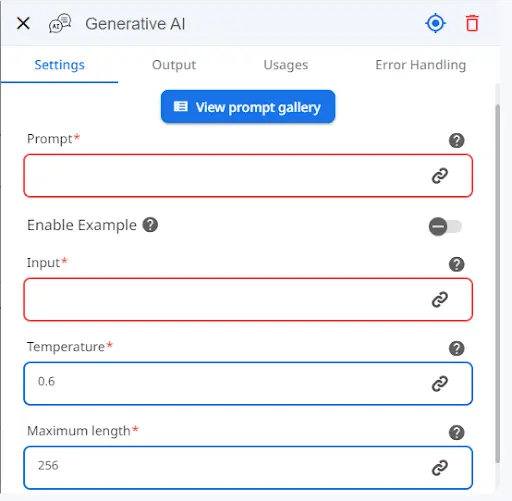
Another, more advanced way to do it, is to use Zenphi’s Generative AI feature! It is like your personal ChatGPT outside of ChatGPT — a way to generate content promptly based on dynamic variables extracted from Google Sheets data. You can use one of the multiple generative AI templates stored in our gallery that represent a collection of tested and efficient prompts.
You see in the image below that we have used the name of the employee, the amount due, company and date due from the initial Google Sheet to fill out the placeholders inside of the template document. This action on its own will generate a Google Doc however it does have the option to enable PDF which we will turn on to be able to send the file through email.
And just like that your customized documents are ready to be sent out.
Step 4: Sending the Email with the File
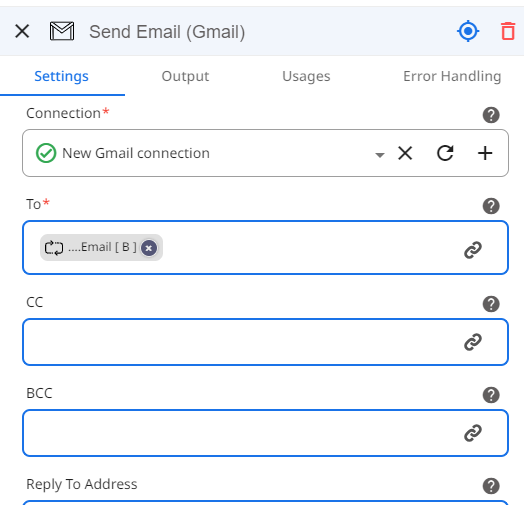
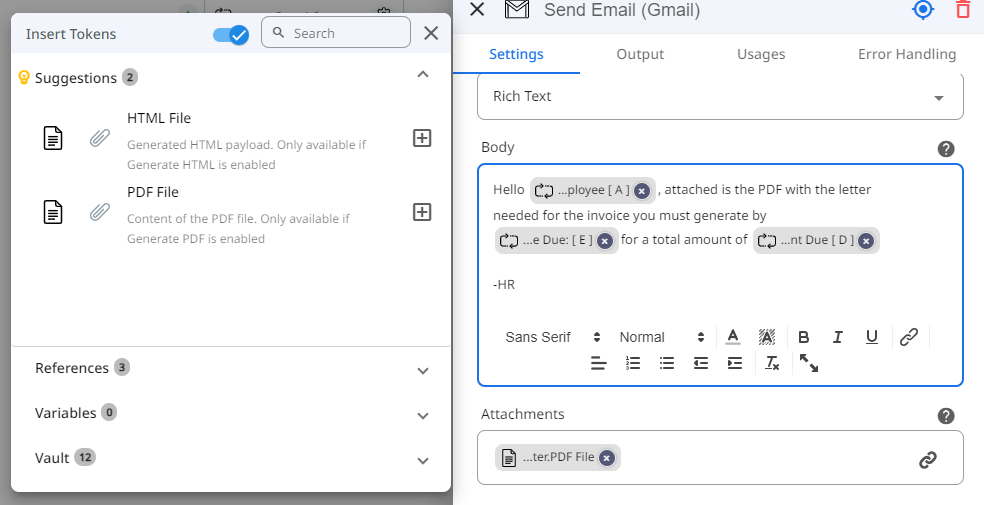
Last but not least, it’s time to hit send! With the “Send Email (Gmail)” action, you can craft the perfect email and attach the PDF file generated in the previous step. Make sure to loop through each recipient from the Google Sheet to ensure everyone gets their own personalized message.
You’ll notice that the token picker is visible in many parts of the action. Feel free to use this tool to be able to personalize your emails even further with the information from the Google Sheets or any previous steps done. At the bottom of the action you’re able to add attachments, this is where we will select the PDF file generated by the previous action.
Testing and Publishing your Flow
Before you unleash your automated masterpiece into the wild, it’s time to test and tweak. Zenphi is highly customizable, so feel free to add or remove steps to fit your workflow process perfectly. Once you’re satisfied, hit publish, and watch as Zenphi works its magic, saving you valuable time with each automated task.
Video Tutorial On Google Sheets Mail Merge
Watch this video that would help you replicate the flow described above even faster.
Talk To Us
Looking for other ways to unlock the full potential of Google Workspace Apps and automate your business processes in the most budget-friendly way? Let our automation experts assist you!

