PDF Mail Merge: PDF creation with dynamic variables from Sheets

How-To , zenphi Use Cases

The final step would be triggering the flow manually and make it run once to make sure everything’s correct. Check workflow logs as well. 

You can also read our guide on how to automate a task of sending out confirmation emails upon Google Forms submission. Or how to automatically send out different emails based on Google Forms Control value.

We hope this guide has provided valuable insights into automating your workflow with Zenphi. 

Talk to us

Not sure how to start your PDF mail merge automation? Let us guide you on every step! Our consultancy is free of charge.

Creating a template

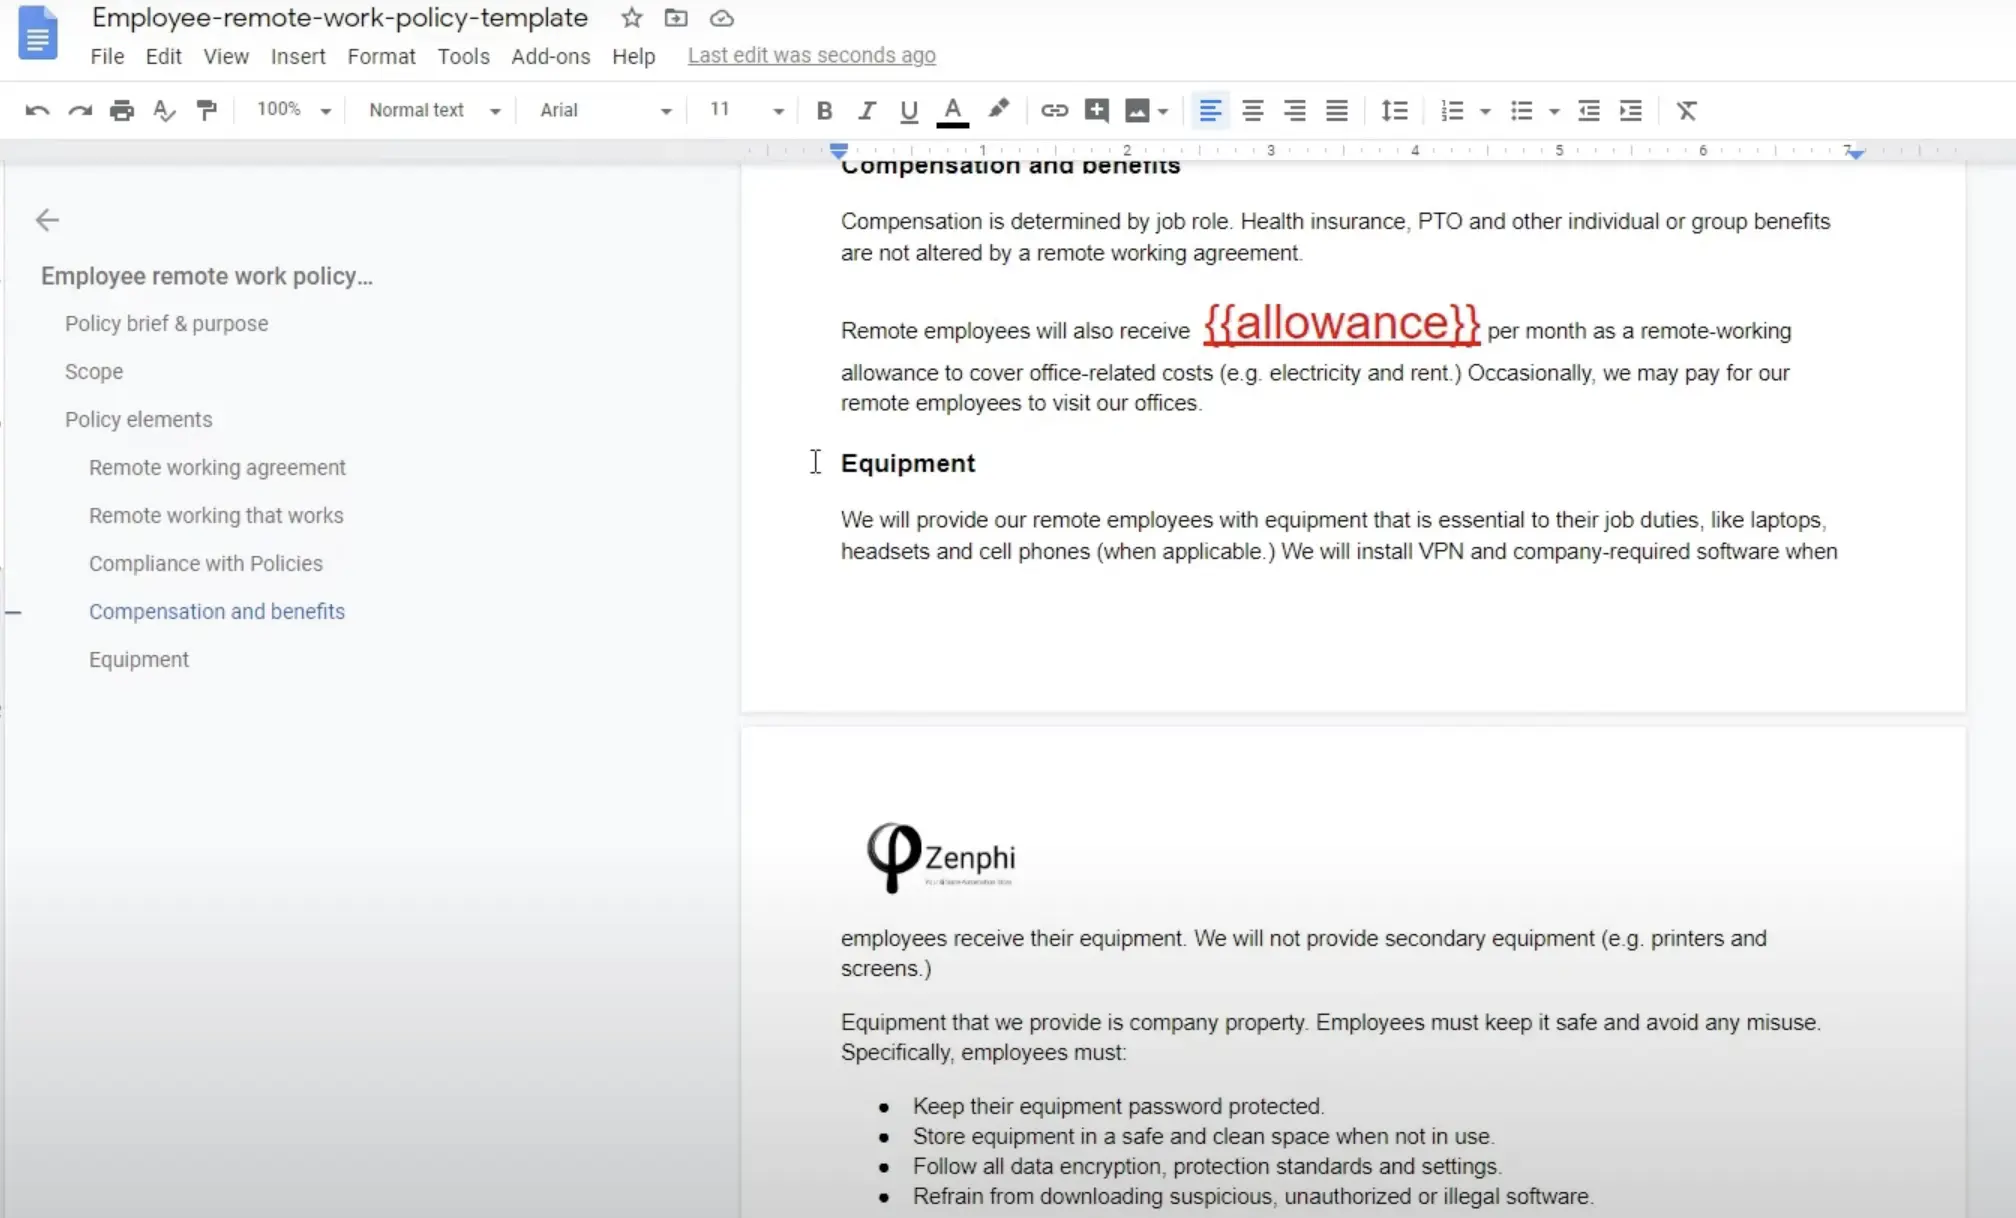
Create a document template on your Google Drive and insert {{variable}} for personalization

Creating a data base (Google Sheet)

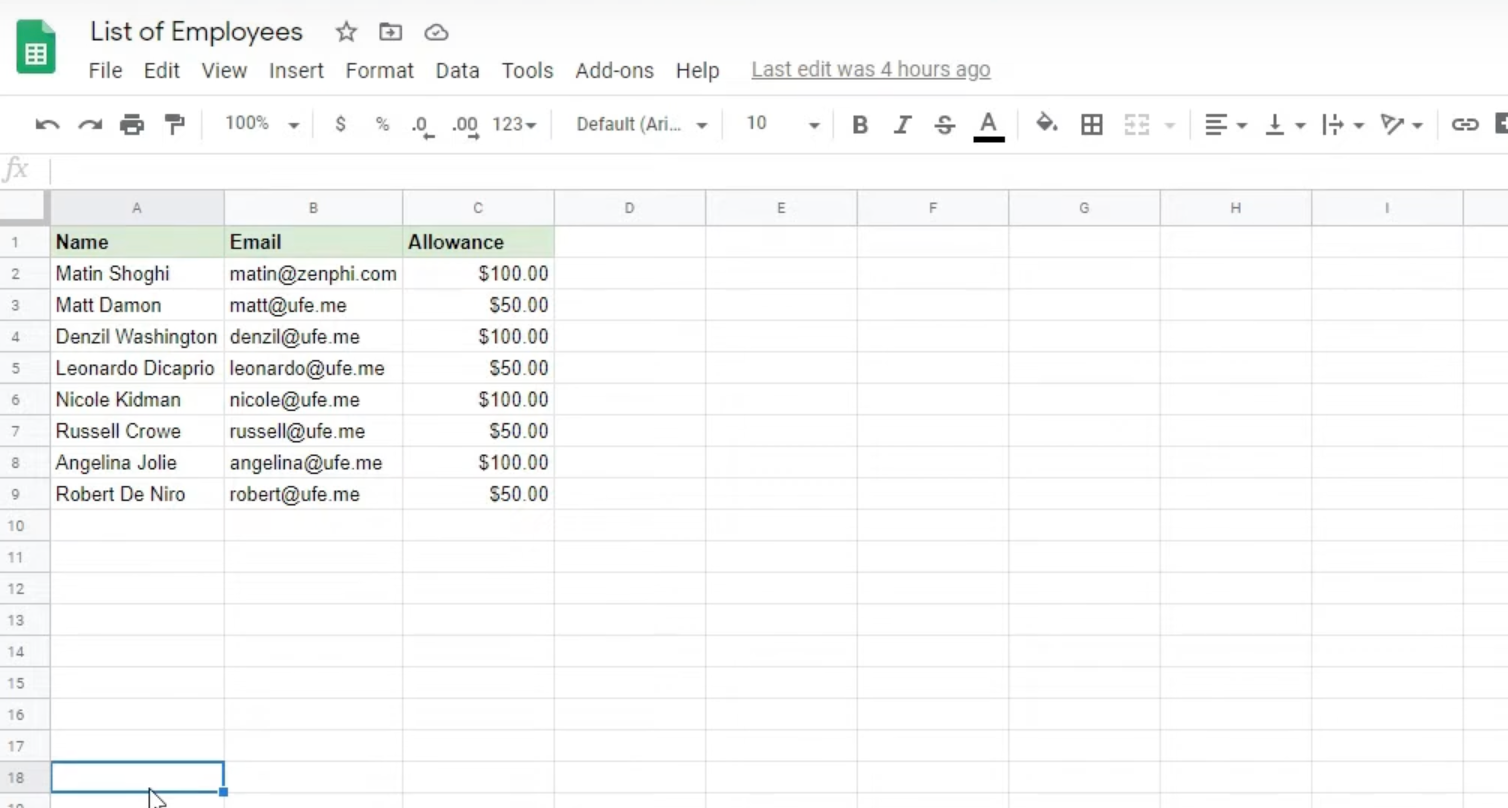
Create a Google sheet you’d want to use as your database to store variables needed for personalized PDFs. Variables can be names, email address (necessary for emailing the PDFs), order details or anythin else. 

Automate PDF creation with dynamic variables

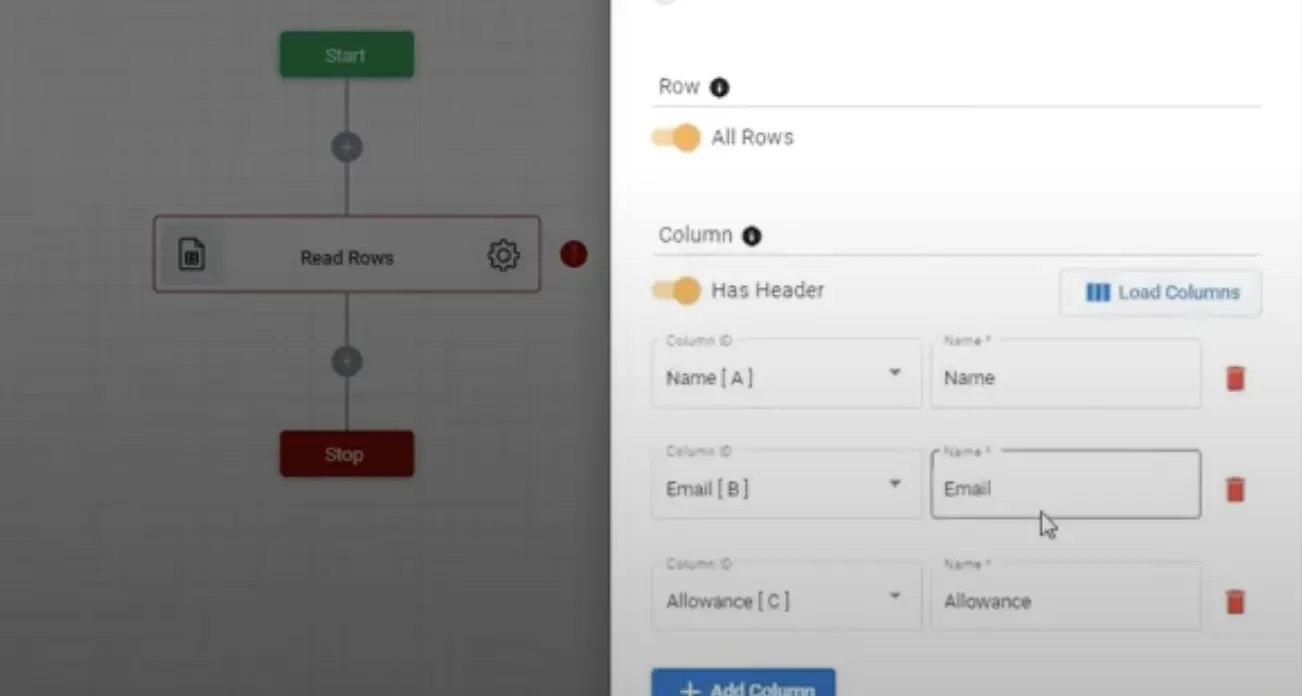
Use a Read a Row action

  1. Establish a connection between Zenphi and your desired Google drive.
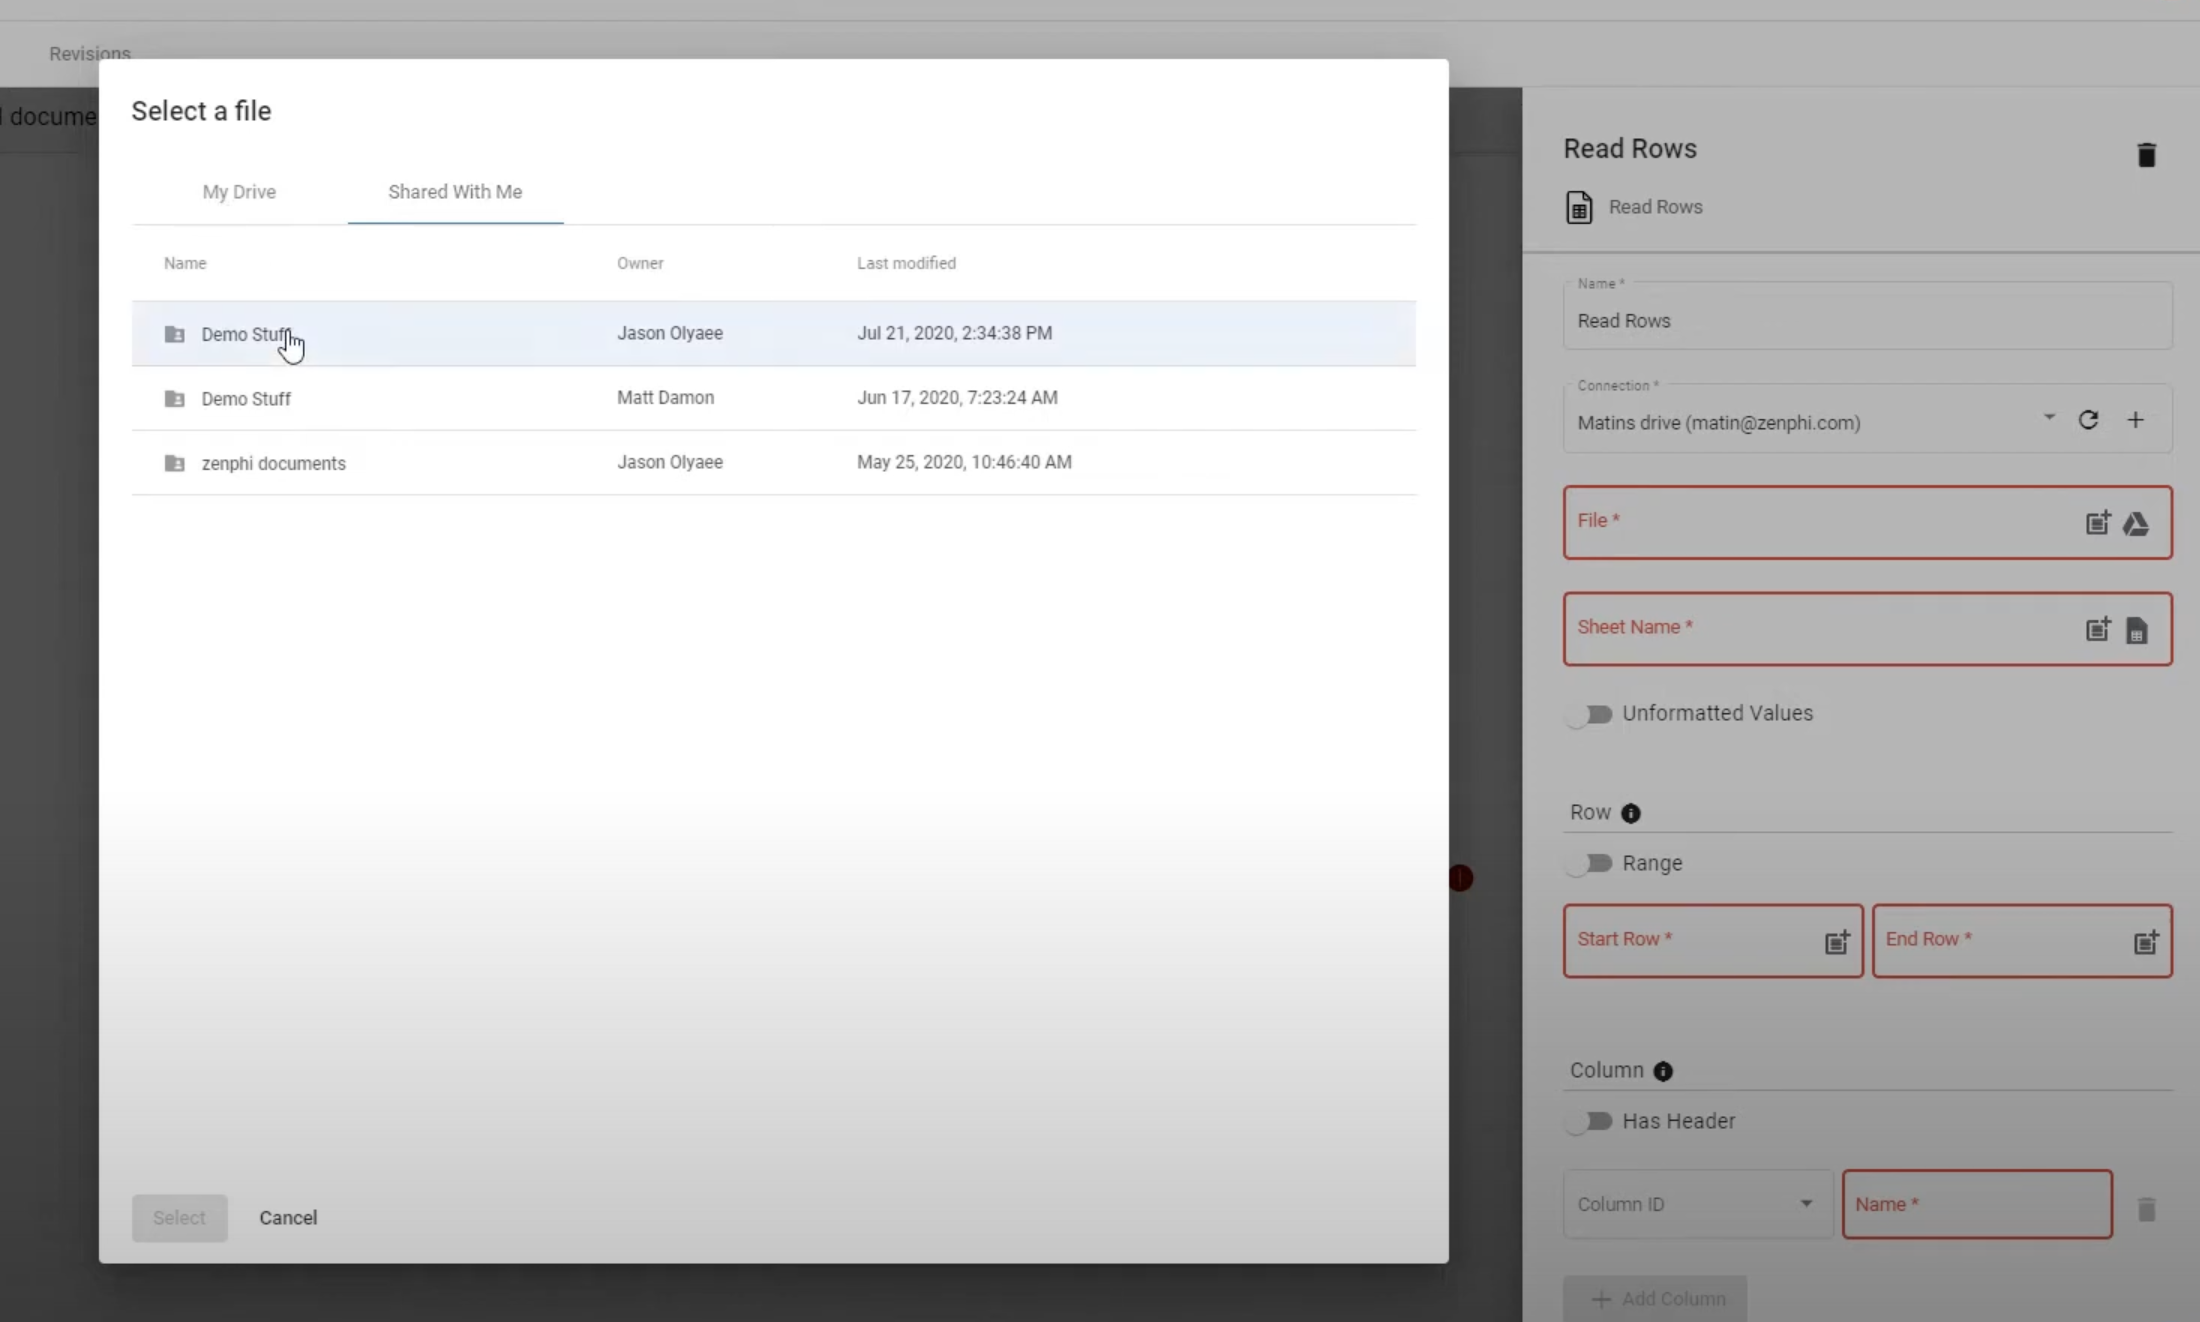
  2. Specify the file and the sheet you want Zenphi to read rows from

Use Load columns button

Use this action to automatically preload the columns and map them to the variables in your flow. For example, you have to tell Zenphi that Name in your Google sheet should be used to replace the variable {{Name}} in your Google doc.

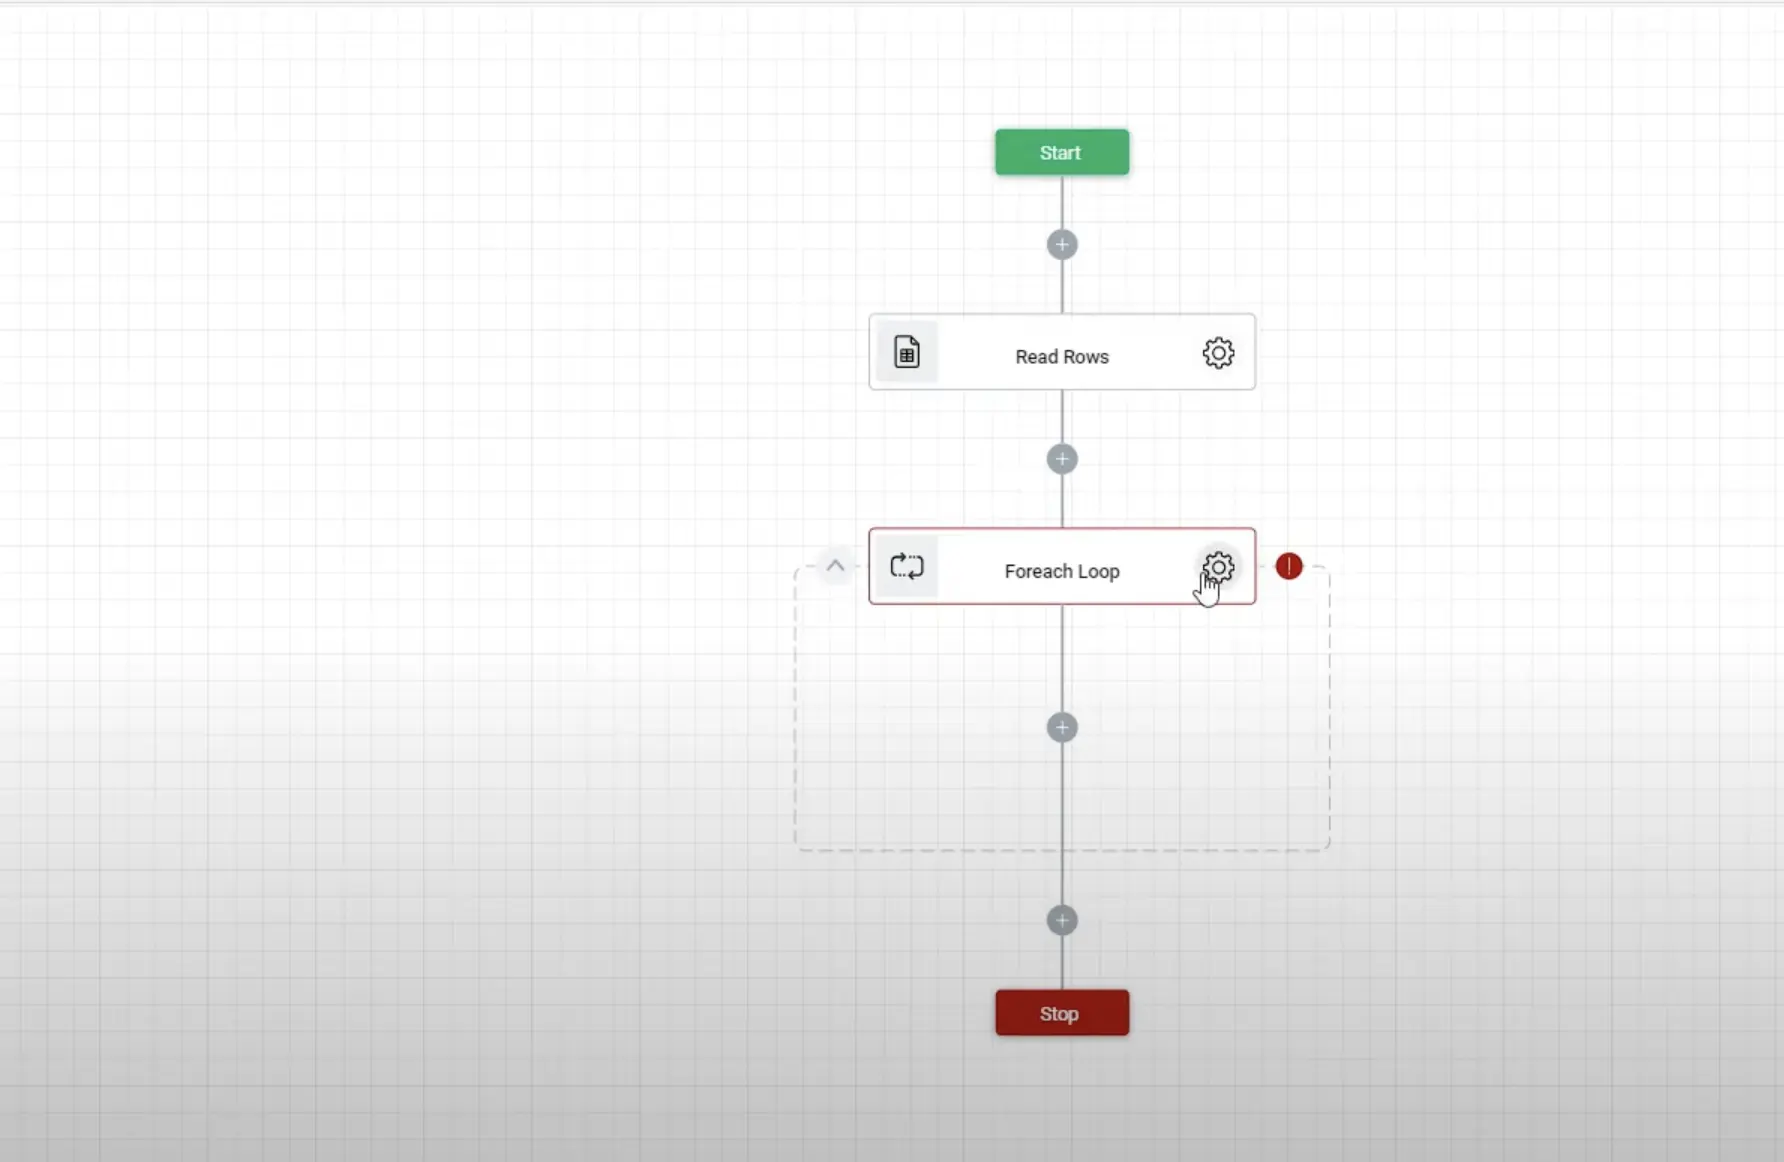
Use Foreach action

What this means is that the flow you’re creating will be repeated for every row. Specify the action that should be taken for each row — in this case, it’s Read a row. In other words, you’re telling Zenphi that you need it to read not just one row. But all the rows in the sheet and perform a flow you describe below for every variable.

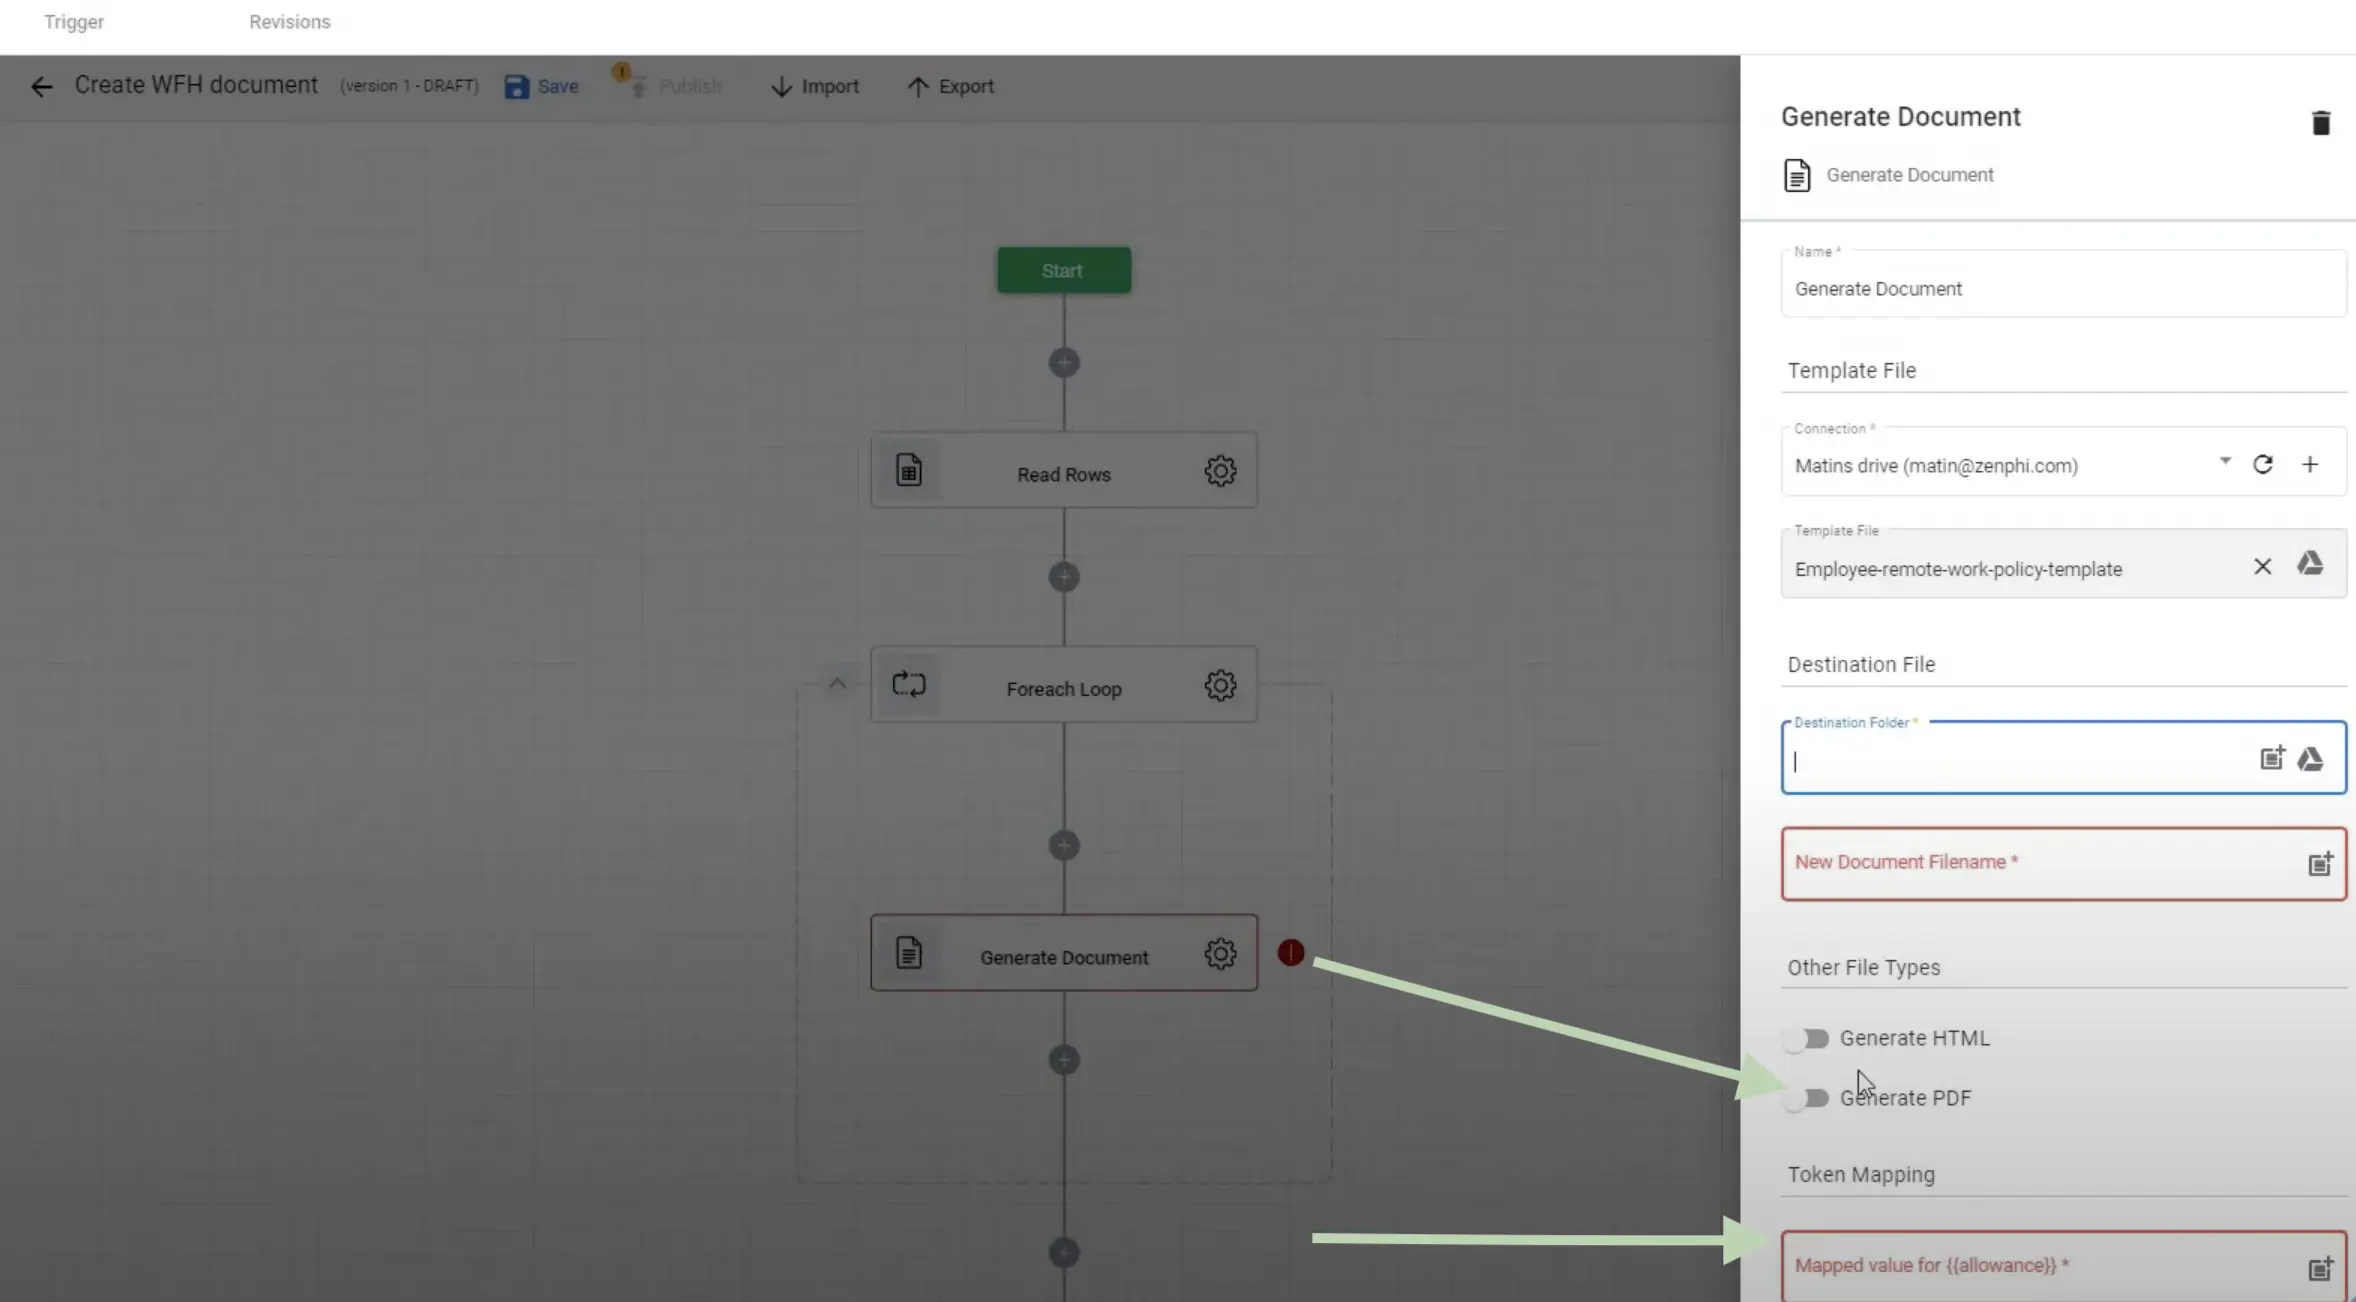
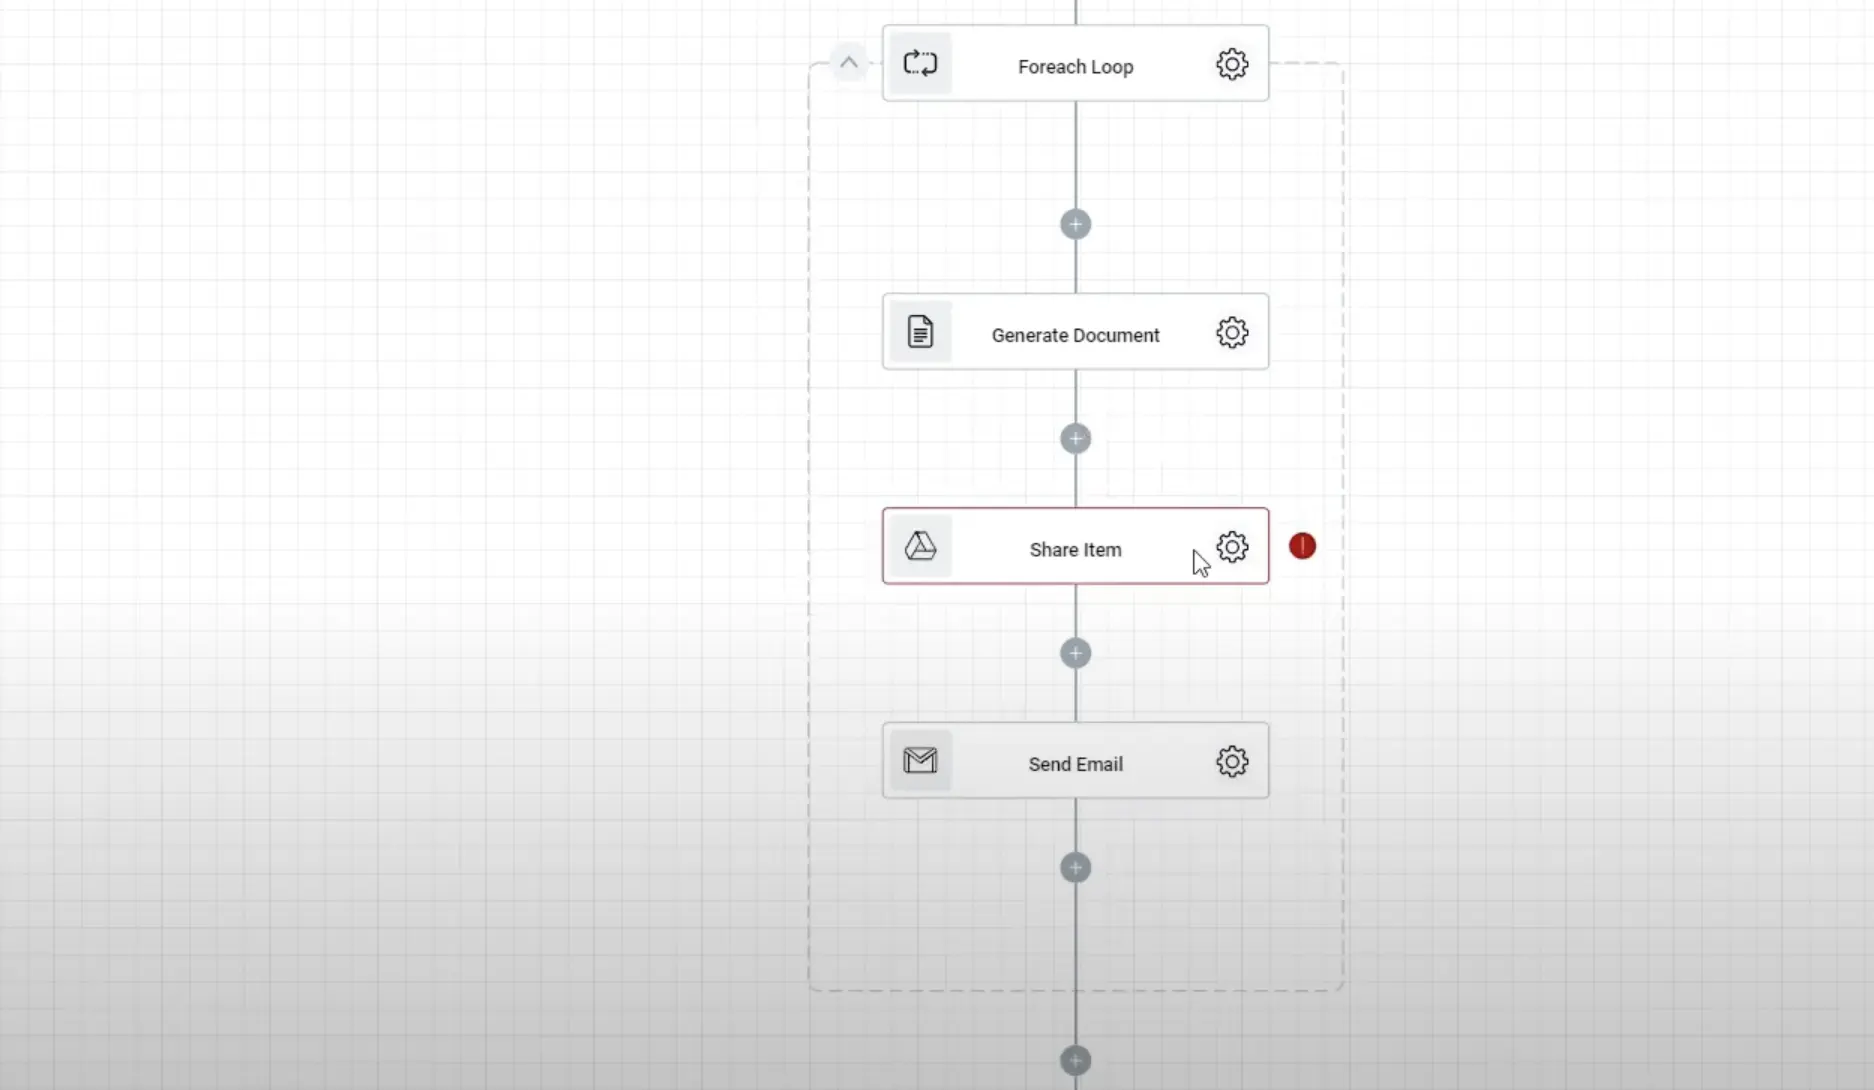
Add Generate a Document Step

This action will be taken not once but as a part of FOREACH flow (meaning, it will repeated multiple times).

  1. Add connection to your Google drive
  2. Specify where to save your new document
  3. Specify the file name (for example {{Name}}_policy.doc)
    You can use template offered by Zenphi that will automatically map all your variables in Google sheet to Google doc.
  4. Toggle on Generate PDF

Make sure all variables you have in your document template are mapped on this step!

Emailing the PDF

Use Send email action

Set up the connection between Zenphi and your Gmail account

You have to be authorized Google workspace Admin! You also can only use Google Workspace, not your personal Gmail account!

Set up the sender's email address

You can hard-code it

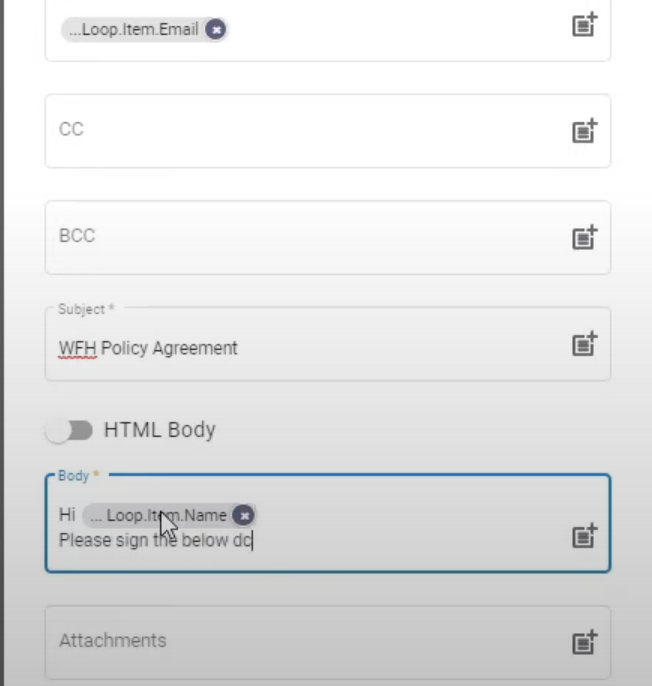
Set up the receiver's email address

For this, you have to tell Zenphi that email address should be taken from the Foreach Loop action

Set up subject

Hard-code or use a variable from your Google Sheet

Set up the body

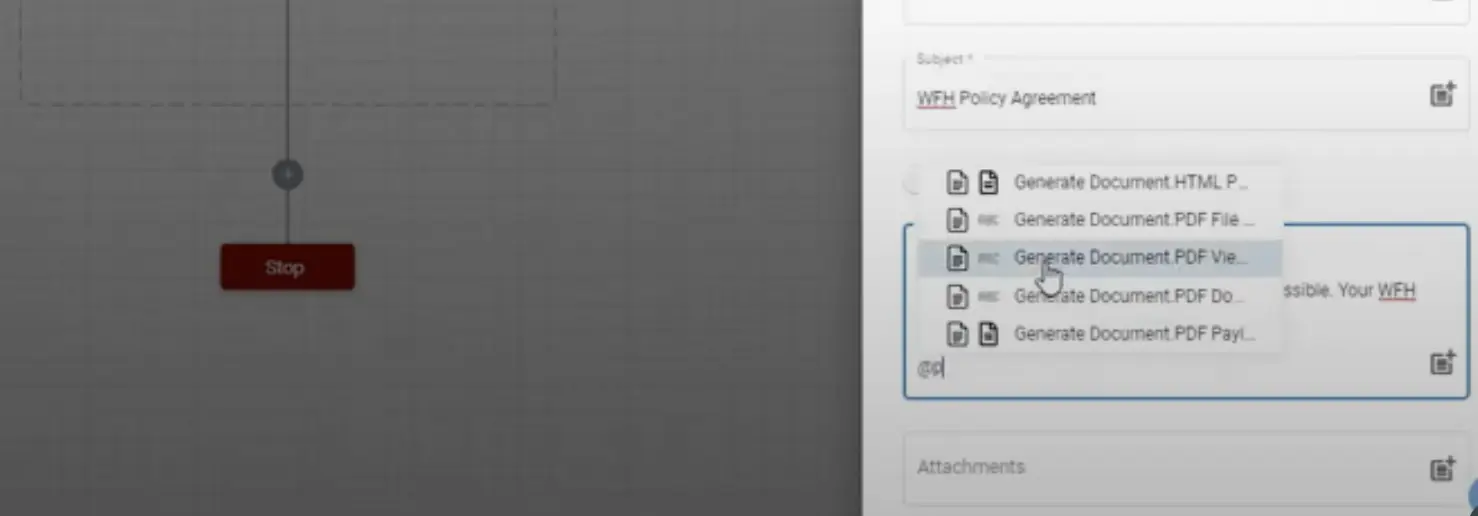
Here you can also write the copy of your email using individual variable for personalization (for example, Name). Or you can create fully personalized copy and store it in Google sheet, adding a reference to the {{copy}} variable on this stage.

Add your PDF as attachments

Specify a dynamic value of your PDF file as an attahment.

Use Share Access action

If you’re using a link to the PDF created and saved on your Google Drive instead of the file itself, you’d want to provide access to this document to a person who receives your email without providing access to all your Google Drive.

In this case you need to add Share Access action between Generate a Document and Send an Email action.

  1. Make sure you provide a correct role to the user
  2. Use a user’s email address stored in your Google sheet  to identify the user who has access to this file (again, use Loop foreach => email address to tell Zenphi where emails are stored)

Customize & Test  PDF mail Merge Flow

The final step would be triggering the flow manually and make it run once to make sure everything’s correct. Check workflow logs as well. 

You can also read our guide on how to automate a task of sending out confirmation emails upon Google Forms submission. Or how to automatically send out different emails based on Google Forms Control value.

We hope this guide has provided valuable insights into automating your workflow with Zenphi. 
Talk to us

Not sure how to start your PDF mail merge automation? Let us guide you on every step! Our consultancy is free of charge.

Creating a template

Create a document template on your Google Drive and insert {{variable}} for personalization

Creating a data base (Google Sheet)

Create a Google sheet you’d want to use as your database to store variables needed for personalized PDFs. Variables can be names, email address (necessary for emailing the PDFs), order details or anythin else. 

Automate PDF creation with dynamic variables

Use a Read a Row action

  1. Establish a connection between Zenphi and your desired Google drive.
  2. Specify the file and the sheet you want Zenphi to read rows from

Use Load columns button

Use this action to automatically preload the columns and map them to the variables in your flow. For example, you have to tell Zenphi that Name in your Google sheet should be used to replace the variable {{Name}} in your Google doc.

Use Foreach action

What this means is that the flow you’re creating will be repeated for every row. Specify the action that should be taken for each row — in this case, it’s Read a row. In other words, you’re telling Zenphi that you need it to read not just one row. But all the rows in the sheet and perform a flow you describe below for every variable.

Add Generate a Document Step

This action will be taken not once but as a part of FOREACH flow (meaning, it will repeated multiple times).

  1. Add connection to your Google drive
  2. Specify where to save your new document
  3. Specify the file name (for example {{Name}}_policy.doc)
    You can use template offered by Zenphi that will automatically map all your variables in Google sheet to Google doc.
  4. Toggle on Generate PDF

Make sure all variables you have in your document template are mapped on this step!

Emailing the PDF

Use Send email action

Set up the connection between Zenphi and your Gmail account

You have to be authorized Google workspace Admin! You also can only use Google Workspace, not your personal Gmail account!

Set up the sender's email address

You can hard-code it

Set up the receiver's email address

For this, you have to tell Zenphi that email address should be taken from the Foreach Loop action

Set up subject

Hard-code or use a variable from your Google Sheet

Set up the body

Here you can also write the copy of your email using individual variable for personalization (for example, Name). Or you can create fully personalized copy and store it in Google sheet, adding a reference to the {{copy}} variable on this stage.

Add your PDF as attachments

Specify a dynamic value of your PDF file as an attahment.

Use Share Access action

If you’re using a link to the PDF created and saved on your Google Drive instead of the file itself, you’d want to provide access to this document to a person who receives your email without providing access to all your Google Drive.

In this case you need to add Share Access action between Generate a Document and Send an Email action.

  1. Make sure you provide a correct role to the user
  2. Use a user’s email address stored in your Google sheet  to identify the user who has access to this file (again, use Loop foreach => email address to tell Zenphi where emails are stored)

Customize & Test  PDF mail Merge Flow

The final step would be triggering the flow manually and make it run once to make sure everything’s correct. Check workflow logs as well. 

You can also read our guide on how to automate a task of sending out confirmation emails upon Google Forms submission. Or how to automatically send out different emails based on Google Forms Control value.

We hope this guide has provided valuable insights into automating your workflow with Zenphi. 
Talk to us

Not sure how to start your PDF mail merge automation? Let us guide you on every step! Our consultancy is free of charge.

A step-by-step guide on how to create personalized PDF using dynamic variables from Google Sheets and email them if needed.

Table of Contents

Use cases for PDF Mail Merge Workflow

A PDF mail merge is similar to a traditional mail merge but specifically involves creating personalized PDF documents from a template. In this process, you use a single PDF document as a template and merge it with a data source like a spreadsheet or database. The data source contains information such as names, addresses, or other details that are unique to each recipient. The mail merge process automatically inserts these details into designated fields within the PDF, generating customized PDFs for each entry in the data source. This is particularly useful for creating personalized forms, letters, labels, or certificates in bulk.

Even when the data source is something like Google Sheets and the output isn’t intended for emailing the term “mail merge” has been retained. It’s now broadly used to describe any process where template documents are automatically filled with individual data entries from a data source, regardless of whether the final product is intended for email, digital distribution, or physical mail. However, in this blog post we’ll deal with the case of sending out a personalized email with a PDF that includes dynamic variables. As emailing the PDF is the last step, you can omitt it if it is irrelevant for your use case. 

Creating a template

Create a document template on your Google Drive and insert {{variable}} for personalization

Creating a data base (Google Sheet)

Create a Google sheet you’d want to use as your database to store variables needed for personalized PDFs. Variables can be names, email address (necessary for emailing the PDFs), order details or anythin else. 

Automate PDF creation with dynamic variables

Use a Read a Row action

  1. Establish a connection between Zenphi and your desired Google drive.
  2. Specify the file and the sheet you want Zenphi to read rows from

Use Load columns button

Use this action to automatically preload the columns and map them to the variables in your flow. For example, you have to tell Zenphi that Name in your Google sheet should be used to replace the variable {{Name}} in your Google doc.

Use Foreach action

What this means is that the flow you’re creating will be repeated for every row. Specify the action that should be taken for each row — in this case, it’s Read a row. In other words, you’re telling Zenphi that you need it to read not just one row. But all the rows in the sheet and perform a flow you describe below for every variable.

Add Generate a Document Step

This action will be taken not once but as a part of FOREACH flow (meaning, it will repeated multiple times).

  1. Add connection to your Google drive
  2. Specify where to save your new document
  3. Specify the file name (for example {{Name}}_policy.doc)
    You can use template offered by Zenphi that will automatically map all your variables in Google sheet to Google doc.
  4. Toggle on Generate PDF

Make sure all variables you have in your document template are mapped on this step!

Emailing the PDF

Use Send email action

Set up the connection between Zenphi and your Gmail account

You have to be authorized Google workspace Admin! You also can only use Google Workspace, not your personal Gmail account!

Set up the sender's email address

You can hard-code it

Set up the receiver's email address

For this, you have to tell Zenphi that email address should be taken from the Foreach Loop action

Set up subject

Hard-code or use a variable from your Google Sheet

Set up the body

Here you can also write the copy of your email using individual variable for personalization (for example, Name). Or you can create fully personalized copy and store it in Google sheet, adding a reference to the {{copy}} variable on this stage.

Add your PDF as attachments

Specify a dynamic value of your PDF file as an attahment.

Use Share Access action

If you’re using a link to the PDF created and saved on your Google Drive instead of the file itself, you’d want to provide access to this document to a person who receives your email without providing access to all your Google Drive.

In this case you need to add Share Access action between Generate a Document and Send an Email action.

  1. Make sure you provide a correct role to the user
  2. Use a user’s email address stored in your Google sheet  to identify the user who has access to this file (again, use Loop foreach => email address to tell Zenphi where emails are stored)

Customize & Test  PDF mail Merge Flow

The final step would be triggering the flow manually and make it run once to make sure everything’s correct. Check workflow logs as well. 

You can also read our guide on how to automate a task of sending out confirmation emails upon Google Forms submission. Or how to automatically send out different emails based on Google Forms Control value.

We hope this guide has provided valuable insights into automating your workflow with Zenphi. 
Talk to us

Not sure how to start your PDF mail merge automation? Let us guide you on every step! Our consultancy is free of charge.


consultant
Free Workflow Automation
Contact our automation experts today and get a workflow of any complexity built for free