AI Document Processing , AI Enablement For Finance Teams , Operationalize AI For Business , Zenphi Use Cases By Industry Or Role
Learn how to automate one of the most important processes in accounts payable — 3 way invoice matching, using Google Sheets.
Table of Contents
What is 3-Way Matching
Three-way matching is a crucial process in the finance world to ensure all invoices are verified and paid accurately. On average, accounts payable departments lose 5% of their annual revenue to fraudulent activity or due to the manual mistakes when an invoice doesn’t match the amount specified in the purchase order. Or the purchase order doesn’t match a receipt. In theory, all three documents should not only indicate one amount but also carry the same set of data: a counterpart, products or services purchased, date, etc.
This is exactly where the name is coming from. Implementing 3-way invoice matching not only validates the legitimacy of received documents but also ensures that the invoice, purchase order, and the goods receipt note’s information (GRN) all align perfectly. Not surprisingly, processing all these documents manually is a lengthy and error-prone procedure.
Automated Intelligent Document Processing is definitely a better and more efficient option. An if your company is already using Google Workspace, you can achieve the same results as advanced or affordable intelligent document processing tools can provide with far less expenses.
In this guide, we’ll show you how to automate the 3-way invoice matching, parse your documents, extract the necessary fields, and compare values seamlessly, using Zenphi, the only dedicated Intelligent Document Processing solution for Google Workspace.
To make it even easier, we’ve created a YouTube video that will take you step by step through the process shown in this guide (scroll to the bottom of the page to access the video). Let’s get started!
3-Way Invoice Matching Automation: Step-By-Step Tutorial
1. Set Up Your Zenphi Account
Start by creating your free Zenphi account using this link. Once getting access to our platform, you can start building your first automated flow.
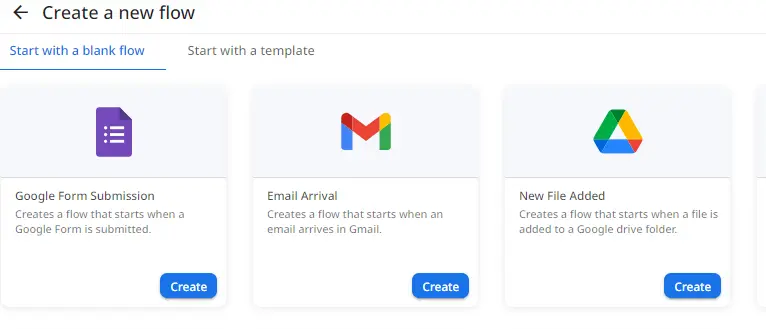
In Zenphi, a ‘flow’ represents an automated workflow. Inside the flow, you’ll find a trigger, which is the action that starts the flow. In this example, we will use the “Email Arrival” trigger, which initiates our flow whenever an email comes into our Gmail inbox.
Zenphi also has a powerful tool inside of its triggers called Conditional Run, which allows us to only run our flow when certain criteria are met. In this case, it will only run whenever an email arrives in our inbox with a subject line indicating that it contains three-way matching documents. A flow also includes subsequent actions, which are the steps in the workflow you want it to perform. You can customize and add as many actions as you need.
Creating Our Flow
Our Zenphi flow will consist of four main sections.
The first section involves creating the Google Sheets template where we will store the fields extracted from our three documents.
In the second stage, we will process the documents and parse the necessary information.
This is followed by a section where we compare the obtained values to see if they match perfectly.
Lastly, we will notify the requester via email whether the 3-way match was successful or not.
2. Creating the Google Sheets Template
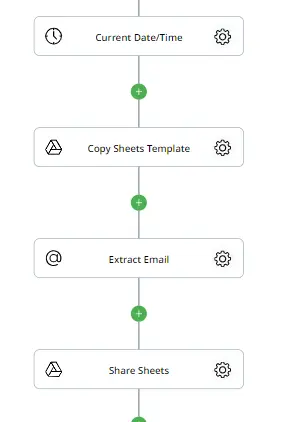
The first action in our flow is “Current Date/Time,” which is completely optional. This action was used to add the current date to the Google Sheet’s name, helping us track when the files went through the 3-way match process.
Next, we’ll use the “Copy File” action to generate a copy of the template file. This way, each time the flow runs, we have a new template to fill with the extracted values. This action only requires you to select the file you wish to copy, the folder inside of your Google Drive you want to save the file in, and if desired a new name for the item. This is where our previous date action comes in handy!
Following this, we’ll use the “Parse Email Address” action to extract the email address from the trigger. The Gmail trigger has a token called “From,” that indicates who the email initially came from. This action allows us to parse the different segments of the sender’s information which we will use in the next step.
The last action in this first section is “Share Item.” Since we have created a Google Sheets file that we will send to the requester at the end of the flow, we need to ensure they have access to the file. This action allows you to assign a role to the person, whether it be commenter, reader, etc. To do this simply indicate the email address you wish to share the file with, which, as you can guess, comes from our previous action!
3. Using Artificial Intelligence to Process Our Documents
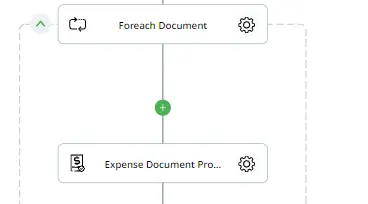
One of the many AI tools that Zenphi offers is the “Expense Document Processor.” This tool makes it so easy, all you have to do is specify which document you wish to process the information from. It comes with dozens of fields you can choose from, making it ideal for most finance documents you may come across.
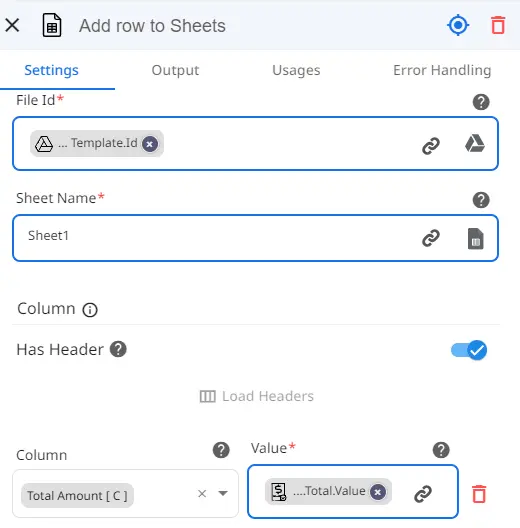
After processing all the documents, we’ll add the found values to the Google Sheet using the “Add Row” action. All you need to do is specify the file you wish to add the row to (in this case, the copied template file), the Sheet Name, and then use our handy token picker, symbolized by a chain icon, to choose which value from our previous action belongs to which column on our spreadsheet. You can refer to the image below for reference on how to fill these values.
4. Comparing The Extracted Values For Appropriate Matching
When managing documents like Invoices, Purchase Orders, and Good Receipt Notes, it’s crucial to ensure data consistency across these records.
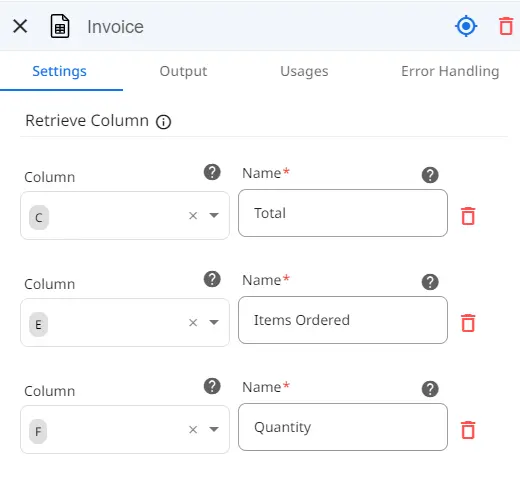
Start by using the “Lookup Row” action for each document. This action allows us to search for a specific value within a column of our previously filled Google Sheets. For this example, we will search by the document names: Invoice, Purchase Order, and Good Receipt Note. Once the relevant row is found, we can retrieve the columns we wish to compare. Here’s how you can achieve this:
Search by Document Name: Use the “Lookup Row” action to search for the document name in your Google Sheets.
Retrieve Relevant Columns: Once the correct row is found, extract the necessary columns for comparison as seen in the above example.
After locating each document and extracting the relevant columns, we need to compare these values to ensure consistency. To do this, we will make use of the “If Condition” action. This action sets clauses to ensure our workflow continues only if the values match. For example, we can set the condition to follow the “True” branch when the Good Receipt Note’s PO number matches the Purchase Order’s PO number as seen below.
For maximum accuracy, we recommend comparing the following fields:
Purchase Order Number: Ensure the PO number matches across all documents.
Items Ordered: Verify that the items listed match.
Quantities: Confirm the quantities are consistent.
Total Amount: Check that the total amount is the same across all documents.
5. Notifying the Requester
Once our workflow has compared all the indicated fields, we need to send the outcome of the matching process to the requester. If a discrepancy is found in any of the values, the workflow will follow the false branch, triggering an email to the user recommending a manual review of the documents. If all the values match, the flow will follow all of the true branches and the user will receive an email indicating that the matching process was successful.
To set up these emails, we’ll use the “Send Email (Gmail)” action. This handy action allows you to specify the sender, and modify the subject and body of the email. You can even add a link to the Google Sheets file with the extracted values that were found so they can verify these fields quickly. Simply use the token picker to add the view link of our copied template which will then add your document as an attachment to the email.
6. Testing and Publishing your Flow
Now you’ve successfully created an automated flow that will ensure accuracy and security for your accounts payable department. All you have to do now is save and publish your flow, this will ensure it’s ready whenever an email arrives in your inbox. Zenphi makes it very easy to add or remove steps to your process, so you can easily customize the steps shown here to make sure it’s perfect for your business.
If you have any questions about this process or want to learn more about Zenphi, feel free to book a personal demo meeting with our specialized team. We can go over different use cases that can benefit your business!
Don’t sacrifice your valuable time to ensure financial security—with Zenphi, you can have both!
Video Tutorial On The 3-Way Invoice Matching Automation
Watch this tutorial where we replicate the whole process to help you handle 3-way invoice matching process automation easily.
Ready to change your manual document processing into set-and-forget workflows? If you use Google Workspace in your business you can easily do it today! Reach out to Zenphi experts and let us help you tailor your document-centric workflows to achieve maximum efficiency and cut opertional costs.
About The Author

Fernanda López Guerra, CS @Zenphi
Fernanda is an experienced Customer Success manager with over 9 years in Tech and B2B Saas. She has automated multiple operations for Zenphi customers in Education, Retail, Tech and other verticals.

