AI Document Processing , AI Enablement For Finance Teams , Operationalize AI For Business , Zenphi Use Cases By Industry Or Role
A step-by-step guide on how to build automated accounts payable process using tools that you’re likely already using — like Google Sheets and Gmail. A detailed video tutorial below.
Processing and approving invoices can be a time-consuming task. In this guide, you will learn how to streamline your accounts payable process using Zenphi’s AI tools and Google Sheets. This process ensures accurate data capture, efficient approval routing, and timely payment processing. If your company is already using Google Workspace (G Suite), it will also be the most budget-friendly and data-secure solution that would allow you to automate multiple process, including 3 way invoice matching, payment approvals and more. Learn how to extract values from your documents and get your invoices approved and paid by your team in a few easy steps!
Table of Contents
Why Automated Accounts Payable
One of the most common tasks for accounts payable teams is processing invoices, handling payments, and obtaining approvals from different departments. This process can be very time-consuming, involving extensive reviews and communications, which can lead to human errors. When a supplier invoices you for a product or service, you typically have 30 days to pay your bill, making it crucial to handle everything on time to avoid any penalties. Also, if your business processes require issuing a lot of commission invoices upon receiving invoices from your customers, delays and errors can have a much stronger effect: decreased liquidity and cash flow disruptions.
Read here how a wholesale company solved these problems completely in 3 months.
According to Gartner, the biggest obstacles in the smooth invoice-to-cash (I2C) process are the following:
Manual Data Entry — leads to typos, miskeyed information, and incorrect data being input, which can cause delays and errors downstream in the payment process.
3 way Invoice Matching disruptions
Broken and Inefficient Approval Workflows.
Most of these obstacles are removes by introducing automated accounts payable process. And this post will guide you all the way from zero to hero and allow you to build your 100% automated accounts payable workflow.
To make it even easier, we have created a YouTube tutorial that guides you through the steps found in this guide. Feel free to follow along!
Video Tutorial: Automated Accounts Payable
Accounts Payable Automated Process Overview
Our workflow will have five main sections, each with different actions
Adding the extracted fields to a Google Sheet.
Reviewing if the supplier is already registered.
Getting approval from the Accounts Payable Department for the information in the Google Sheet.
Requesting the payment from the Payments Team.
Notifying the supplier that the payment has been made.
Zenphi, the #1 Intelligent Document Processing solution for Google Workspace, makes it easy to add or remove actions, so feel free to adjust this guide to fit your accounting needs.
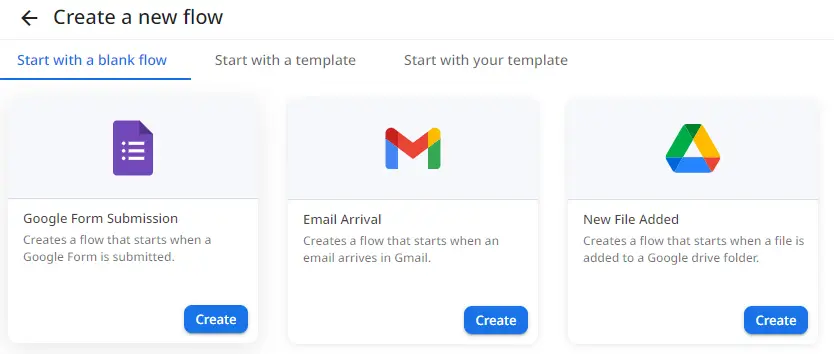
Step 1: Set Up Your Zenphi Account
Let’s get started by setting up your Zenphi account! Click here to create your free account. Once you’re in, it’s time to build your first automated flow.
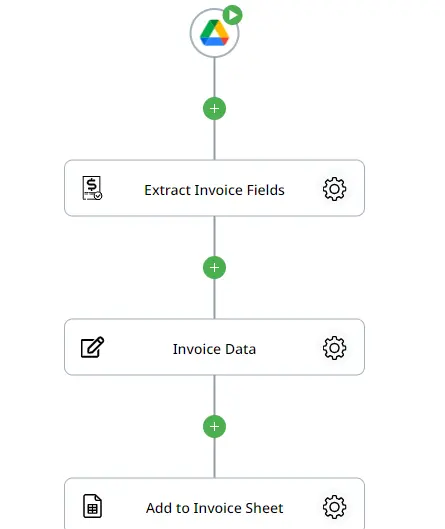
In Zenphi, a ‘flow’ refers to the entire workflow process. It consists of a ‘trigger’ that initiates the flow and subsequent actions, which are the steps carried out in the process. For this example, we will use the ‘Google Drive File Add Trigger.’ This trigger will start our flow whenever a file is added to a folder of our choice. This ensures that you never miss an invoice – as soon as it’s added to your Google Drive, Zenphi takes care of the rest!
Step 2: Adding the Invoice Fields to Google Sheets
The first action in this AP workflow is the ‘Expense Document Processor‘ action. This action is very useful for any finance use case, allowing you to parse various fields such as the invoice number, purchase order number, due date, and more. In this example, we will be extracting the supplier name, total due, due date, and invoice number from the received invoice.
Since this action can provide dozens of different fields, to make it easier, we will store only the ones we need inside a variable using the ‘Set Variable‘ action. This allows easy access to the values we wish to use. Then, we will add these values to our previously created Invoice Google Sheet. This action only requires you to indicate which value should be assigned to which column.
Step 3: Reviewing if the Supplier is Already Registered
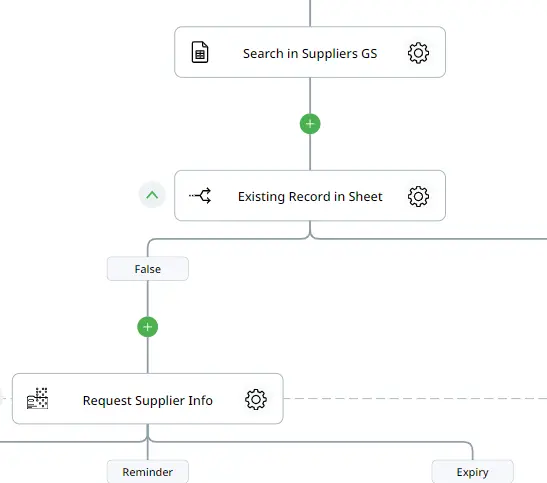
You may receive invoices from the same supplier multiple times, so we have created a sheet inside Google Sheets with a list of previous suppliers and their contact information for easy access. Using the ‘Lookup Row’ action, we will search inside that sheet, setting the search column as the Supplier Name and searching by the previously extracted name. Then, using the ‘If Condition’ action, we will determine if there is an existing record for the supplier.
If we don’t find a record, we will use the ‘Request Data’ action. This handy action allows us to request information from a designated recipient. We can build a Zenphi form to send out to the AP team to retrieve the necessary information. Then, using the ‘Add Row’ action, we can add the information for the new supplier to the Google Sheet, specifying that this time we want to update the Supplier sheet.
Lastly, we will use the ‘Lookup Row’ action again to retrieve the updated information for the supplier. This way, we will be able to contact them after the approval or payment process.
Step 4: Getting Approval from the Accounts Payable Department for the Information in the Google Sheet
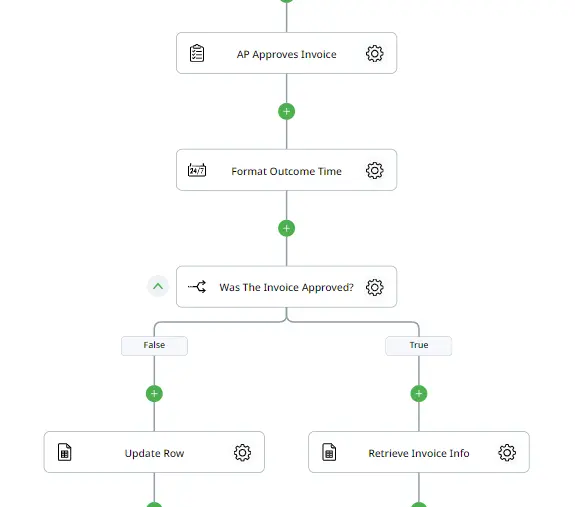
Getting approval from the Accounts Payable department is a crucial step in this process. We want them to review the information added to our Google Sheet and authorize the invoice to proceed to the next team. Using the ‘Assign Task’ action, we can assign a task for someone to review. The AP department will be able to select whether they approve or reject the invoice.
After their decision, we will use the ‘If Condition’ action to direct the flow to the corresponding branch: if the response outcome is Approved, it will follow the true branch. If the invoice is rejected, the flow will use the ‘Update Row’ action to change the status of the reviewed invoice to ‘Rejected’ and send a rejection email using the ‘Send Email (Gmail)’ action. This email will be sent to the supplier using the contact information from the Supplier Sheet, which was either requested or already in the listing.
Using the ‘Format Outcome Time’ action, we can format the response time to notify the supplier exactly when the invoice was rejected. If the invoice is approved, we will retrieve the updated invoice information. We will use the ‘Lookup Row’ action once again to search through the Invoice sheet and retrieve the invoice details.
Step 5: Requesting the Payment from the Payments Team
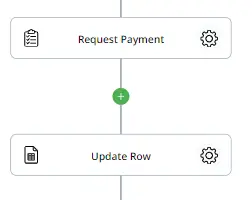
If the invoice is approved, our next step is to ensure it is paid. We will once again use the ‘Assign Task’ action to request the Payments Team to process the previously approved invoice. Here, we can use the token picker to include information in the email body such as the amount due, payment due date, and approval date by the AP department.
In this case, the only available outcome for the task is “Completed Payment.” This allows the Payments Team to process the payment and mark it as completed by clicking the corresponding button.
Once this task is finished, we will proceed to use the ‘Update Row’ action once again. This action will enable us to change the status of the paid invoice to “Paid.”
Step 6: Notifying the Supplier of the Completed Payment
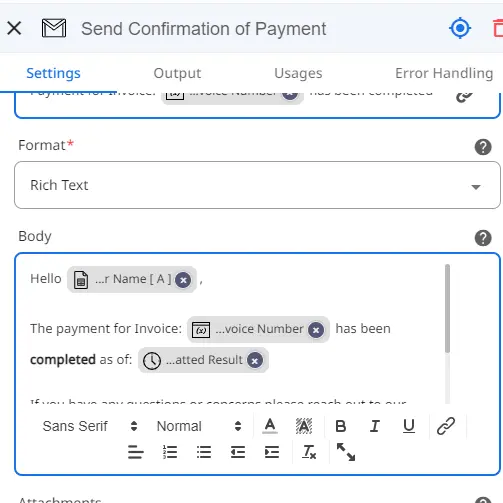
Last but not least, we will notify the supplier that the payment has been completed. Using the ‘Send Email (Gmail)’ action we can send out a confirmation email. Here you can add any necessary information to the email body. In this example, we have indicated the date of completion as well as the invoice number.
Step 7: Testing your Completed Flow
Now, all that’s left is to save and publish our flow. Once it is published, your flow will begin to monitor your selected folder and analyze any invoices that arrive in your Google Drive.
Zenphi makes it really easy to customize your process, so feel free to add any other actions to ensure your accounts payable process runs how you’d like it to. It’s as easy as that to start saving time by automating your AP workflow! Read more about automating 3 way invoice matching flow or a simplier version – 2 way invoice matching.
Also, you can access our detailed video tutorials on Zenphi community portal: Invoice processing with Gemini; how to save data from email attachments to Sheets; how to analyze data fro invoices using AI and more.
Ready to change your manual document processing into set-and-forget workflows? If you use Google Workspace in your business you can easily do it today! Reach out to Zenphi experts and let us help you tailor your document-centric workflows to achieve maximum efficiency and cut opertional costs.
About The Author

Fernanda López Guerra, CS @Zenphi
Fernanda is an experienced Customer Success manager with over 9 years in Tech and B2B Saas. She has automated multiple operations for Zenphi customers in Education, Retail, Tech and other verticals.

