Prev post
Google Forms Workflow Automation and Approval Tasks
Next post
In a business setting, one of the most frequent and recurring tasks that you can observe is document approval. As a Zenphi content writer, it is my daily task to draft our blog post and request my editor’s approval.
This used to be one of our most tedious processes with one too many back and forth that cost us several delays in the past. In short, it became a huge bottleneck for our three-person content marketing team. Without a solid approval workflow automation in place, we also run the risk of losing track of comments and feedback that we need to address.
Being an automation company, it was an easy decision for us to use zenphi to create and streamline our Document Approval workflow as a part of the document workflow automation system. We heavily use the collaborative editing feature of Google Docs for this. One critical advanced feature which made this possible was State Machine. It allows us to have multiple back and forths between branches within the same instance of the Workflow. In our case, we call the back and forth “the approval loop”.
It has made our new blog approval process several times faster, and with more efficient results. And I would like to share with you all our automated document approval workflow so you can share in the fun and improve your own process.
Note that the automation logs each step into the blog post approval sheet.
Ready to start learning? Then follow on…
Step #1:
Using Google Forms, create the document approval request.
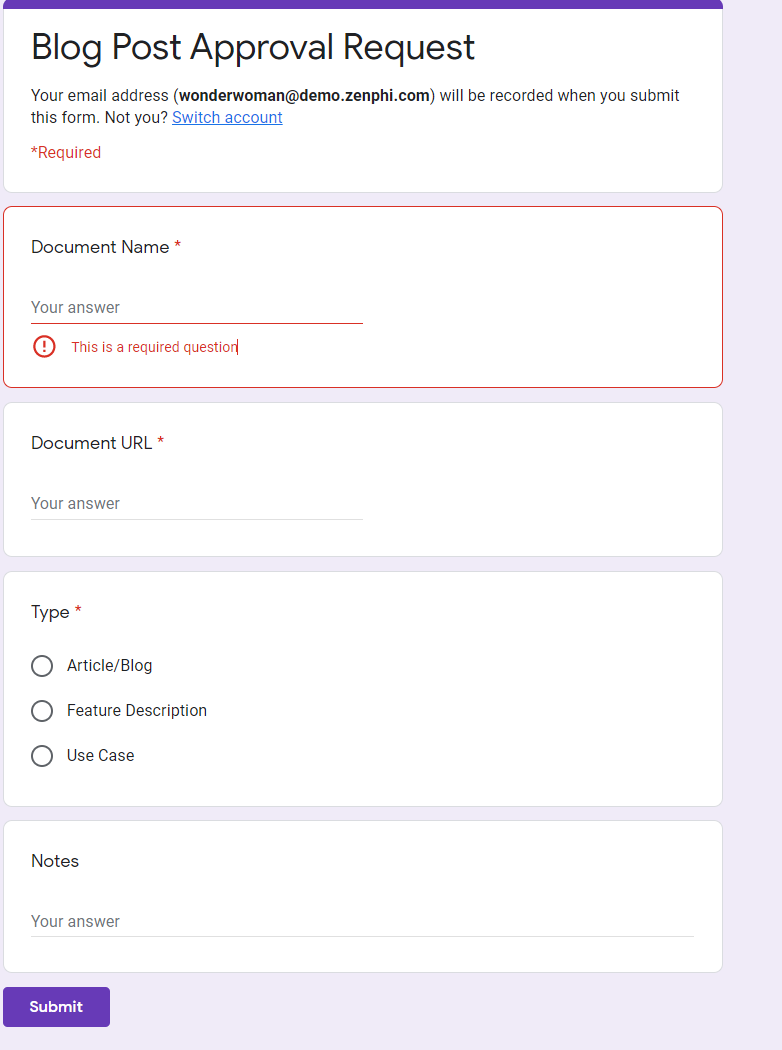
Go to Google Sheet and create columns that you want to log and track for every step in our Document Approval Workflow.

Save both form and sheet to Google Drive and assign a folder where you want this information to be stored.

Step #2:
Log in to your zenphi account and create a new flow. If you haven’t yet registered, you can create a free basic account using your Google credentials. Name your flow accordingly. We named ours “New Blog Post Approval”.

Clicking the Next button, you will arrive at the next section where you will choose the trigger action. The trigger action is what will activate this document approval workflow. Choose New Response.
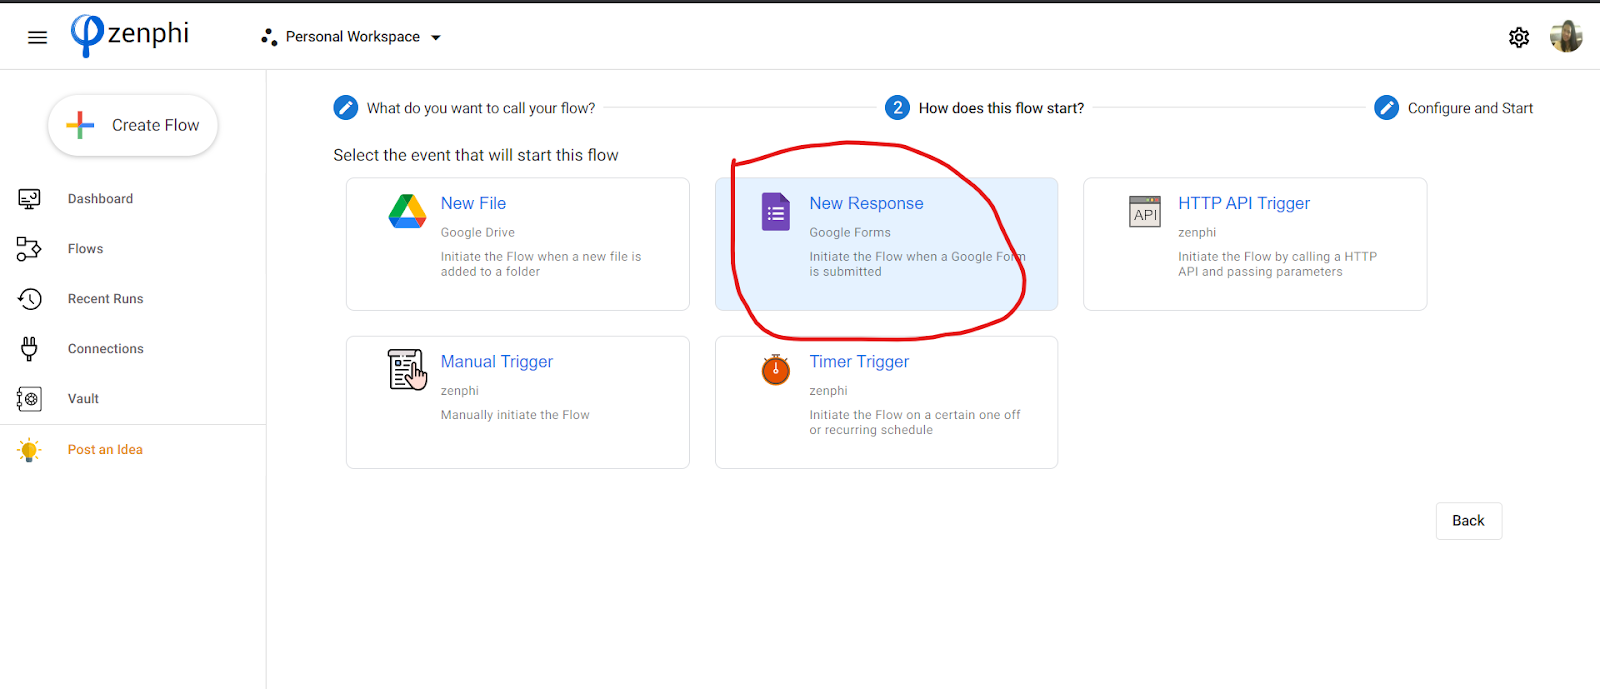
Select the Connection. This is the Google inbox that receives the approval request. Start by clicking the Plus button and selecting the proper inbox.
For the Select A Form section, click the Google Drive icon and select the request form you created earlier.
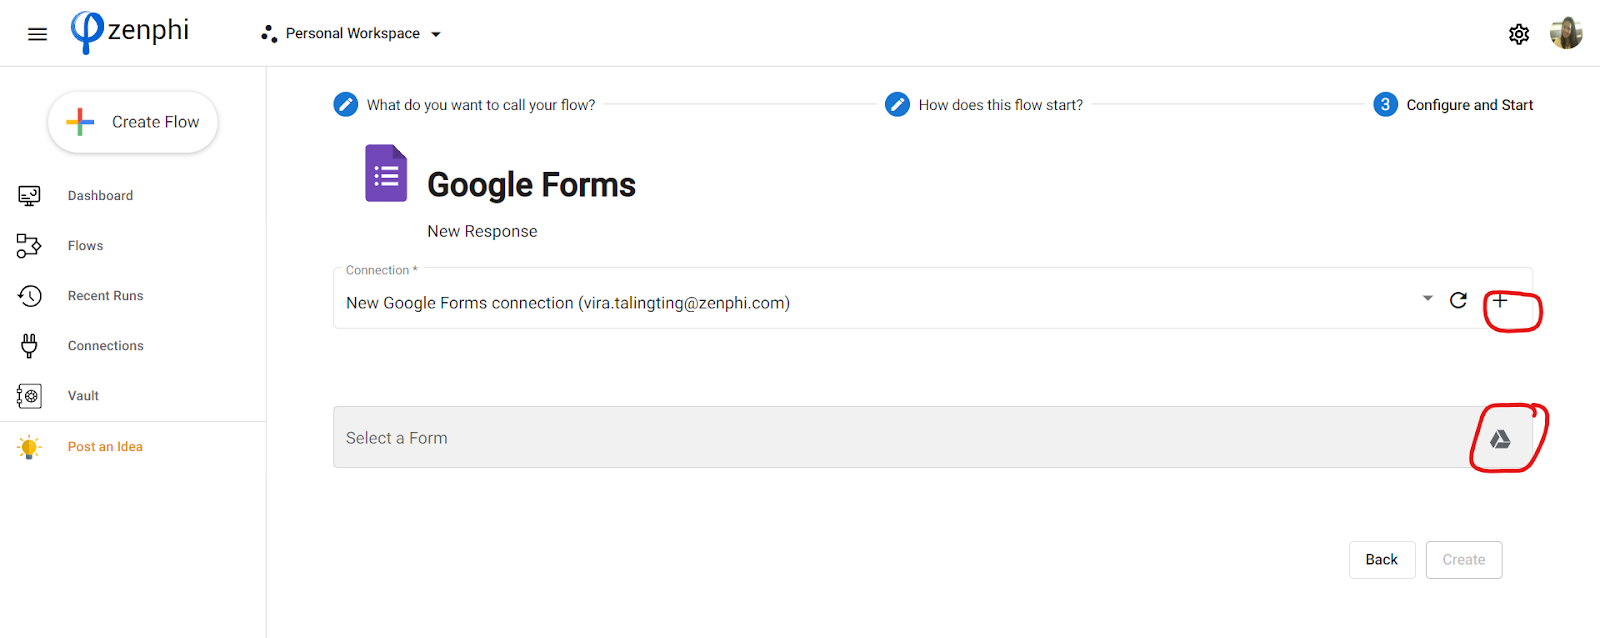
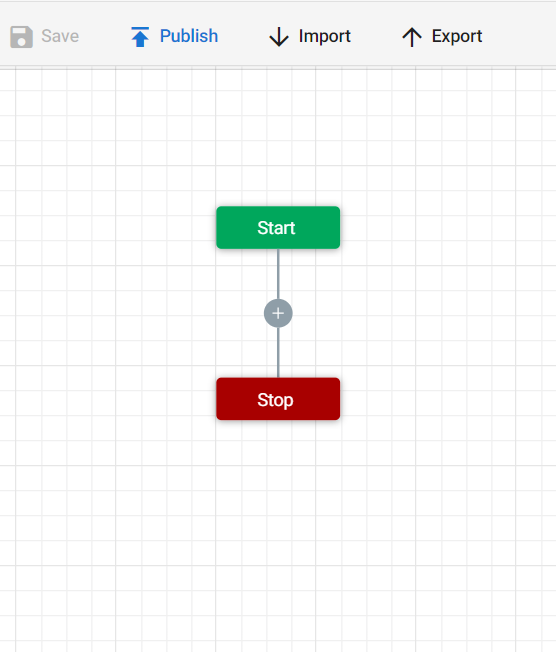
Hit the Create button. This is what your blank workflow looks like:
Step #3:
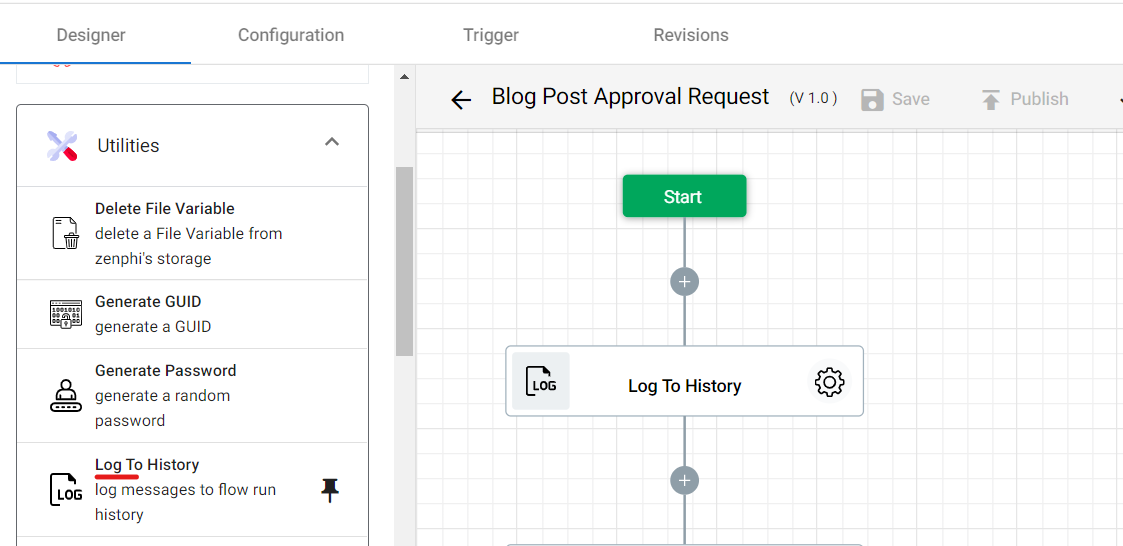
From the left-hand side of your screen, click Utilities, then drag and drop Log To History. This step will log to your sheet when the Document Approval workflow was triggered(using the request form) and who was the initiator.
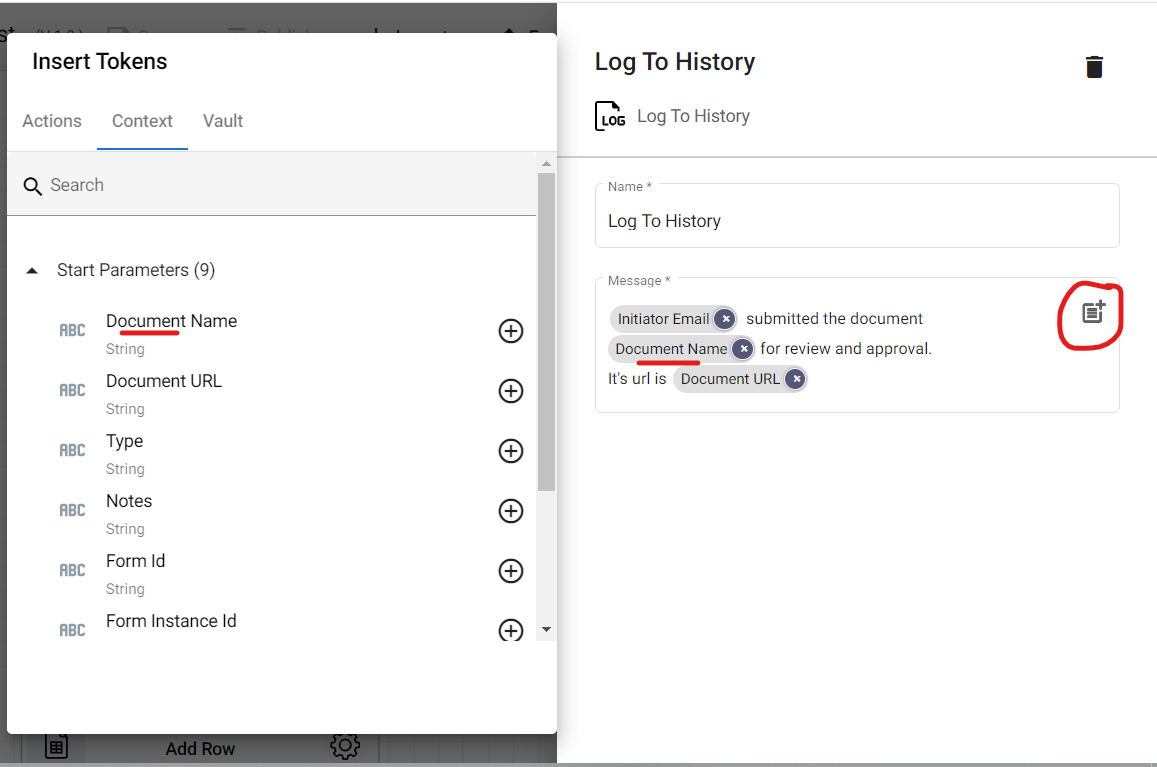
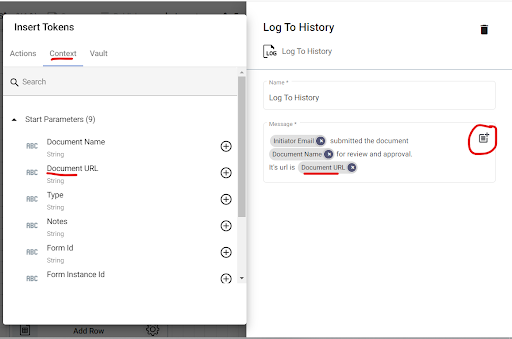
Go to Settings, and configure the message. Click the parameter(encircled in red) button, and from the left-hand side, click Context. From the dropdown list, add Initiator Email. This will automatically log the requester’s information such as email, the document sent, and it’s URL.

Step #4:
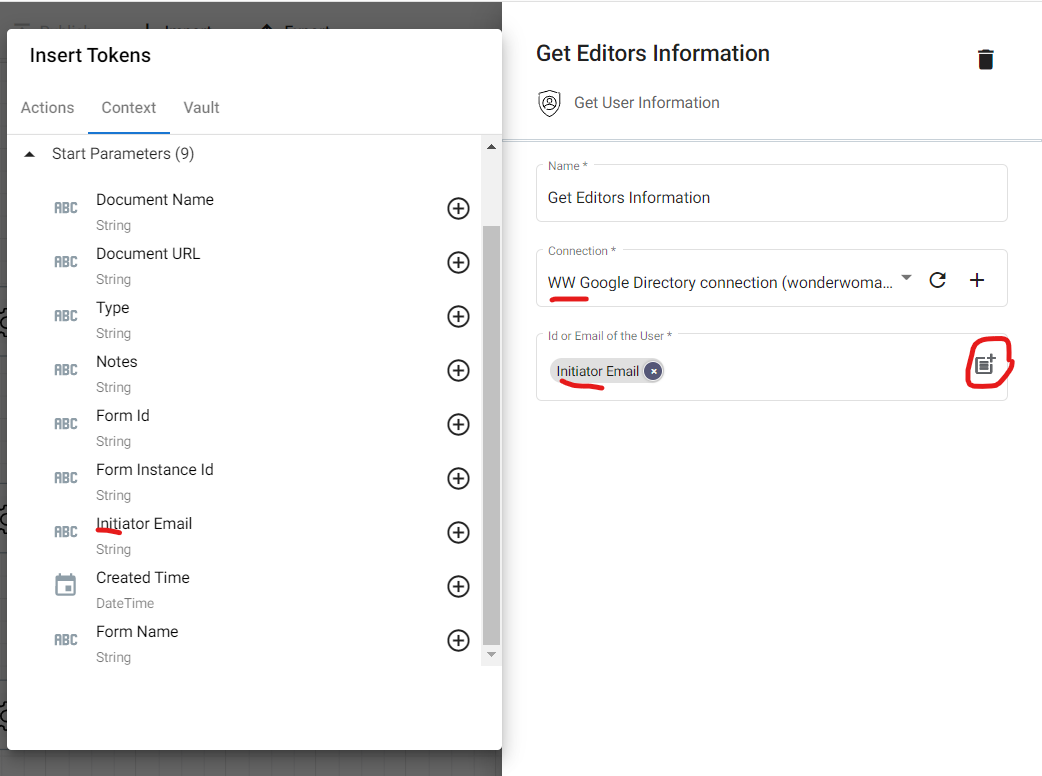
Go back to the Designer panel, then click Google Directory. From the dropdown menu, drag and drop the Get User Information.
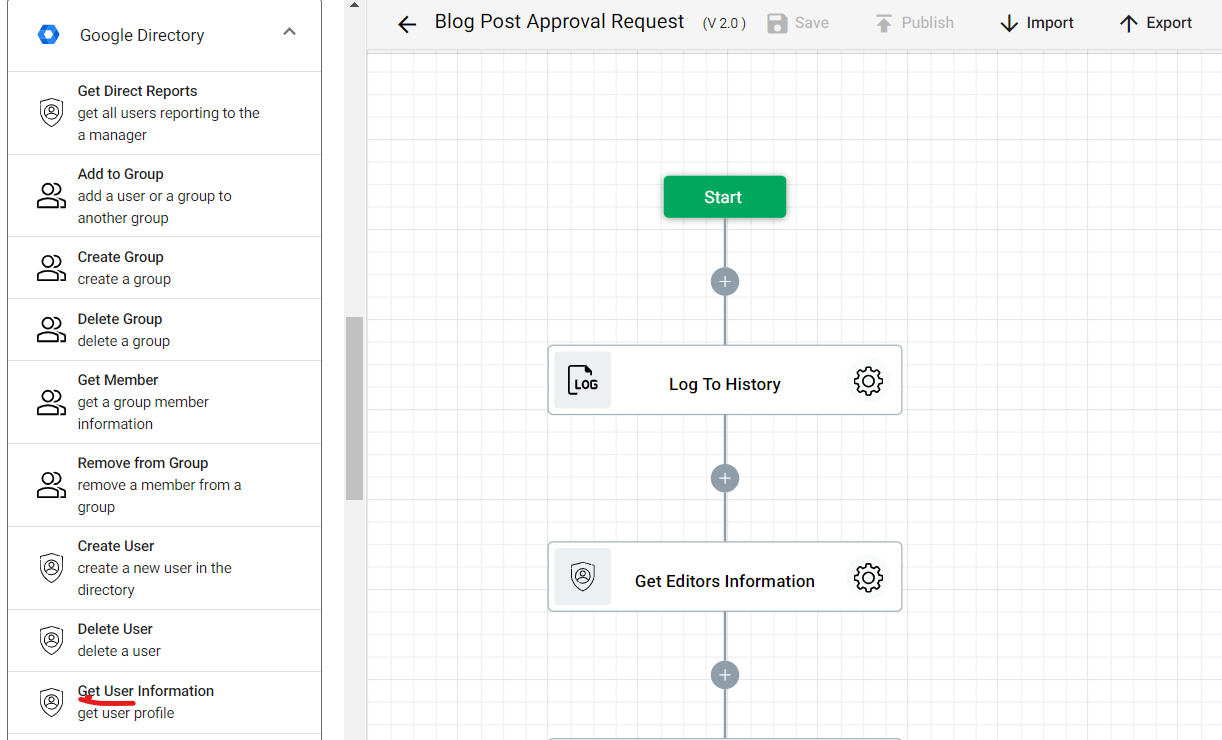
Go to Settings, and name the step accordingly. Click Connection and assign whose directory the email will be stored, in our case, it’s the manager’s directory.
For the ID or Email of the User section, click the parameter(encircled in red) icon, and click Context. From the dropdown list, choose the initiator’s email.
Step #5:
Go back to Designer and click Google Sheet. From the dropdown list, drag and drop the Add Row. This will create a new row where new information will log automatically.

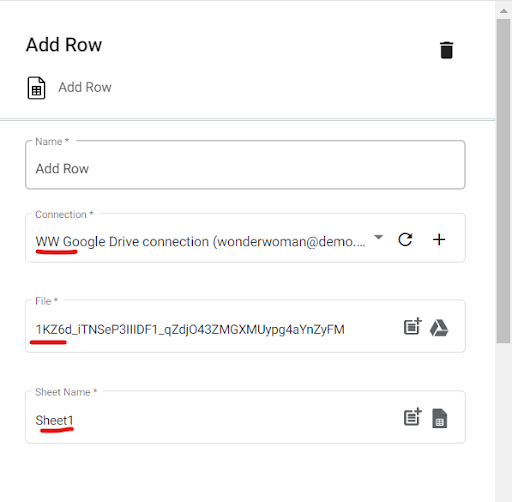
Select the Settings and configure the step. In the Connection section, select the Google Drive where the Blog Post Approval log sheet is stored.
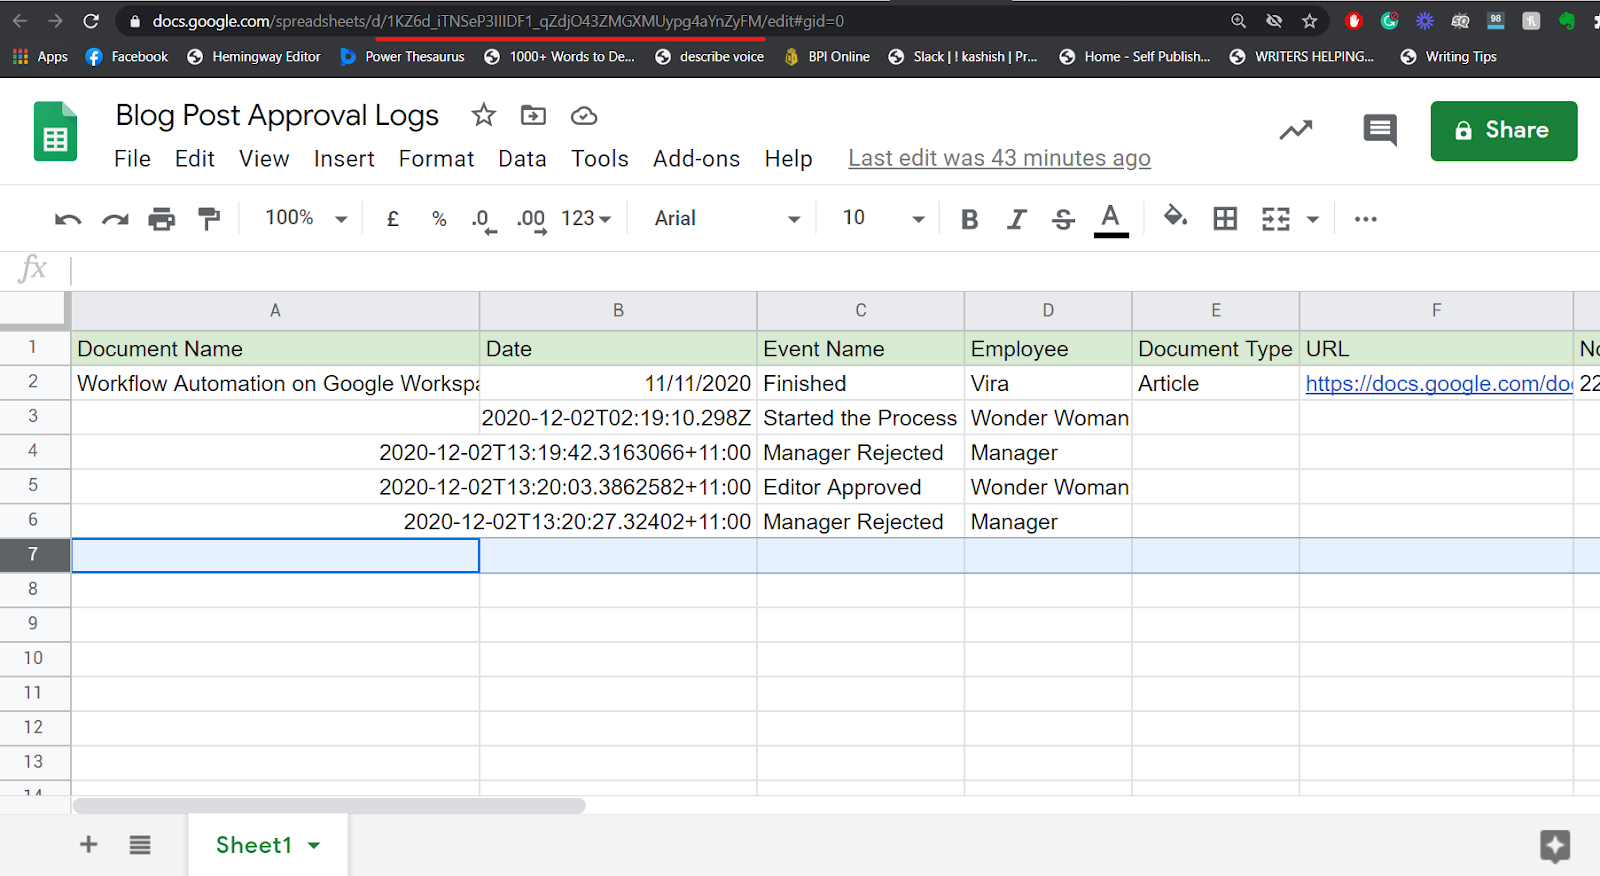
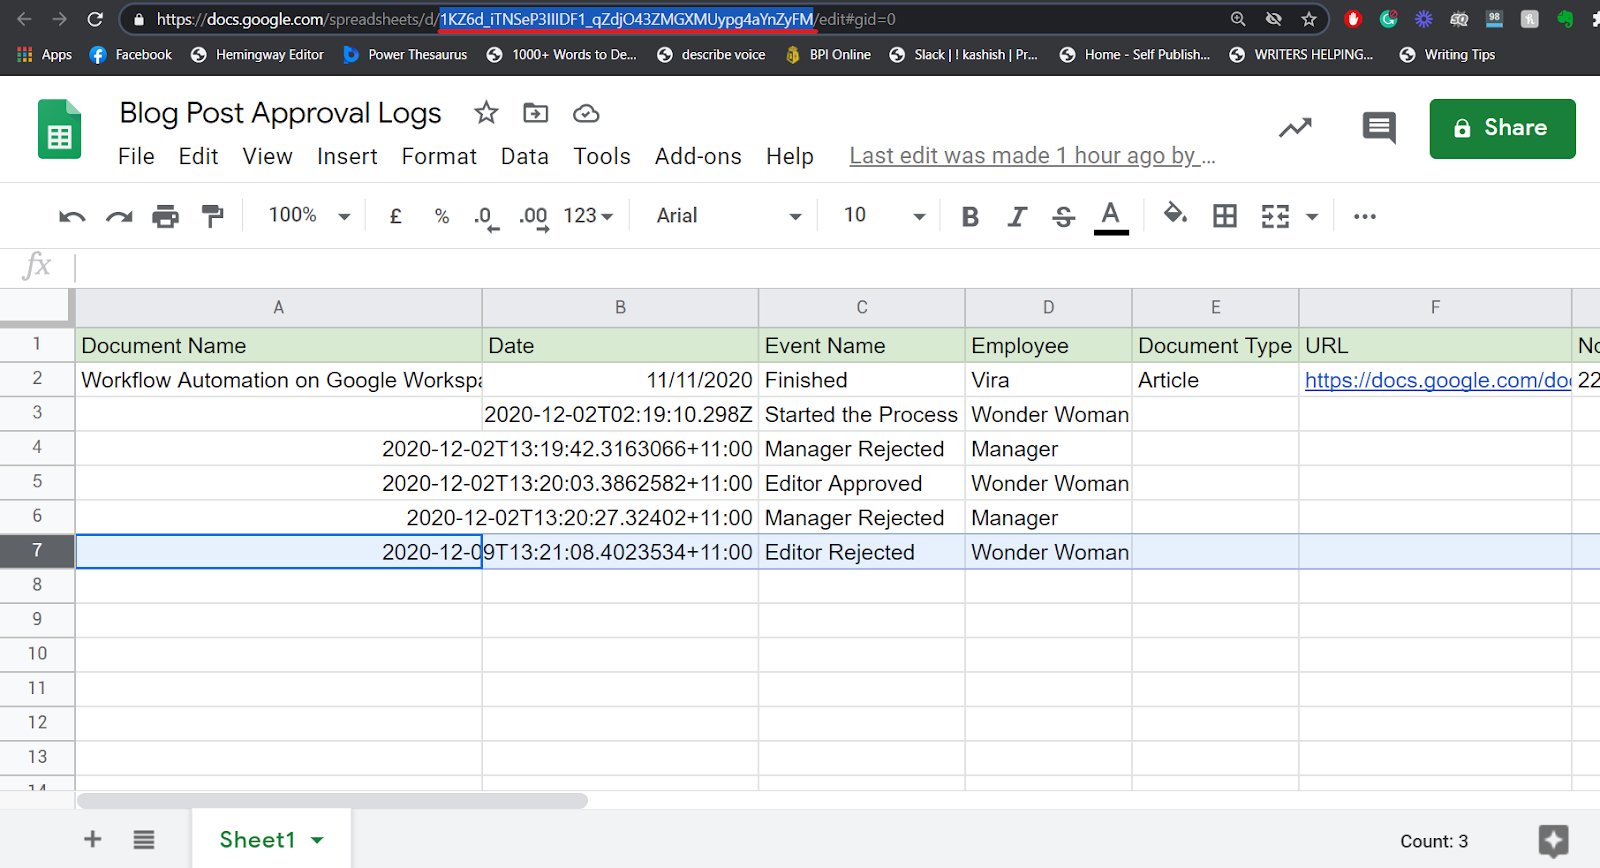
In the File section, input the file id of the Blog Post Approval log sheet. Make sure that you have the right sheet in the Sheet Name section.
This is where you can find the file id of the log sheet.
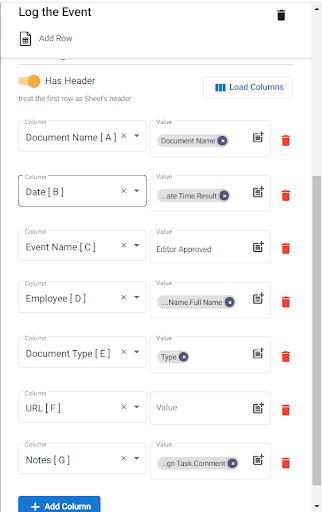
Scroll down, and enable Has Header. Add all the rows you have in your Blog Post Approval spreadsheet.
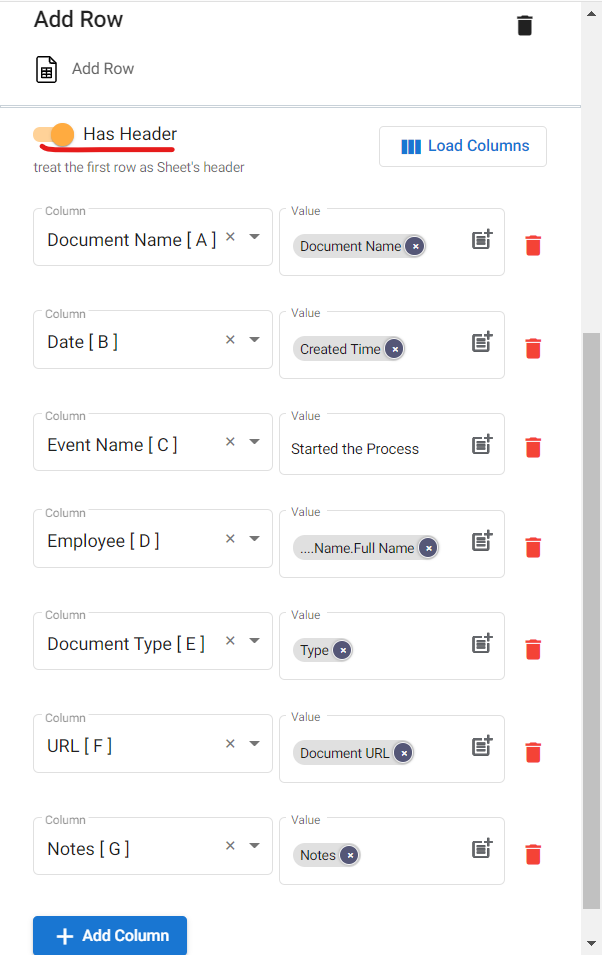
Configuring the values of the columns.
For Document Name[A], click the parameter icon, and then go to Context. From the dropdown list, select Document Name.
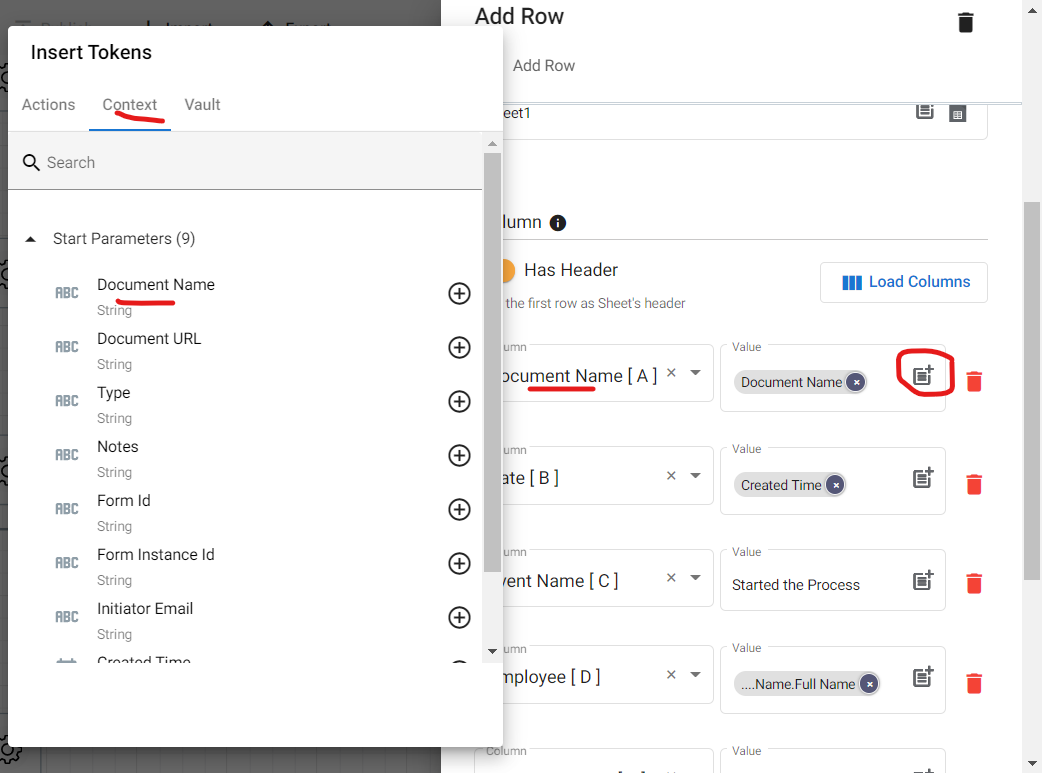
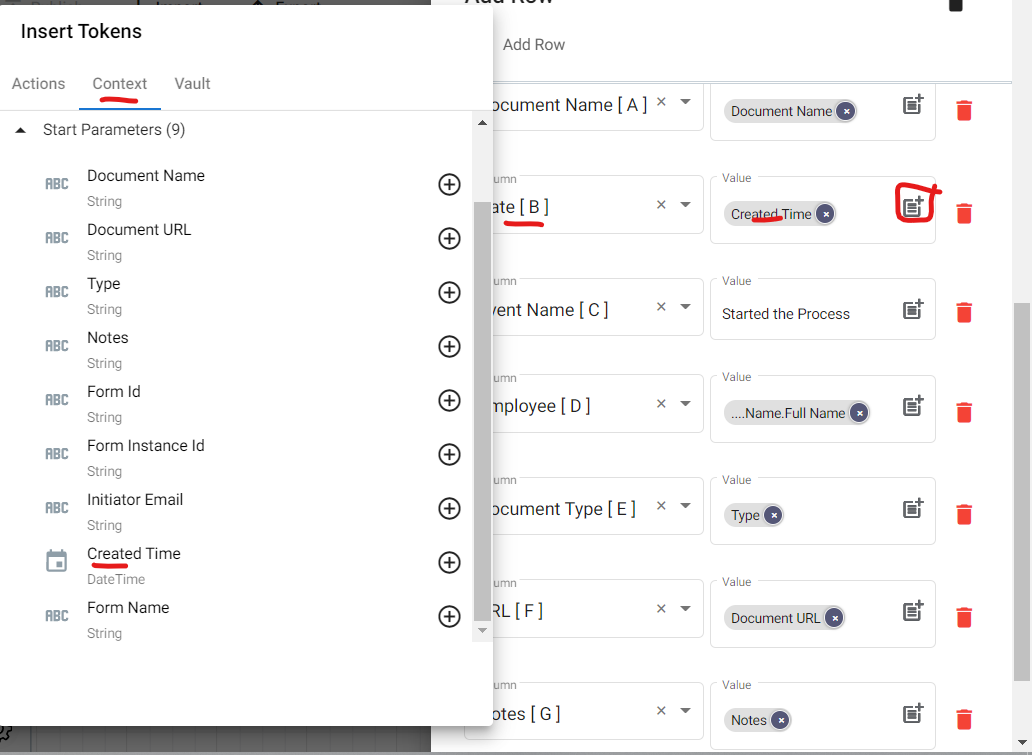
To configure the value of the Date[B] column, click the corresponding parameter icon. Click Context, and from the dropdown menu, select Created Time.
For the value of the column Event Name[C], just input “Started the Process”.

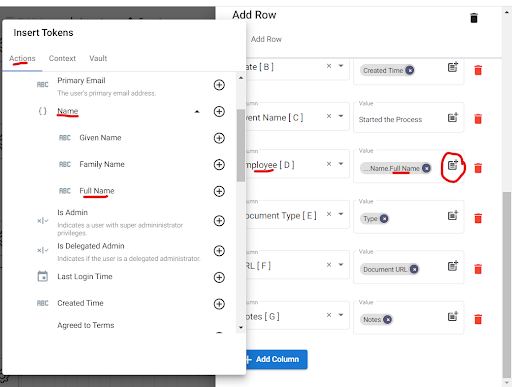
To configure the Employee[D] column value, just click the parameter icon and choose Get Editor’s Information. From the dropdown list, click Name and select Full Name.
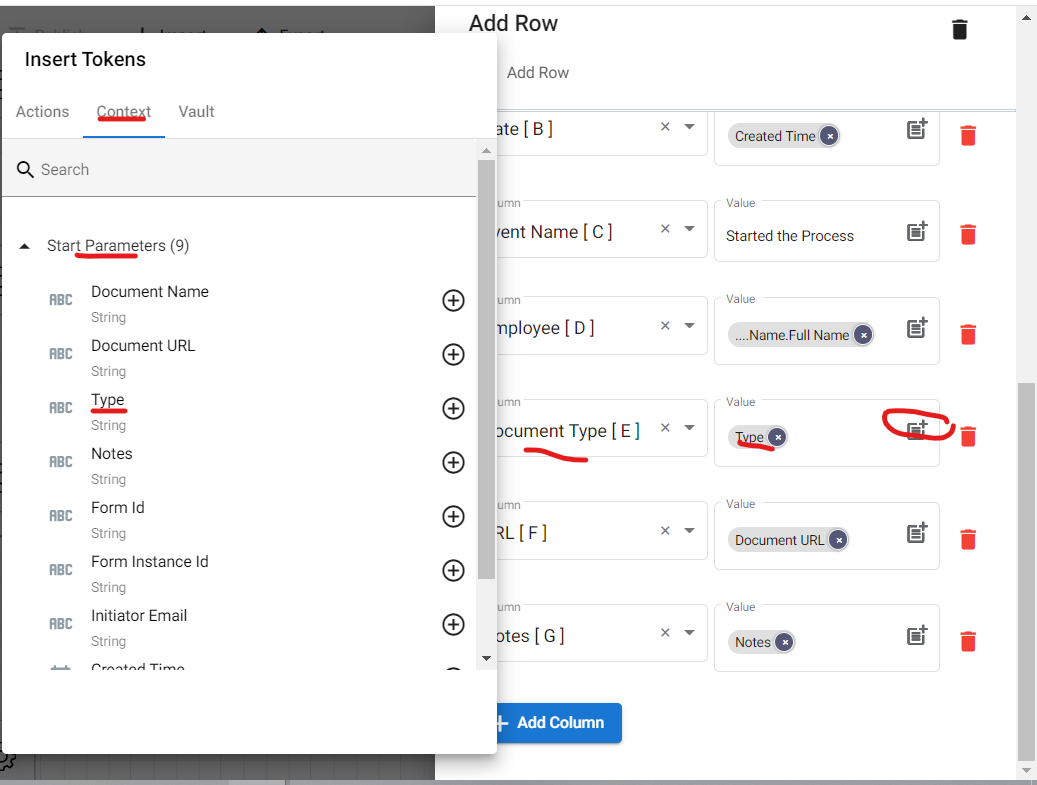
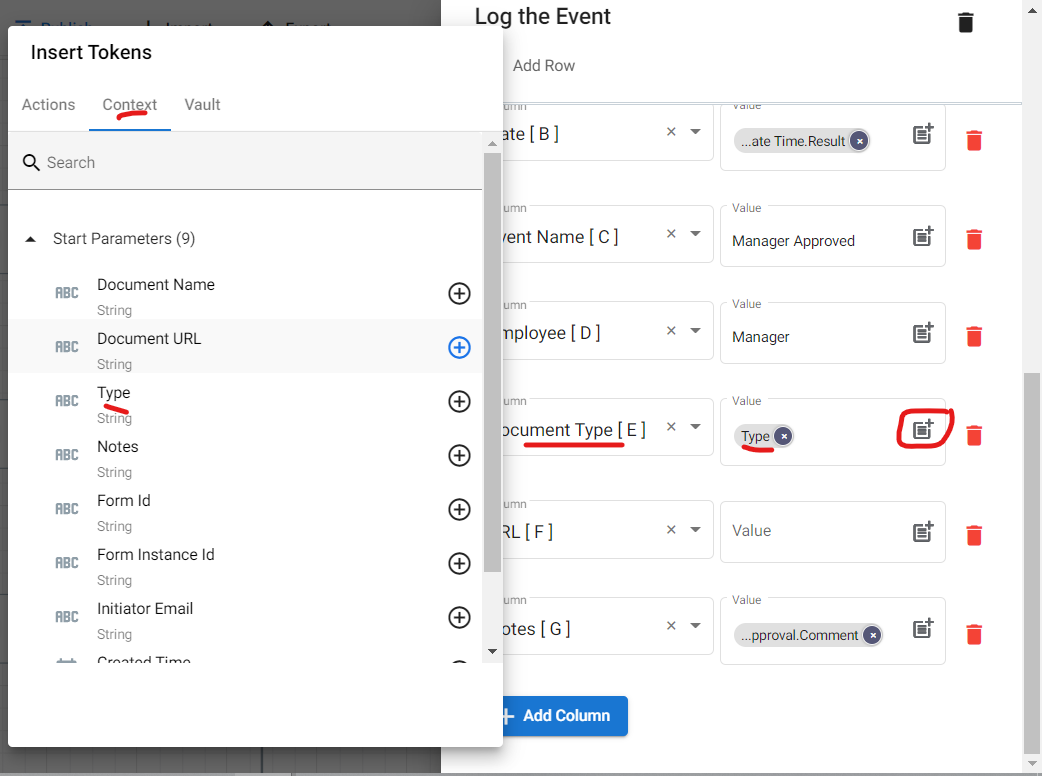
For the value of the Document Type[E] column, click the parameter icon and then Context. From the list, select Type.
For the URL[F] column, click the parameter icon then Context. From the dropdown list, select Document URL.
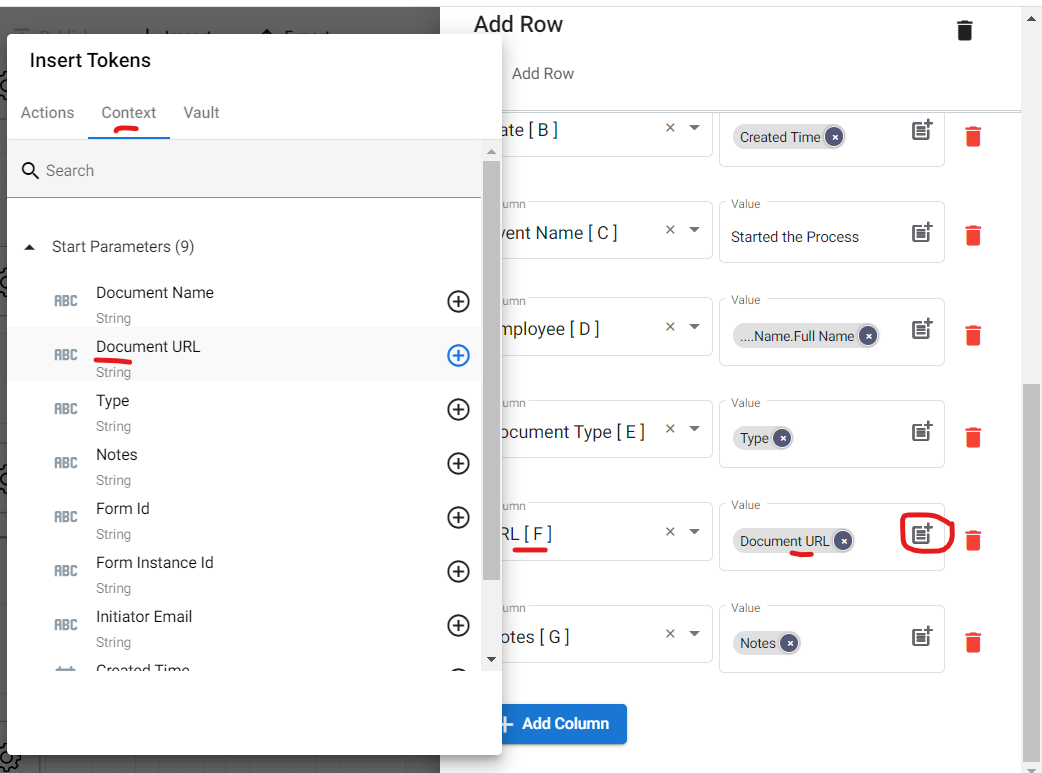
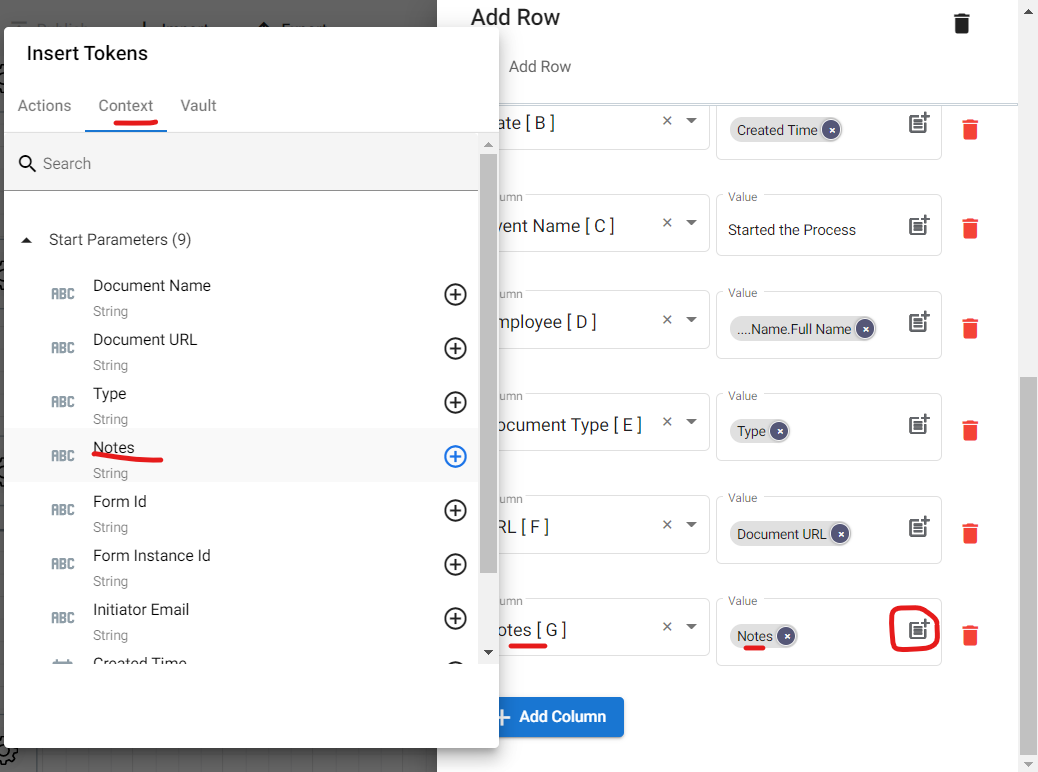
You can configure the Note[G] column value by clicking the parameter icon once more and then Context. From the dropdown list, select Notes.
Step #6:
Adding the approval loop. In our Document Approval Workflow automation, I need to get the approval of both the manager and the chief editor. If I get a rejection from any of them, the loop will automatically send back the document to me along with the notes and feedback.
From the Design panel, click Control Flow, and then drag and drop the State Machine.
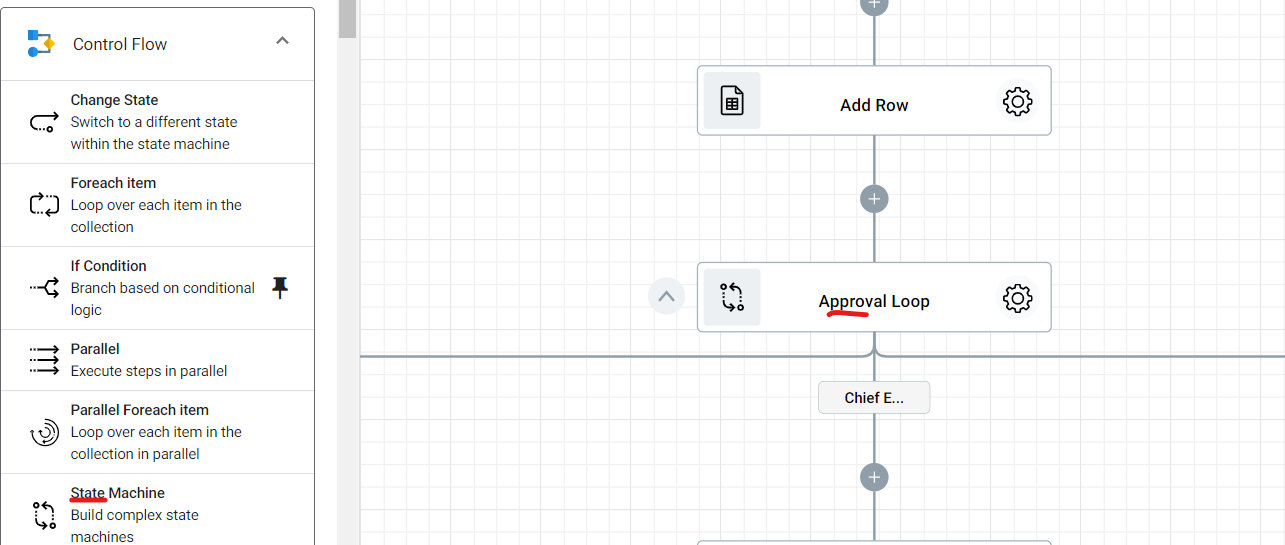
Go to Settings and configure the State Machine. We named it “Approval Loop” and added all the people involved in the document approval.
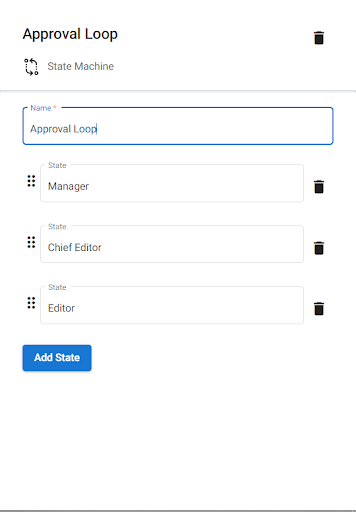
Our loop will then look like this:

The Manager Branch:
Go to the Designer panel and click Communication. From the list, drag and drop the Assign Task to the Manager branch.

Configure by going to the Settings and name the step appropriately. In our case, we named it “Manager’s Approval” so it’s clear what this step is for.
Then add two Outcomes for Approval and Rejection.
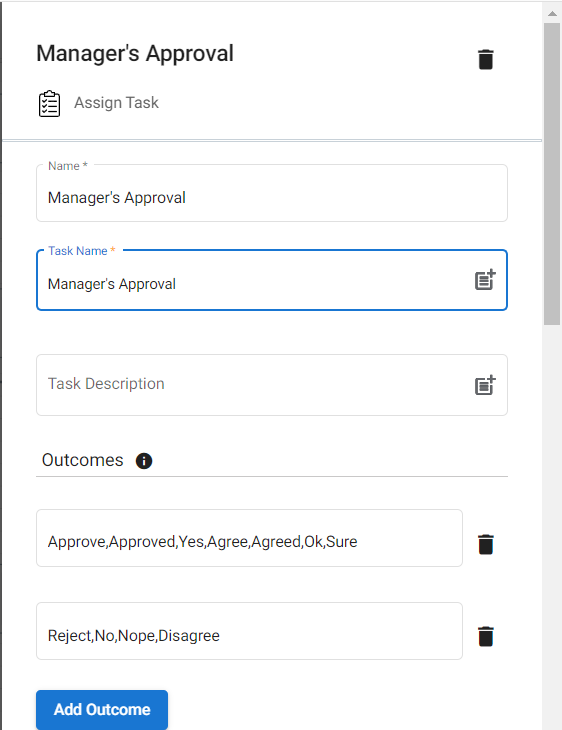
Scroll down and configure the task Assignee section(the person who will first check the draft). Click the parameter icon and then the Vault. From the drop-down list, select the right email.
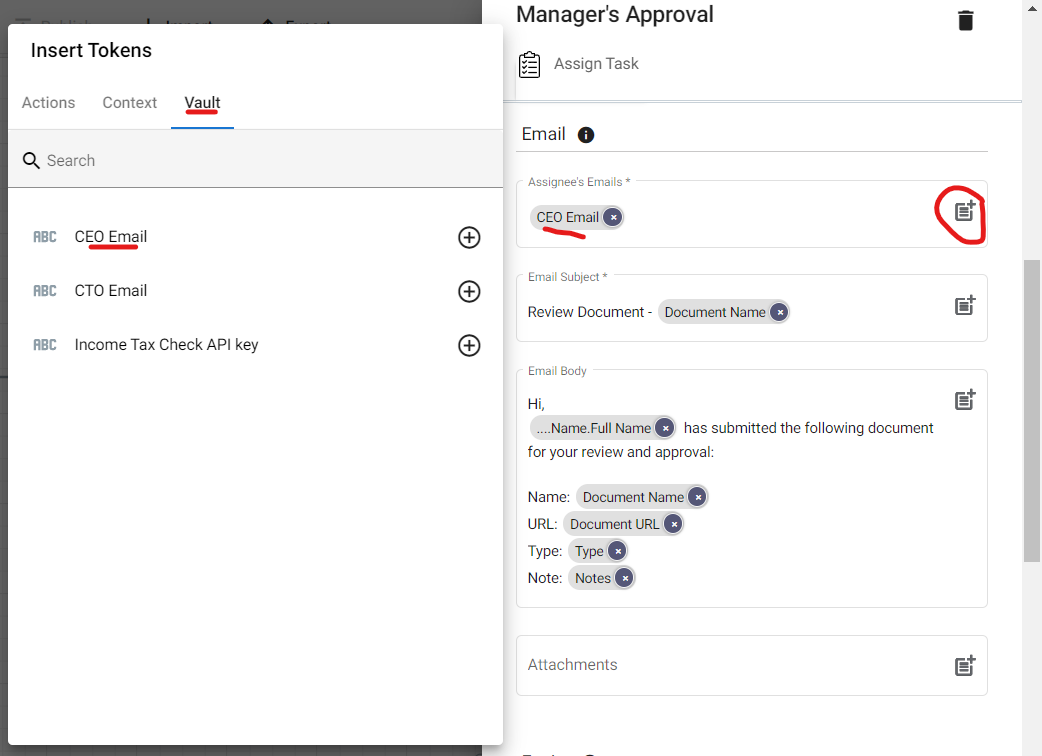
The Vault feature of zenphi is where you can store sensitive information that you do not want to share with others.
Note that even the zenphi team is not allowed to take a look at your vault. Zenphi is making strides to protect user data at all times.

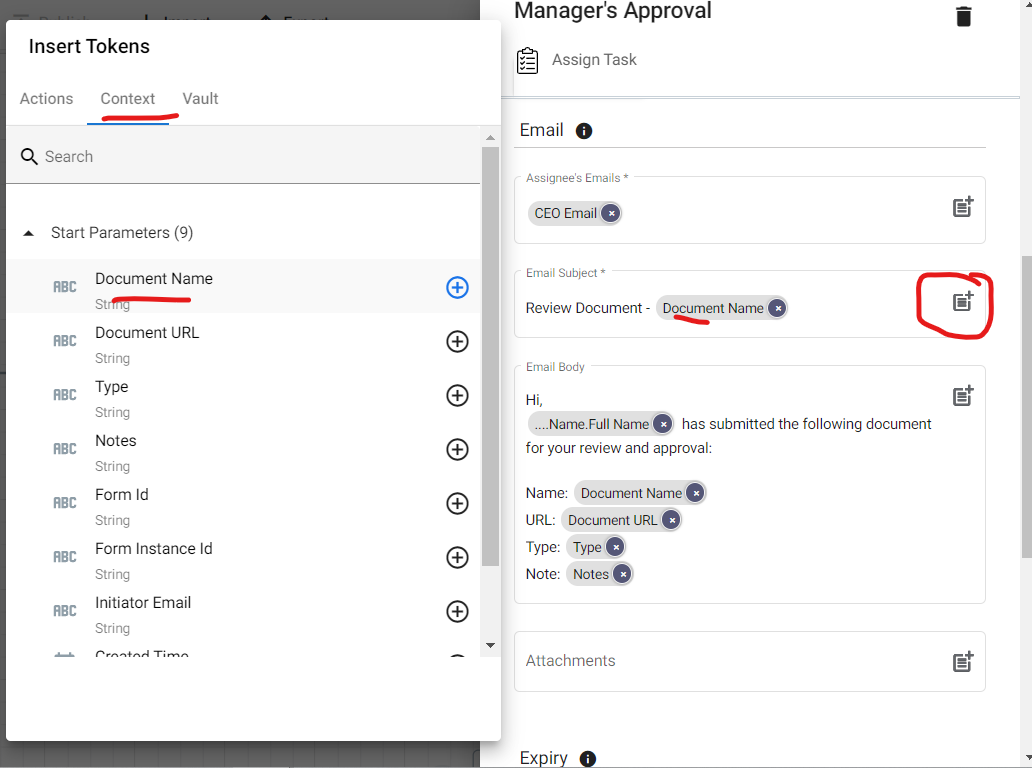
For the Email Subject section, click the parameter icon, and then Context. From the dropdown list, select Document Name. This will automatically retrieve the Document Name from the Blog Post log sheet.
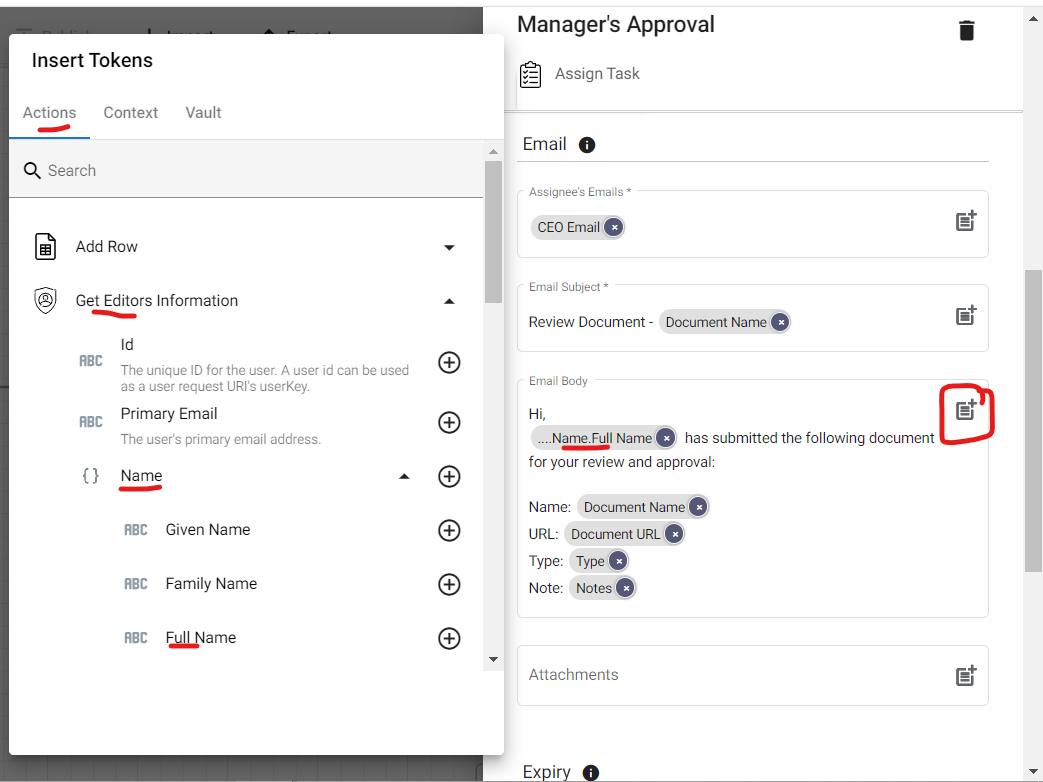
To configure the Email Body, Click the parameter icon and then Get the Editor’s Information. From the dropdown list, select Name and Full Name.
To retrieve the Document Name from the log sheet:
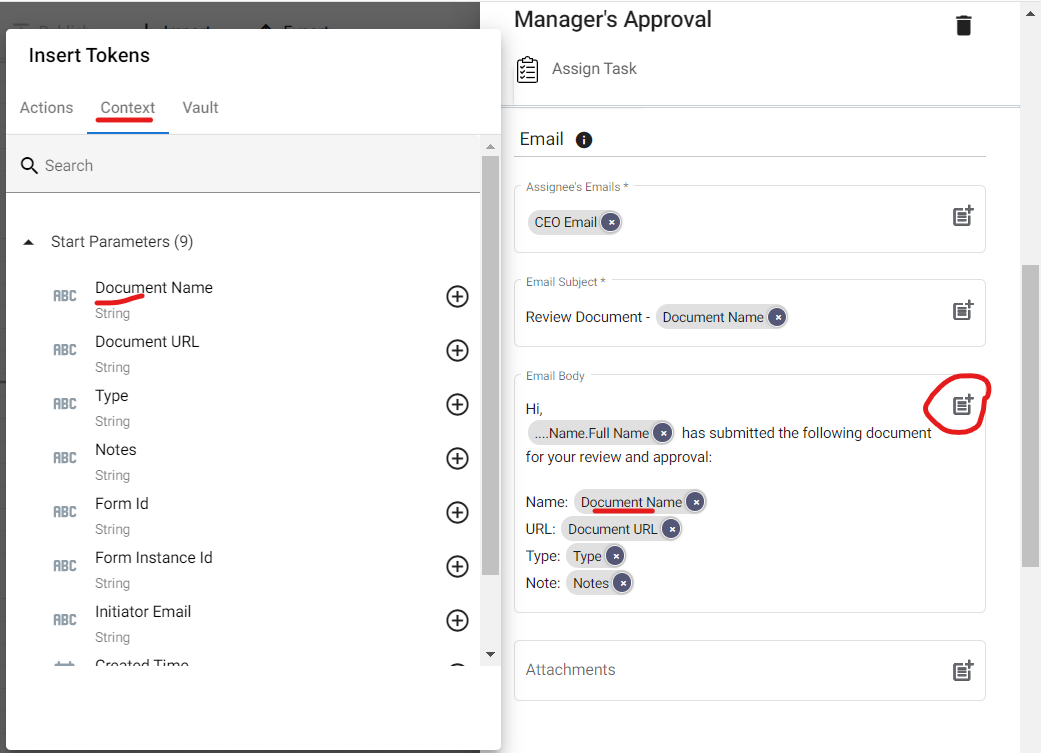
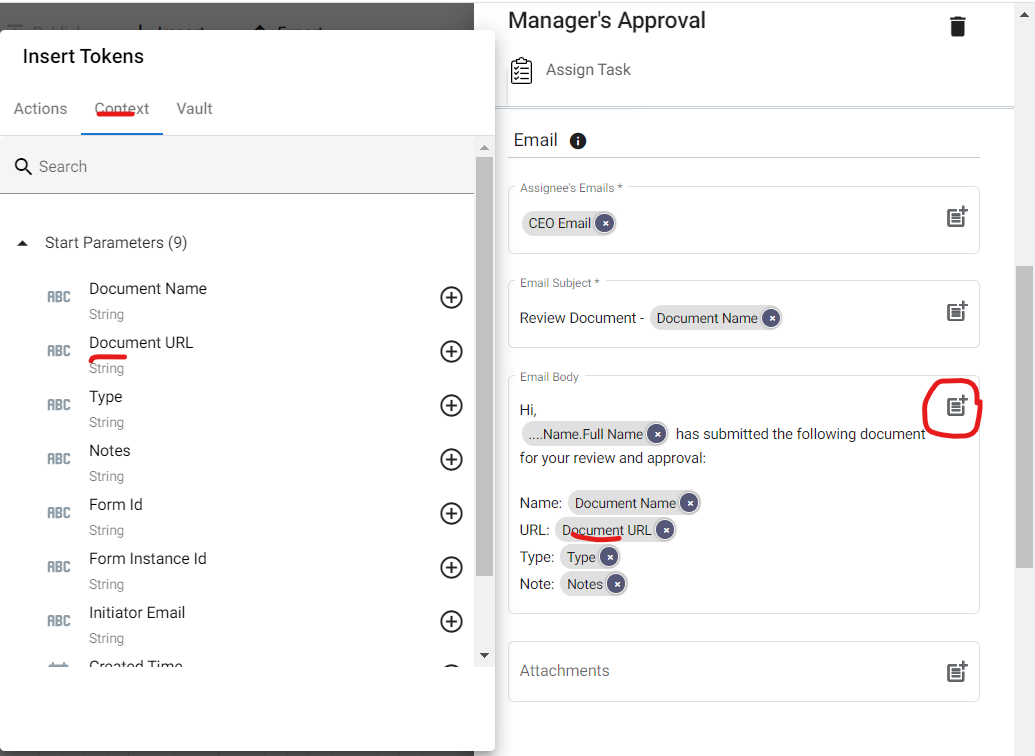
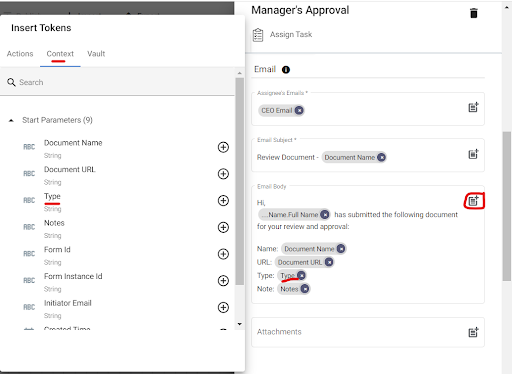
Go back to the Designer panel and then click Control Flow. Drag and drop the If Condition under the Manager branch.
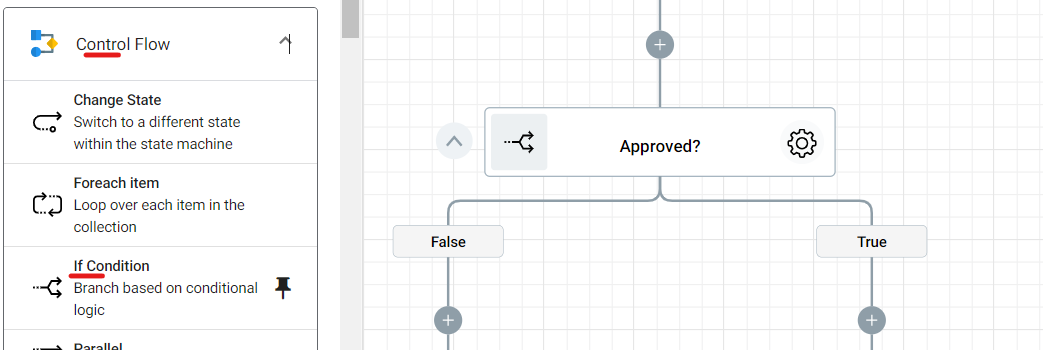
Click the Settings and configure by naming the step properly and setting the condition of the clause.
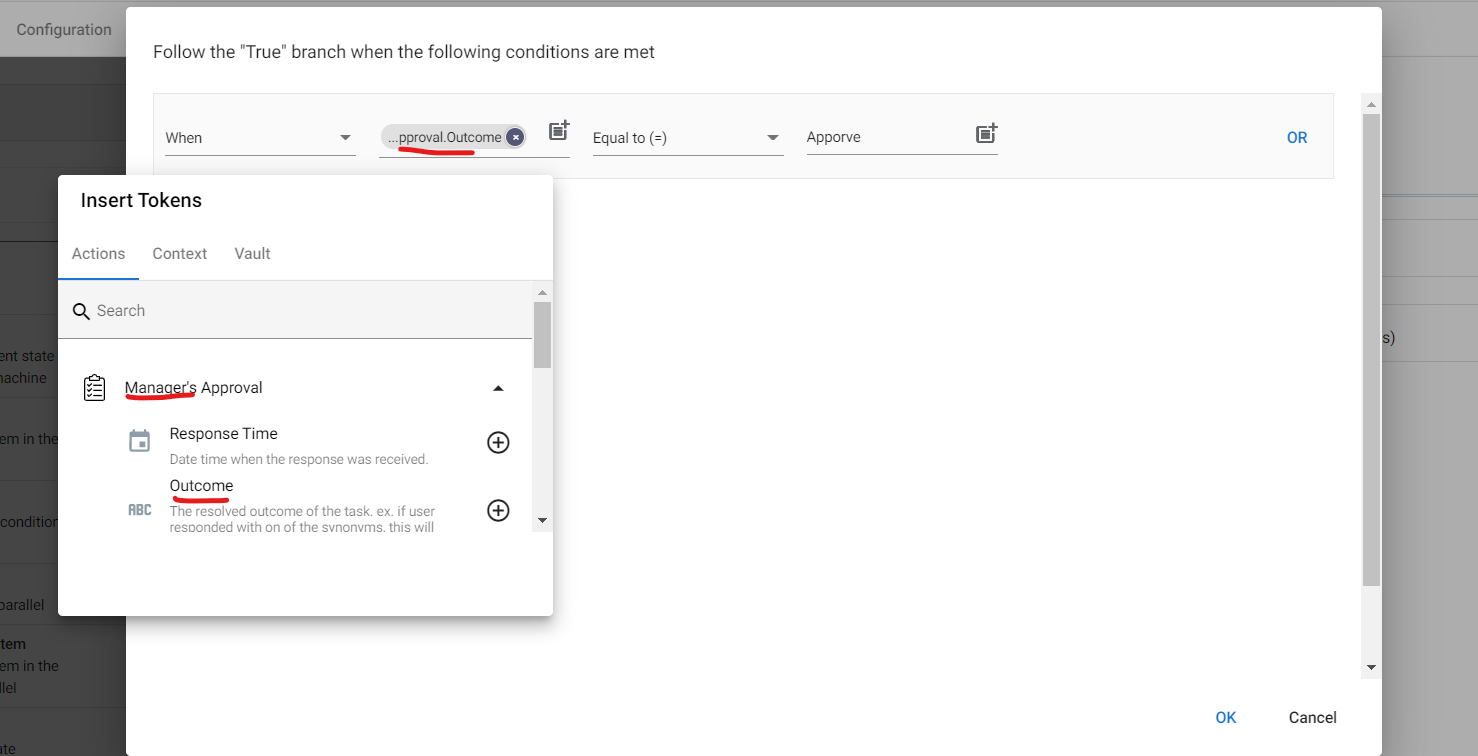
False
Go to the Designer panel and click Date Time. From the menu, drag and drop Current Date Time to the False branch.
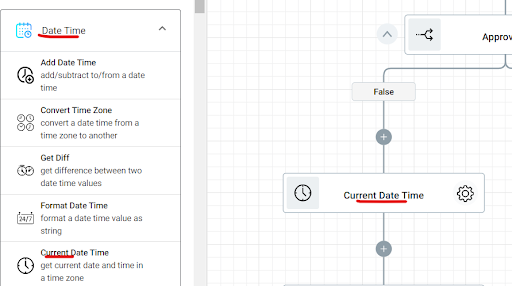
Click Google Sheets from the designer panel, and then drag and drop Add Row.
This step will automatically update the log sheet when the Manager rejects the document.

Configure the Settings by naming the step “Log The Event”. The Connection section is the Drive where the Log sheet is.
In the File section is the File ID of the Blog Post Approval sheet.
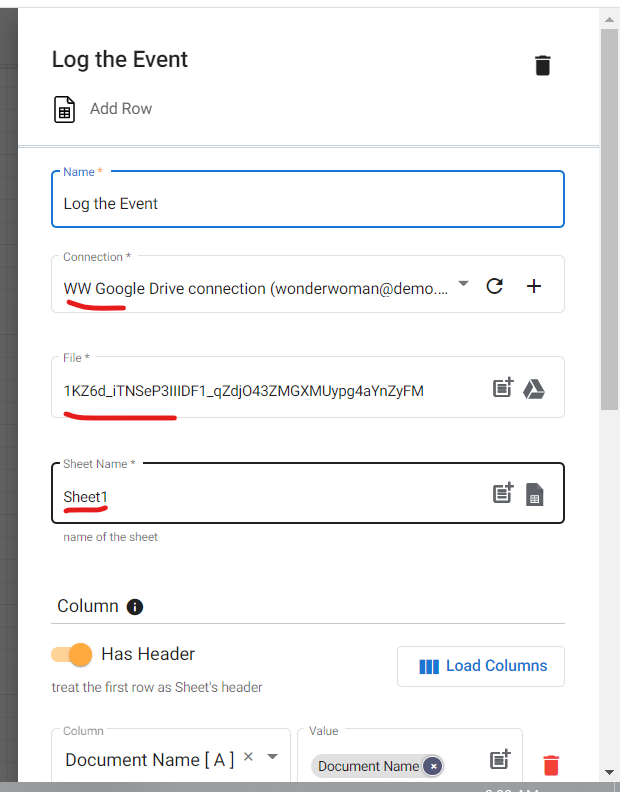
Scroll down and enable Has Header. Then add all the columns in your log sheet.
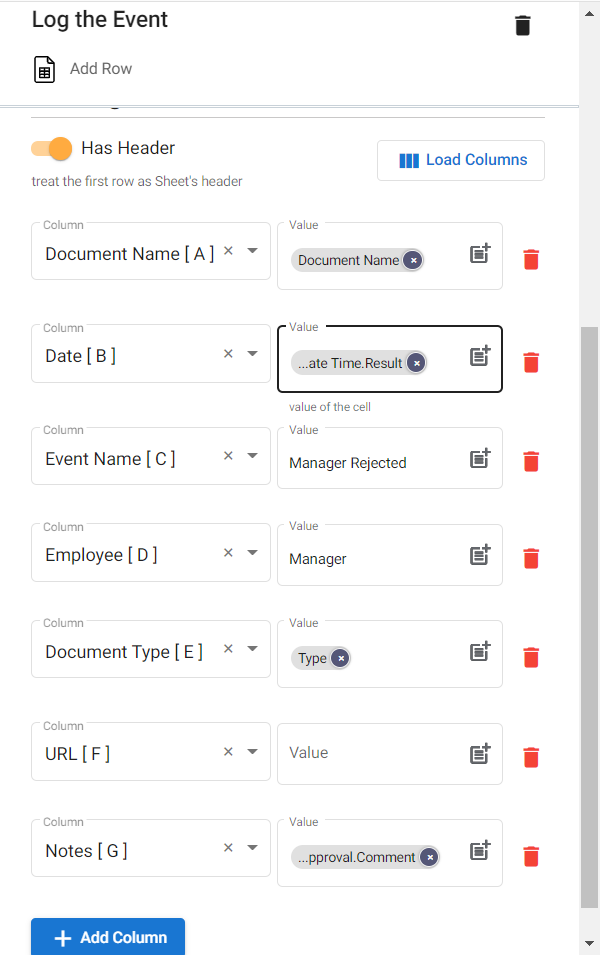
To configure the values of the columns, kindly refer to Step #5.
Go back to the Design panel and click Control Flow. Next, drag and drop Change State to the False branch.
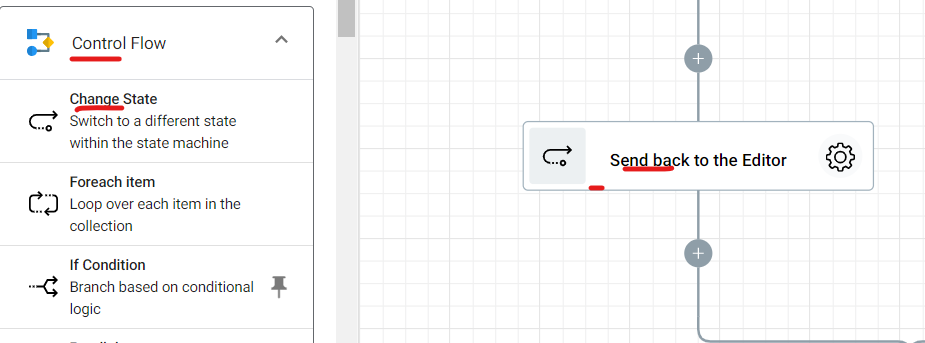
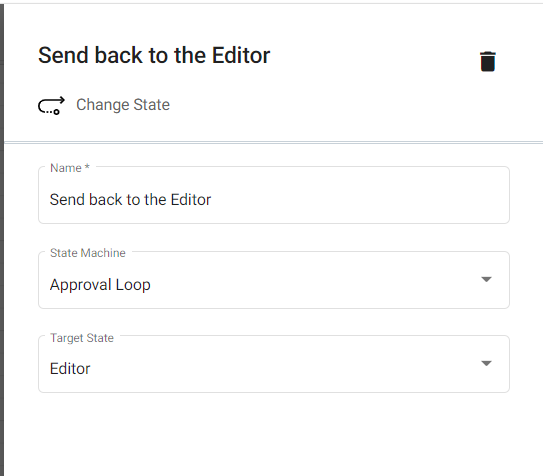
Configure the step by clicking the Settings icon and assigning a name. Click the State Machine section and select Approval Loop. In the Target State, assign Editor.
This step will send the document back to the Editor to check and edit.
True
From the Designer panel, click Date Time, and drag and drop Current Date Time to the True branch.
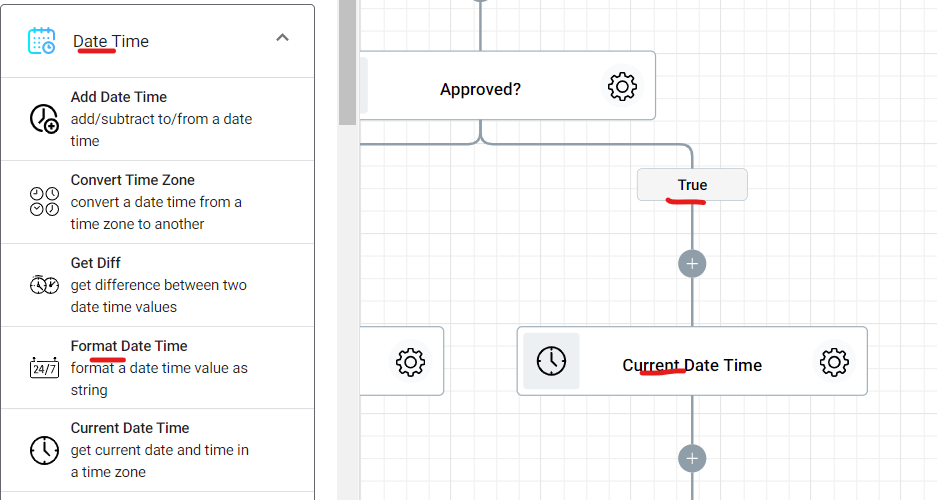
Add Row by going back to the designer panel and clicking Google Sheets.

Configure by clicking the Settings icon. Start by naming the step and assigning the Connection(where the Blog Post Approval sheet is.).
In the File section is the file id of the Blog Post Approval Sheet.
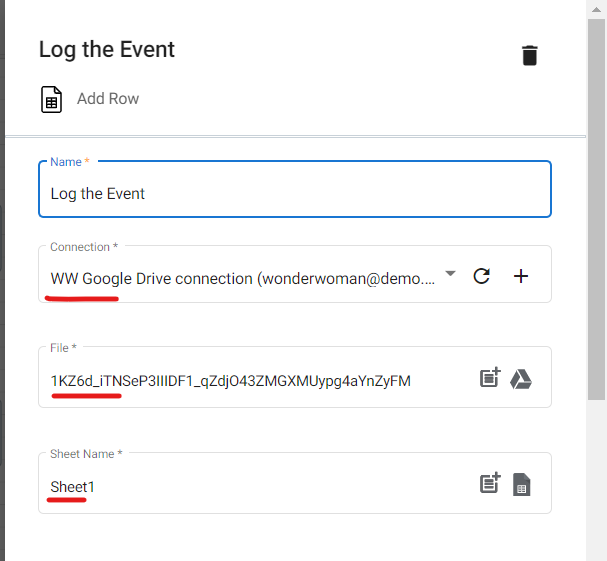
Scroll down and enable Has Header. Add all the columns in your Approval log sheet.
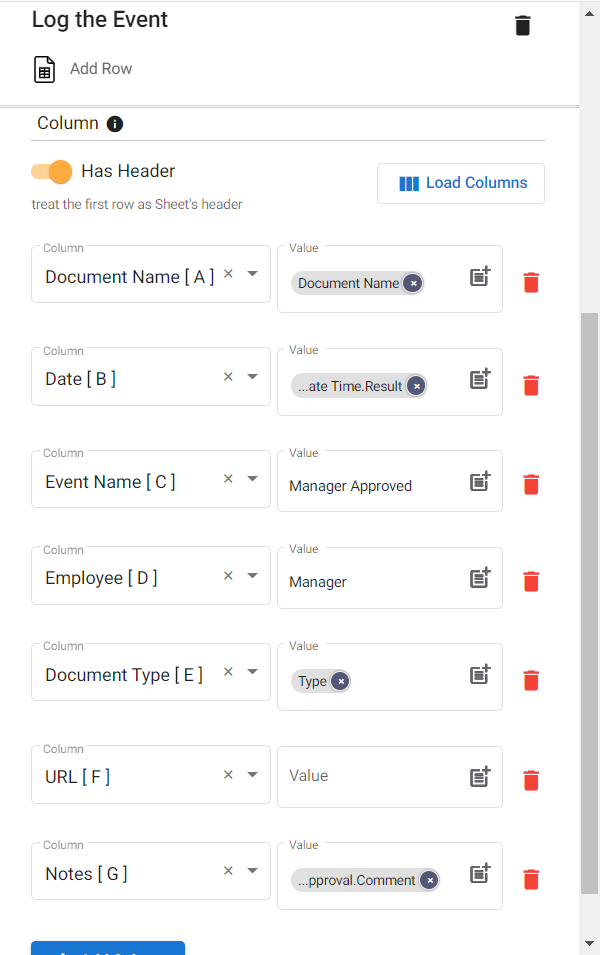
Configure Column values:
Document Name [A]
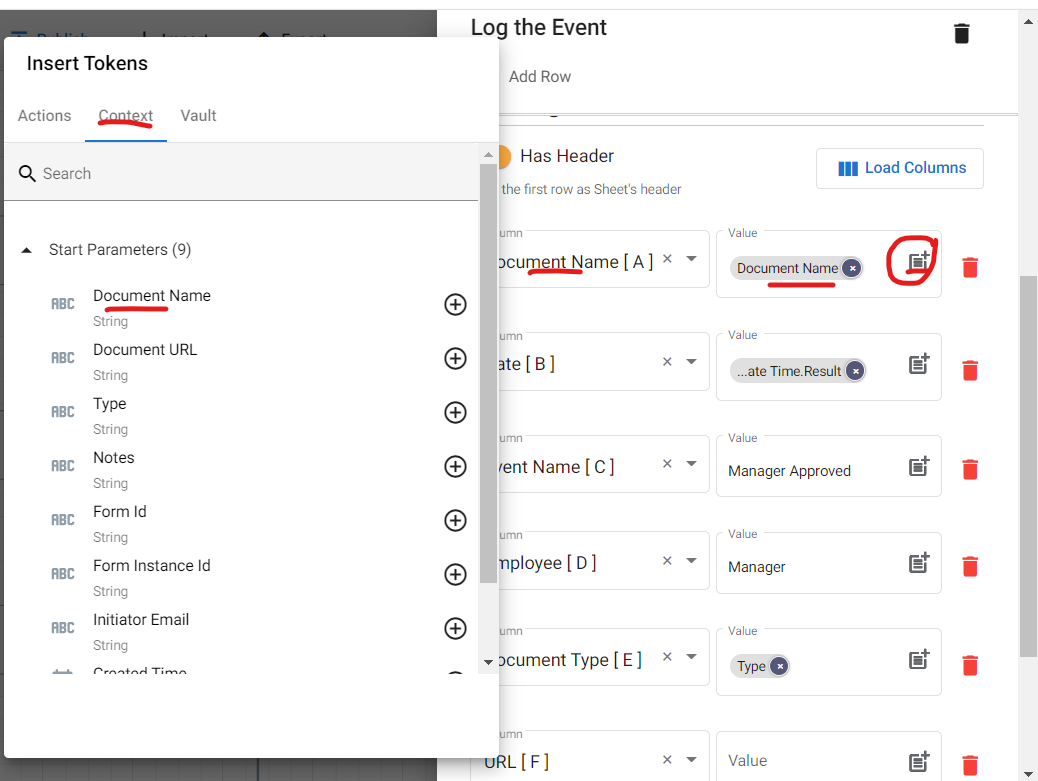
Date [B]:
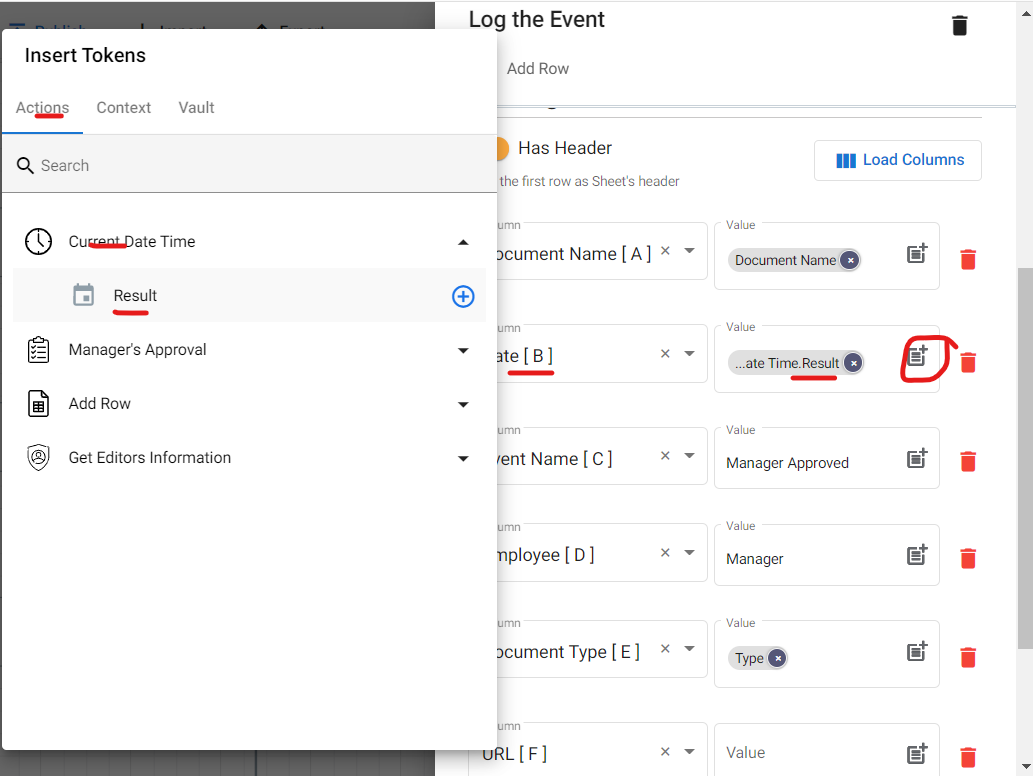
Event Name [C], just type “Manager Approved”.

Employee [D], type “Manager”.

Document Type [E]
URL [F]
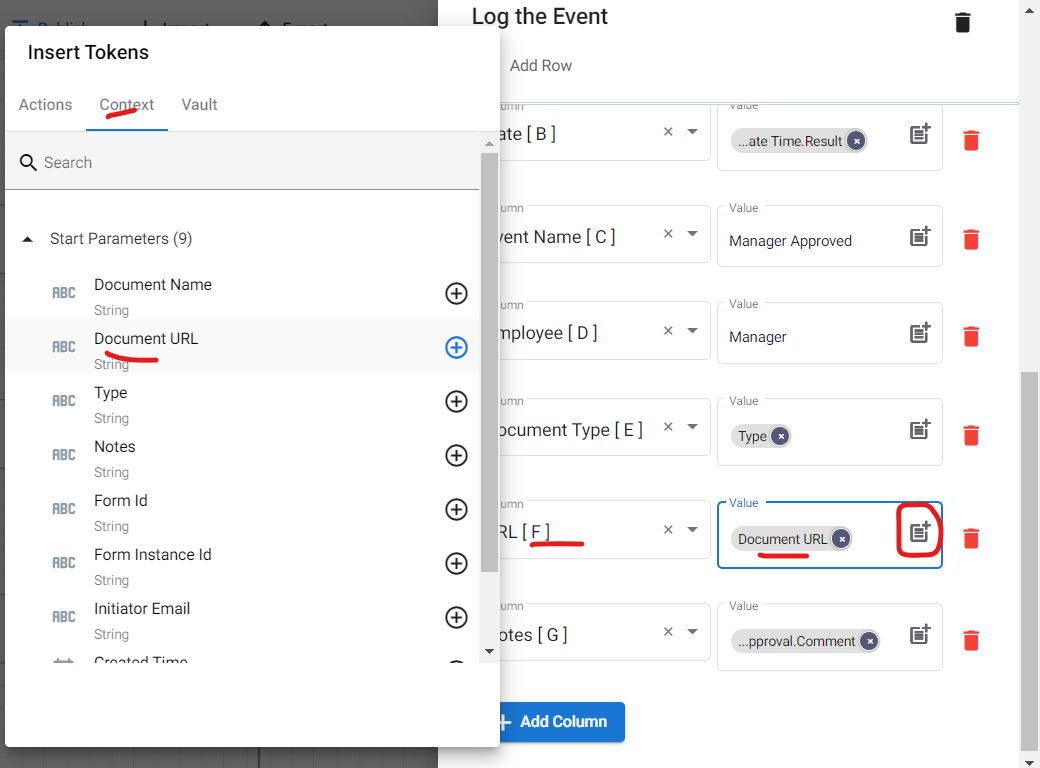
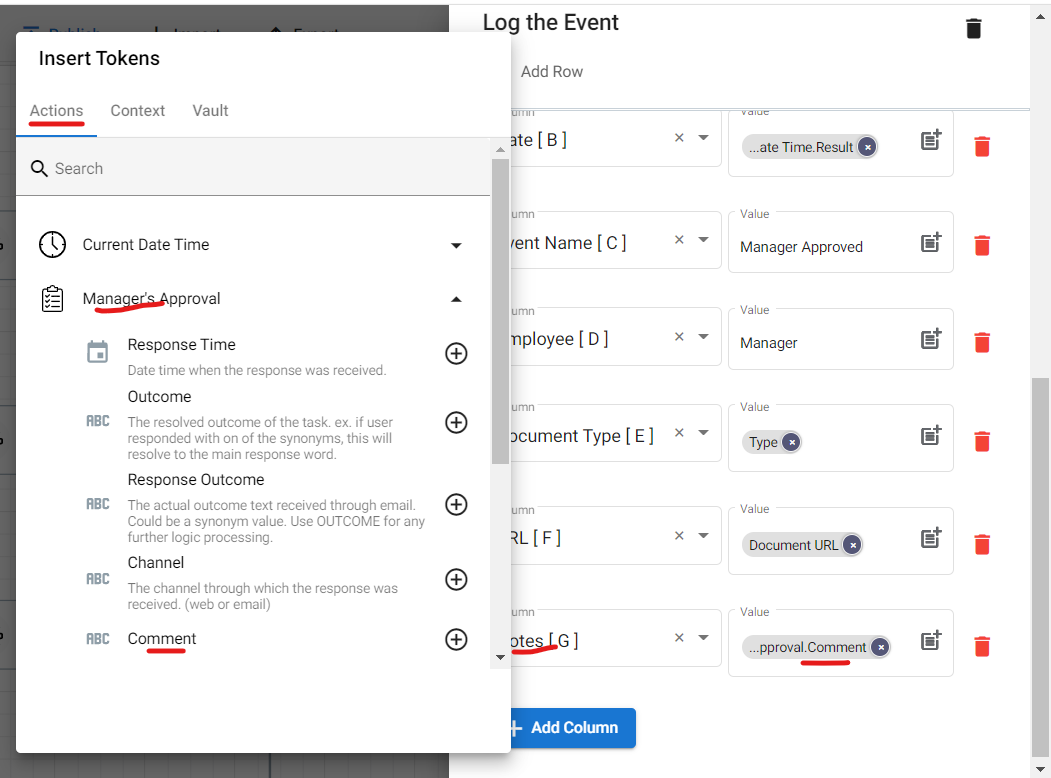
Notes [G]
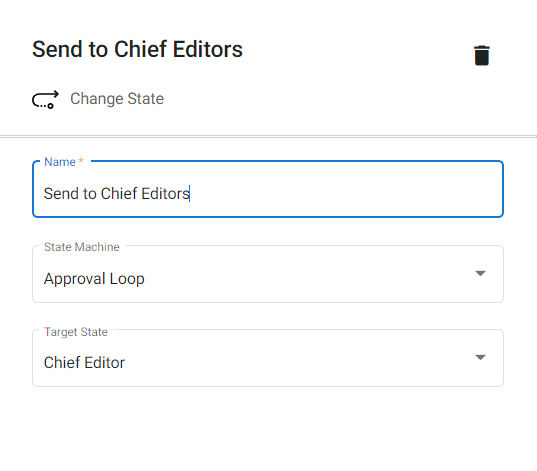
Go back to the designer panel and click Control Flow. Drag and drop Change State to the True branch. This step will send the approved document to the Editor in Chief.

Configure by clicking the Settings icon.
The Chief Editor Branch of the Approval Loop
Greatly similar to the Manager branch steps with slight variation in information such as email.
Click Communication, and then drag and drop Assign Task to the Chief Editor’s branch.

Configure this step by clicking the Settings icon. Name the task and add the Outcome for Approval and Rejection.
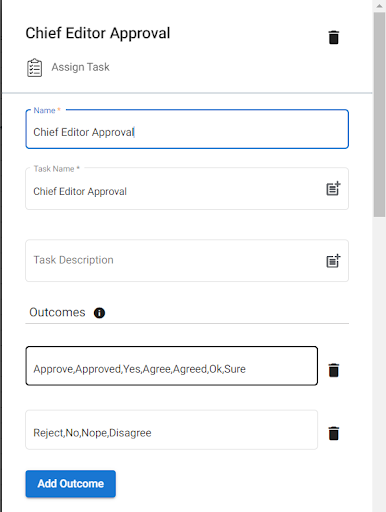
Set the Assignee section by retrieving the Chief Editor’s email from the Vault.
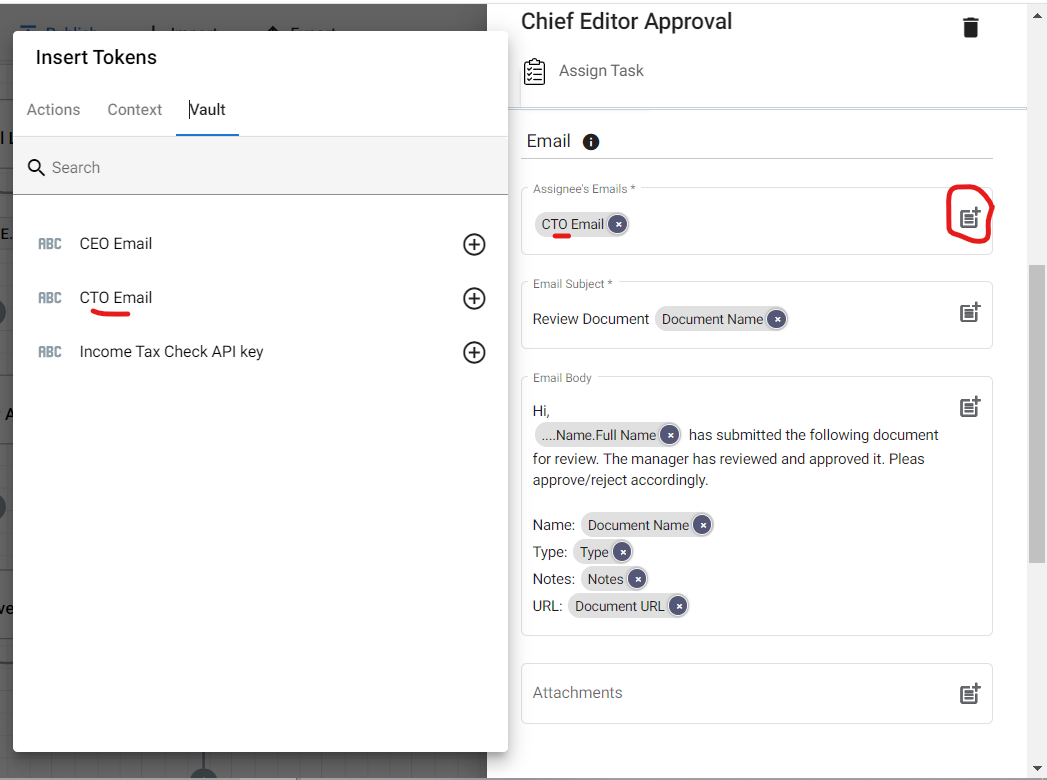
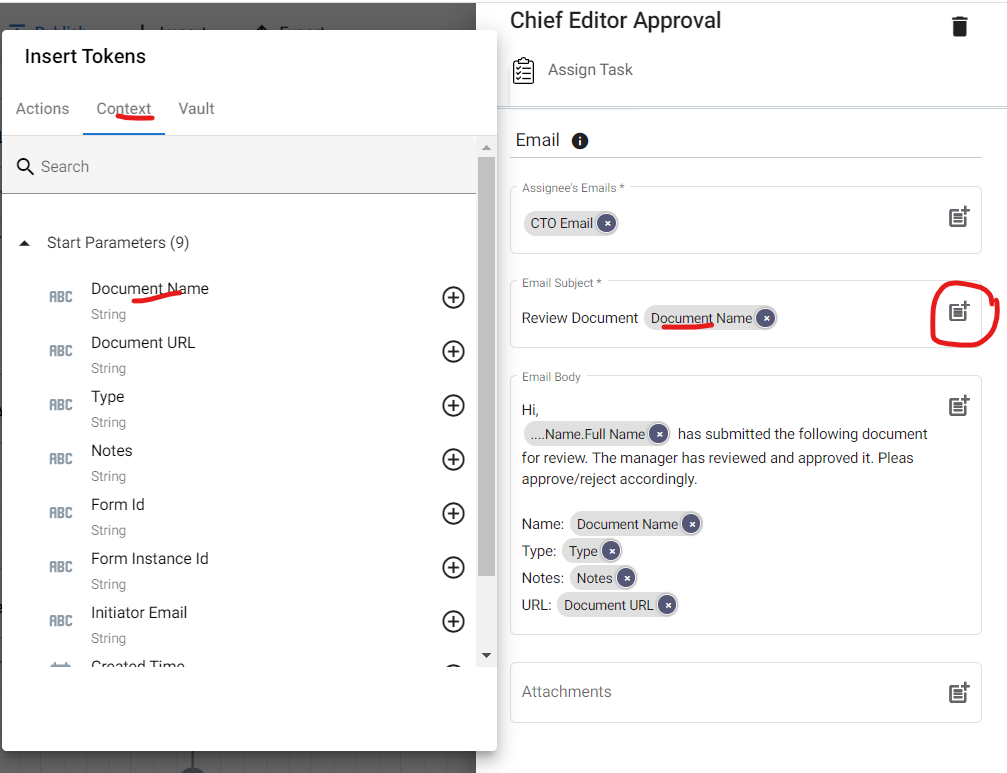
Configure the email subject.
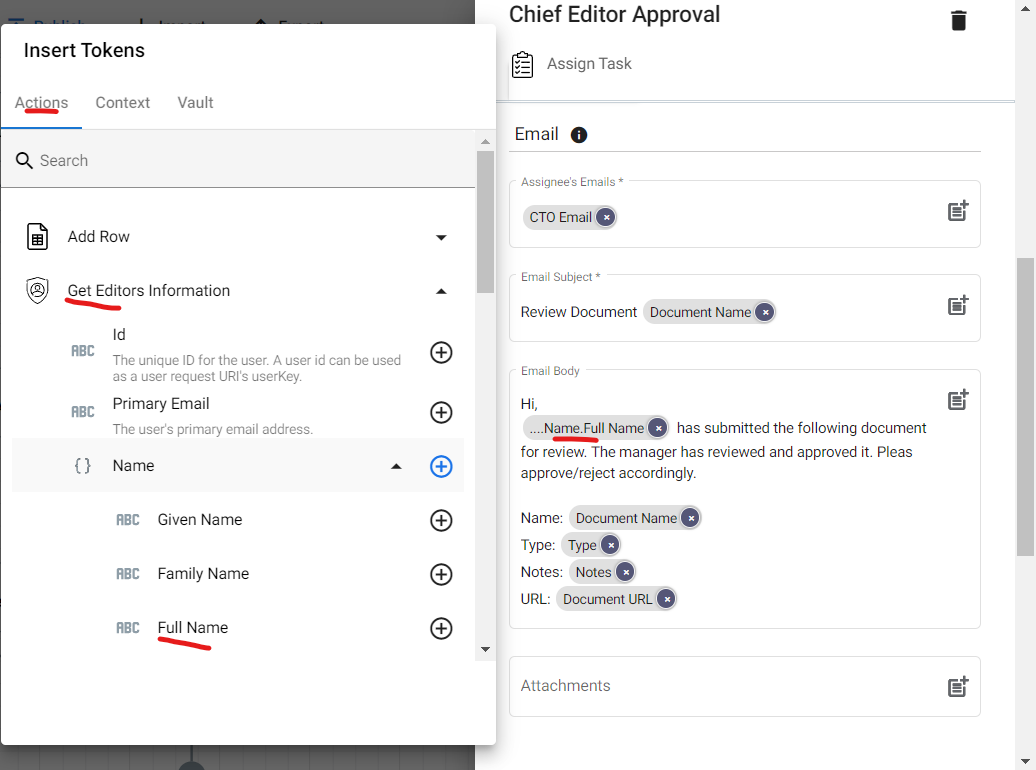
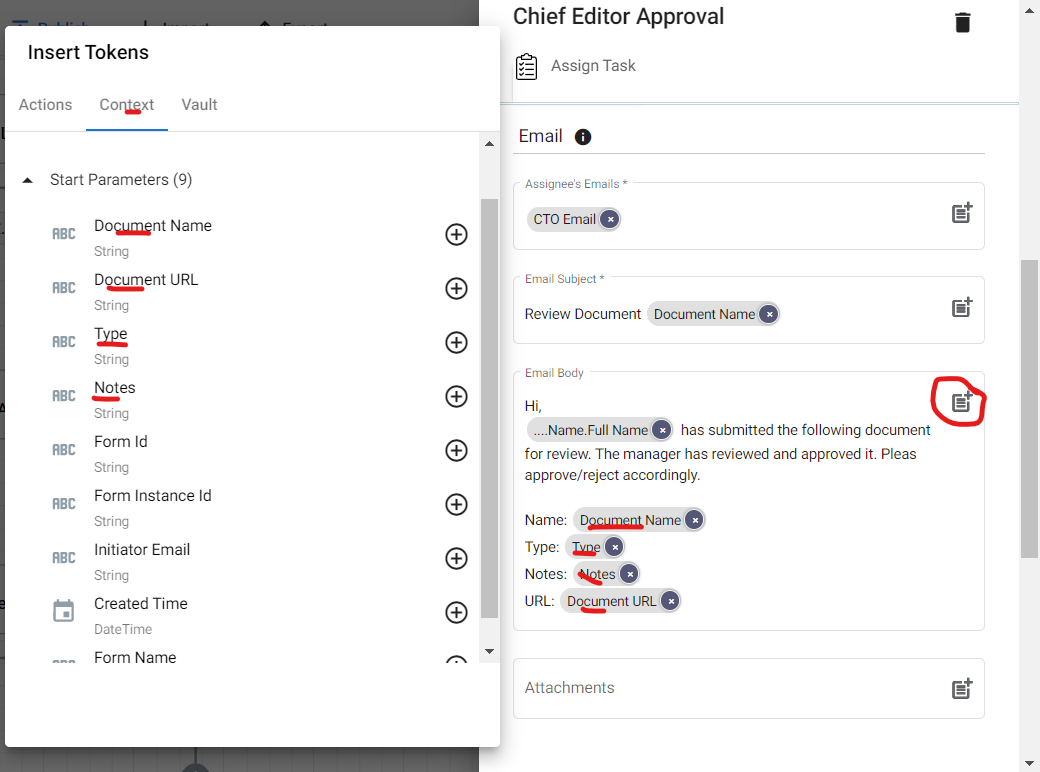
To configure the Email Body, click the parameter icon, choose Get The Editor’s Information. Click Name and select Full Name.
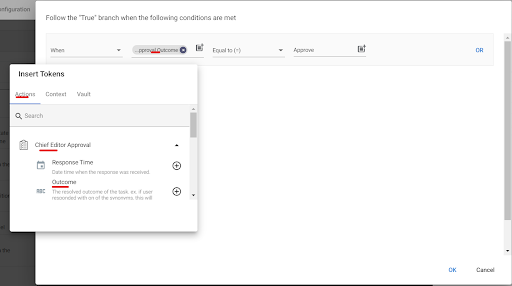
From the Designer panel, click Control Flow, and then drag and drop If Condition to the Chief Editor’s Branch.

Configure the step by setting the clause.
False
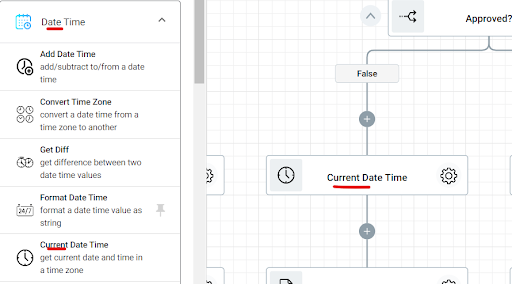
From the Designer panel, click Date Time and drag and drop Current Date Time.
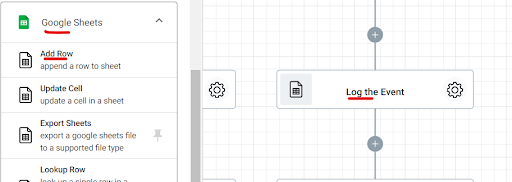
Click Google Sheets from the Designer panel, and then drag and drop Add Row.
Configure the step by going to the Settings. The Connection is still the Drive where the Blog Post Approval Sheet is.
The File section should contain the id file of the Approval Sheet.
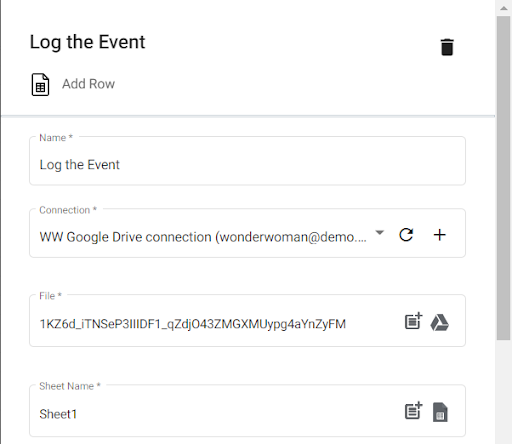
Add all the columns of the Blog Post Approval log sheet.
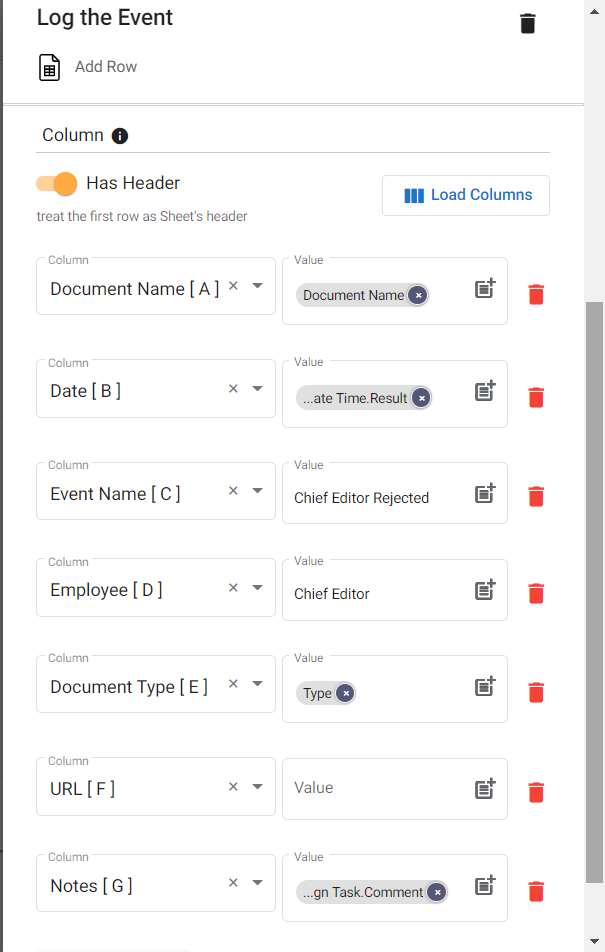
Configuring the column values.
Document Name [A]:
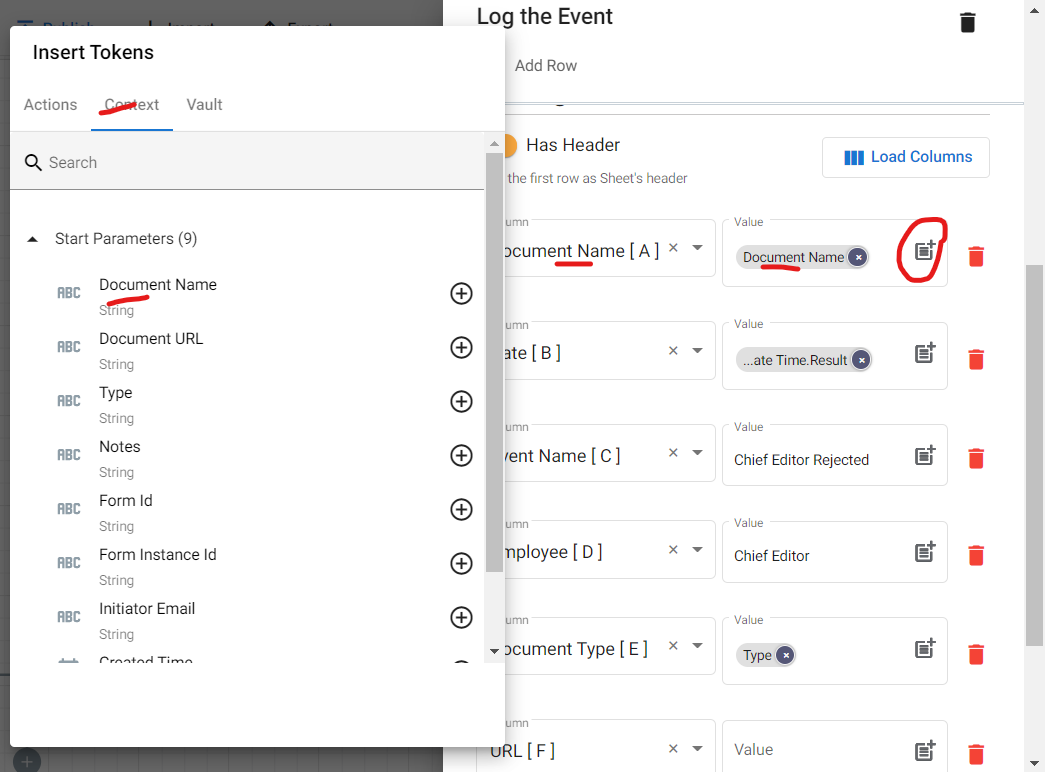
Date [B]:
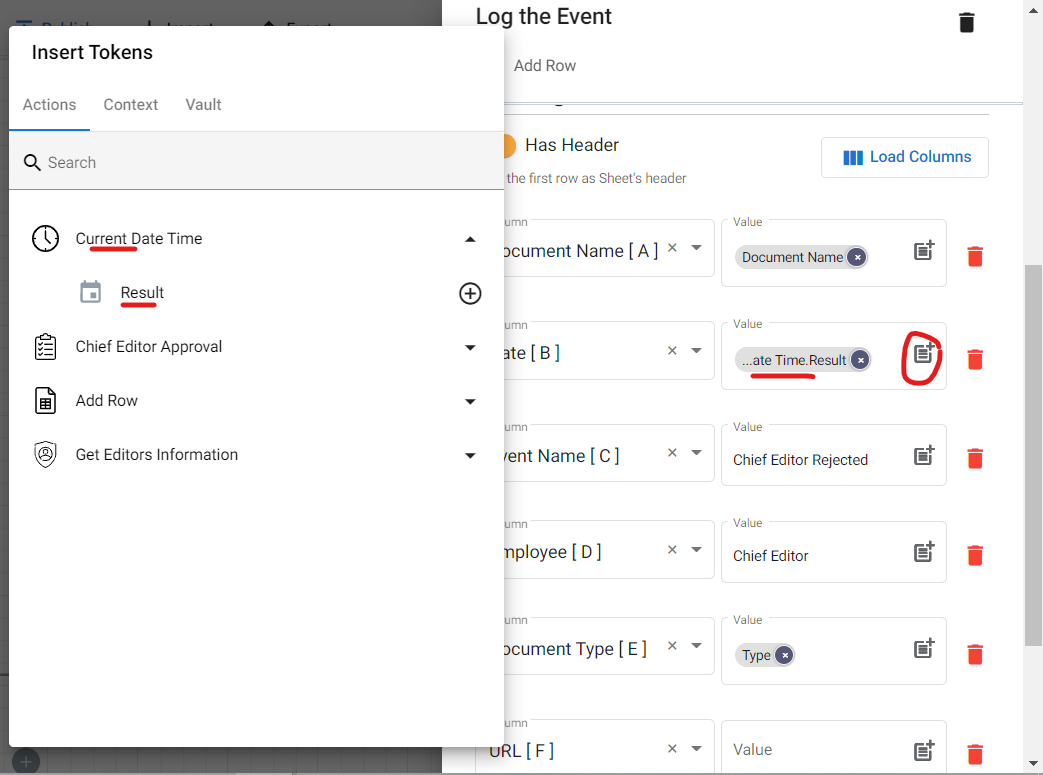
Event Name [C], type “Chief Editor Rejected”.

Employee [D], input “Chief Editor”.

Document Type [E]:
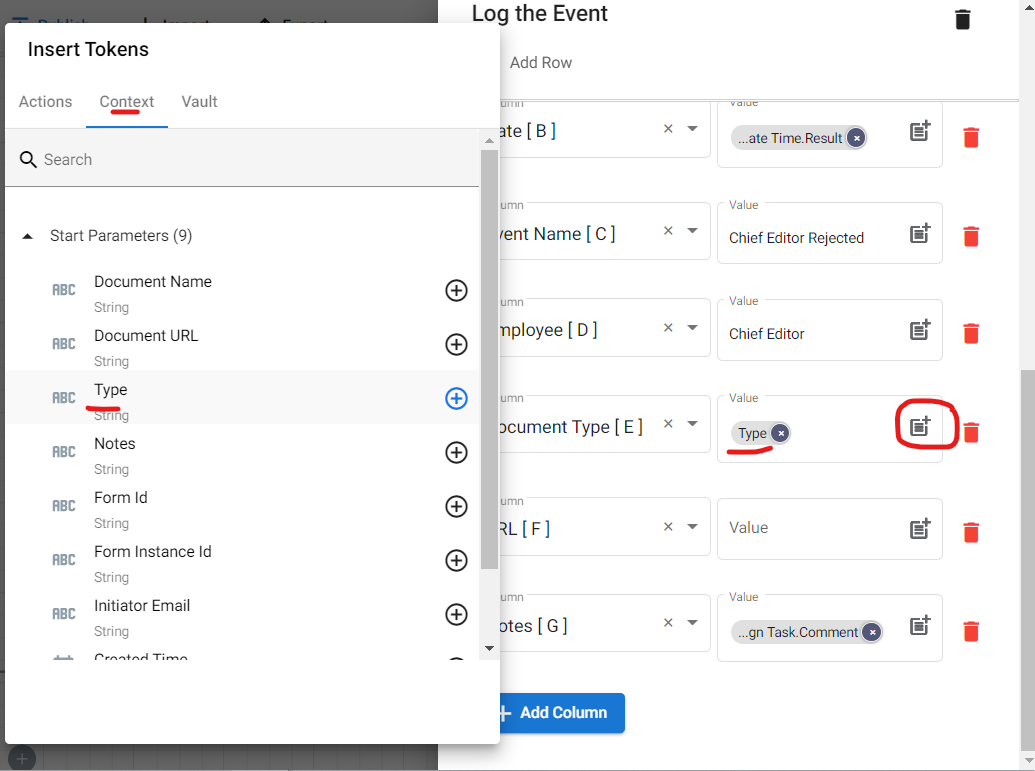
URL [F]:
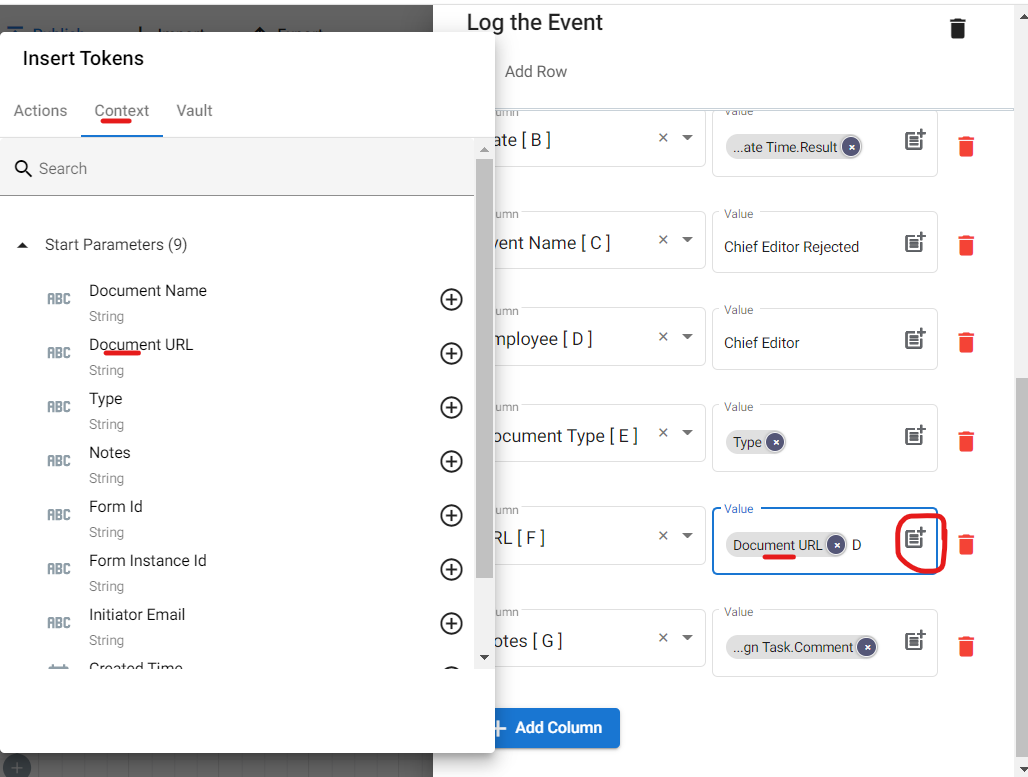
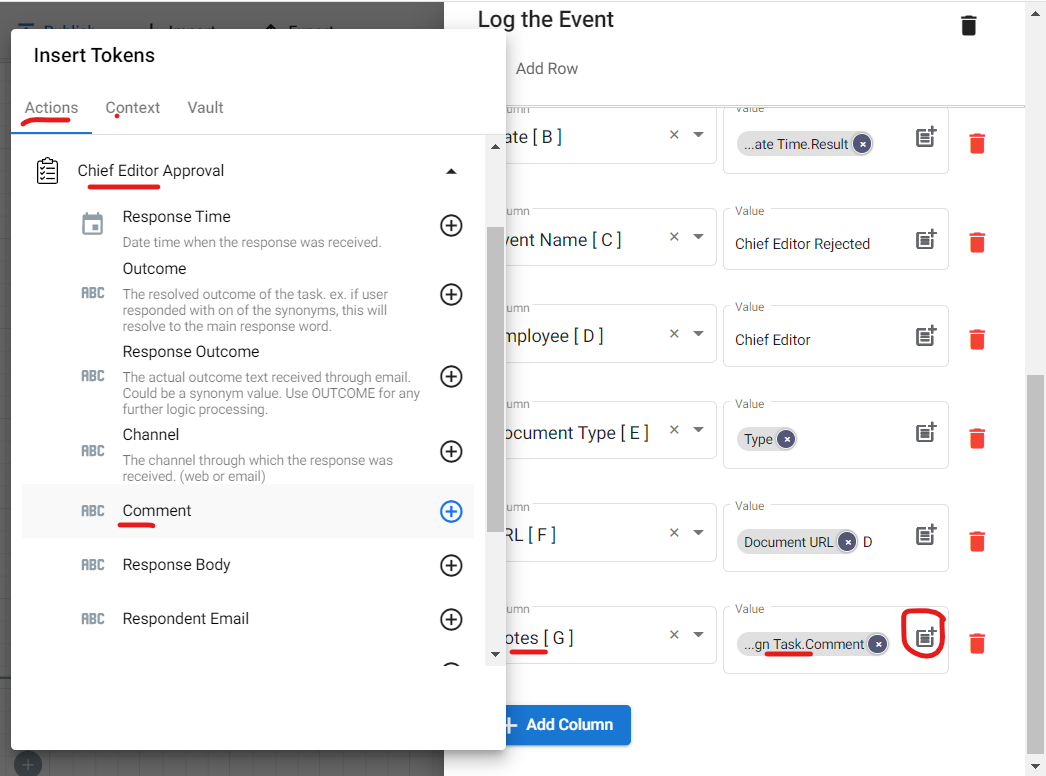
Note [G]:
True Branch
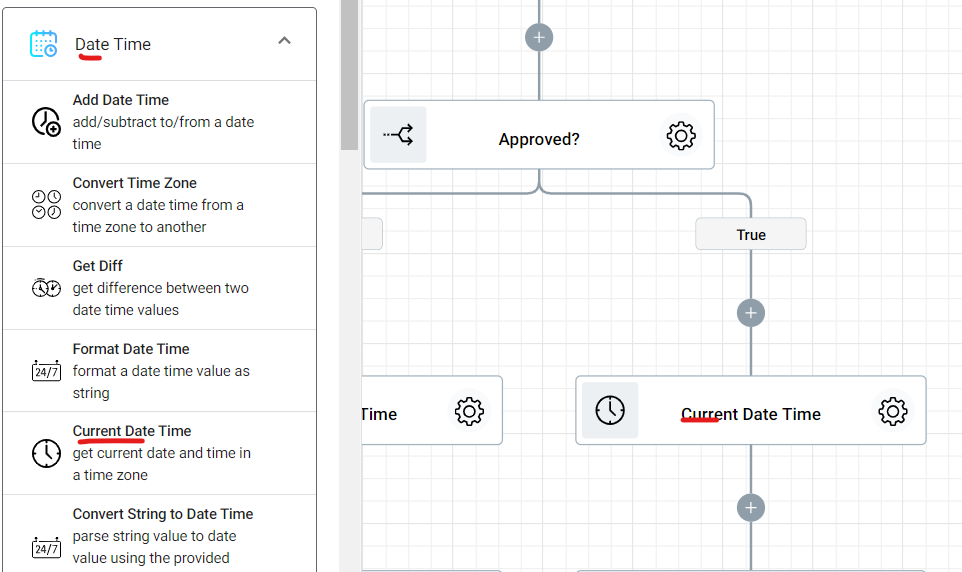
Go to the Designer panel and click Date Time. From the list, drag and drop Current Date Time to the True branch under the Chief Editor loop.
Click Google Sheets and drag and drop Add Row.

Configure this step, just click the Settings icon. The Connection still refers to the Drive where the Blog Post Approval log sheet is.
The File section will contain the id file.
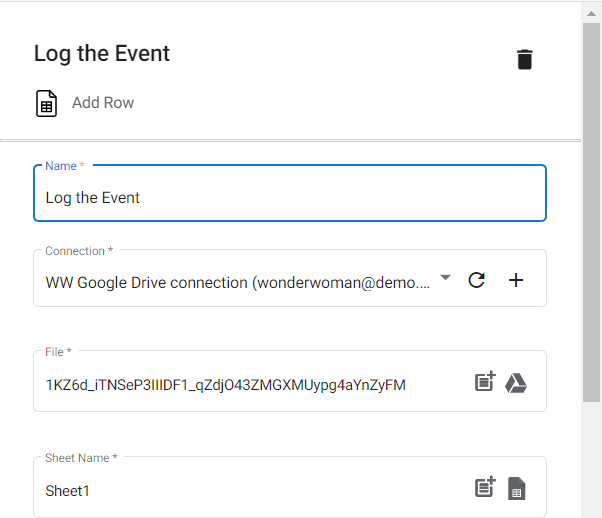
Scroll down and add all columns within your approval log sheet. To configure the value, kindly refer to the previous steps in the False branch.
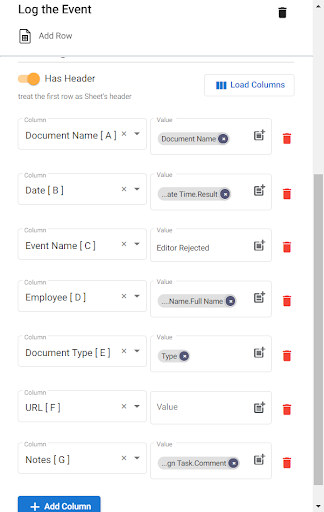
The Editor’s Approval Loop branch:
Go to the Designer panel and click Communication. Then drag and drop Assign Task to the Editor branch.

Configure this step by clicking the Setting icon. Assign a name to the task and add two Outcomes for Approval and Rejection.
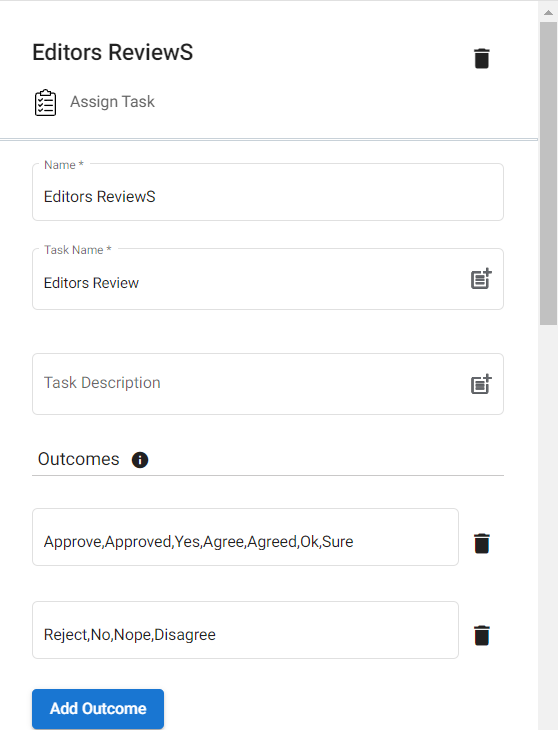
Set and configure the Assignee.
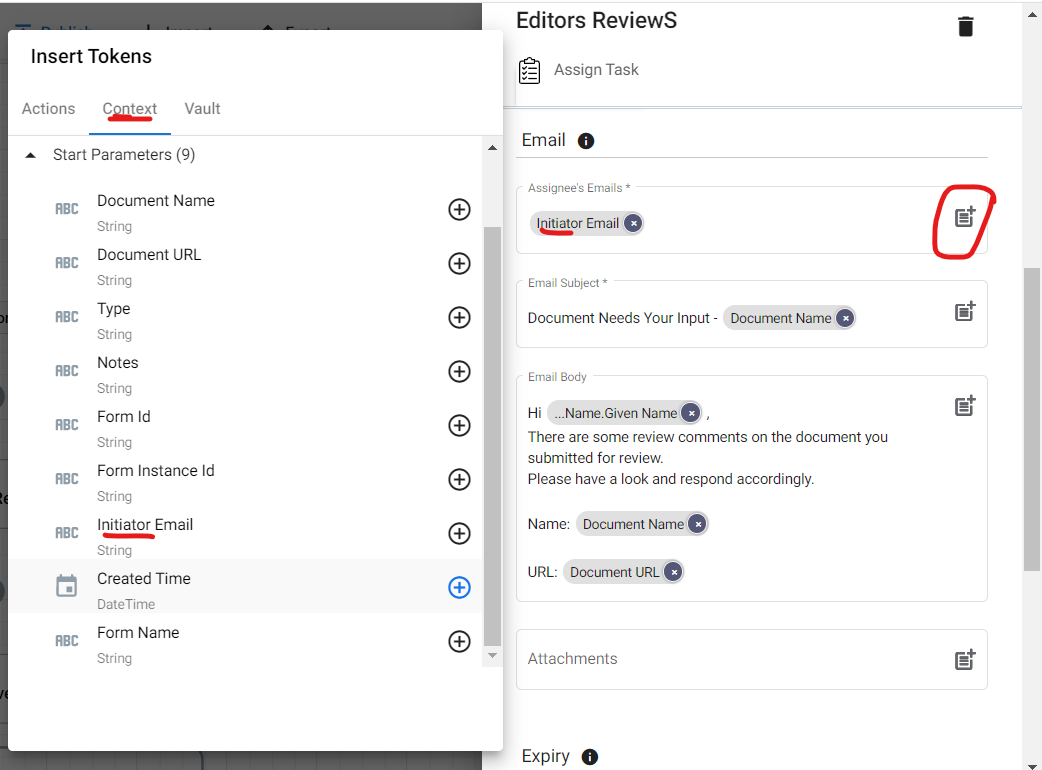
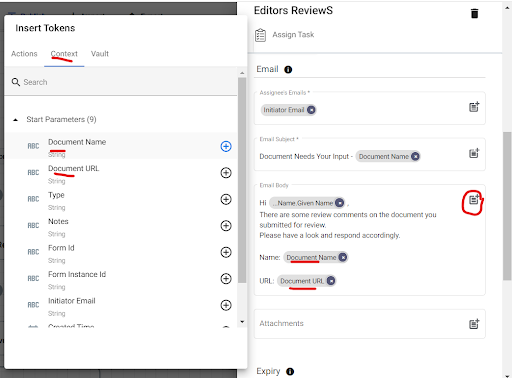
For the Email Subject, you can configure it by clicking the parameter icon and Context. Click Parameters, and from the dropdown list, select Document Name.
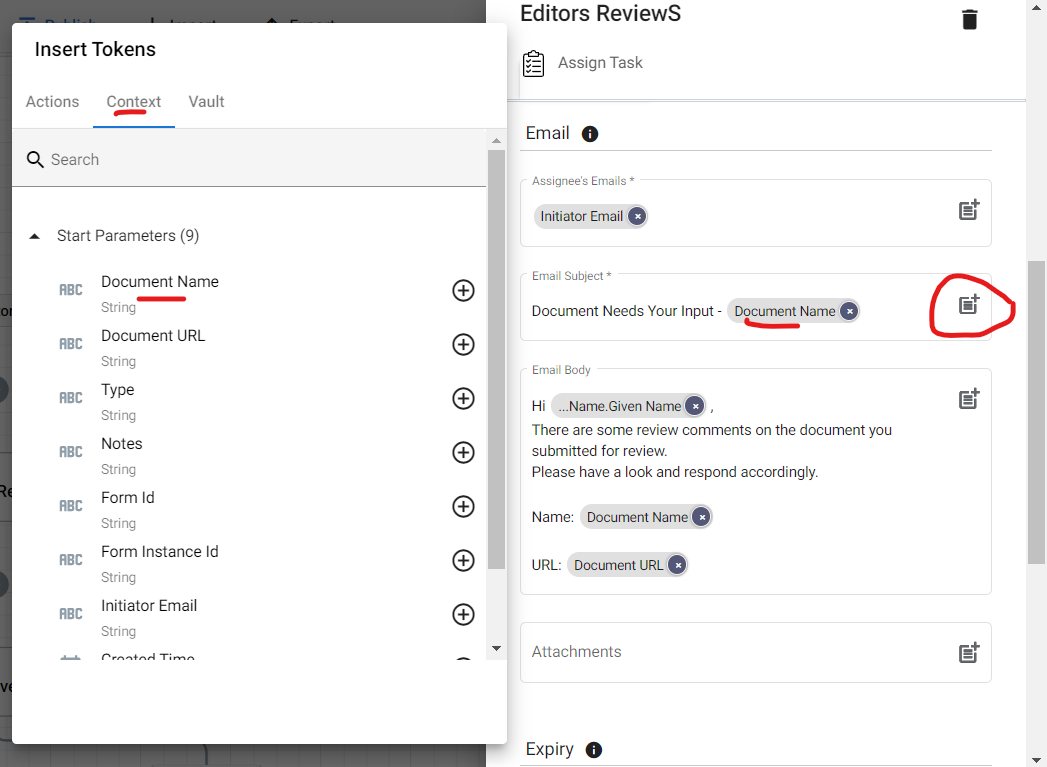
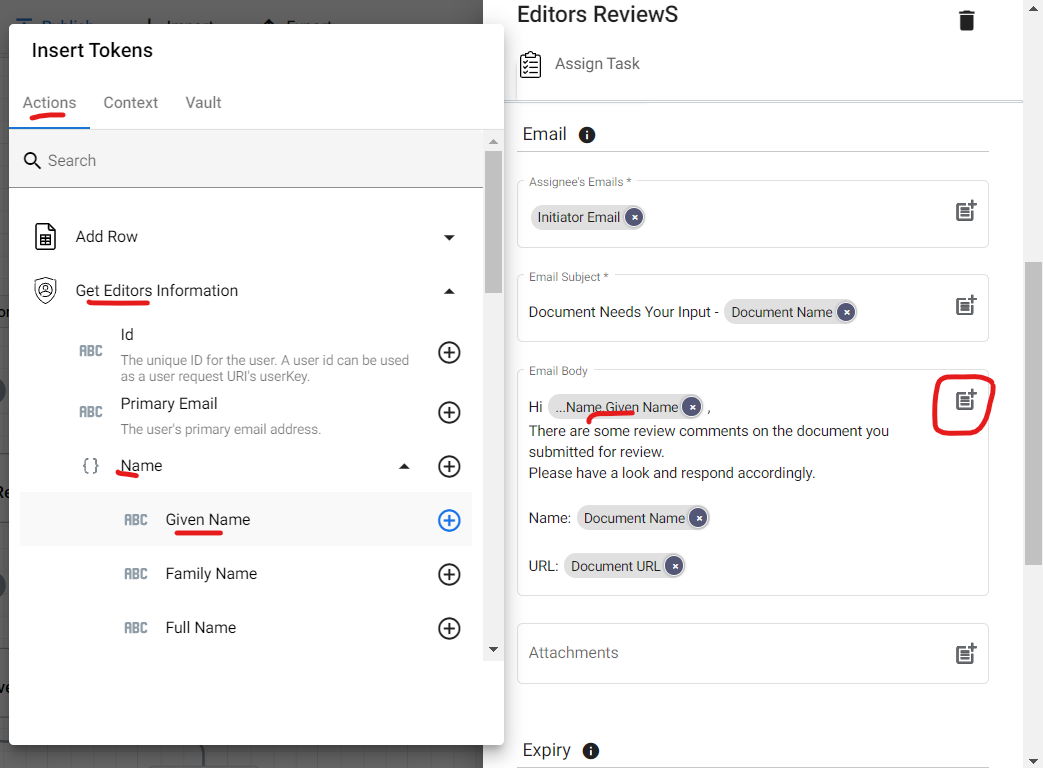
To set up the Email body, click the parameter icon, and then click Get Editor’s Information. From the dropdown list, click Name and select Given Name.
Go back to the Designer panel and click Control Flow, and then drag and drop If Condition.

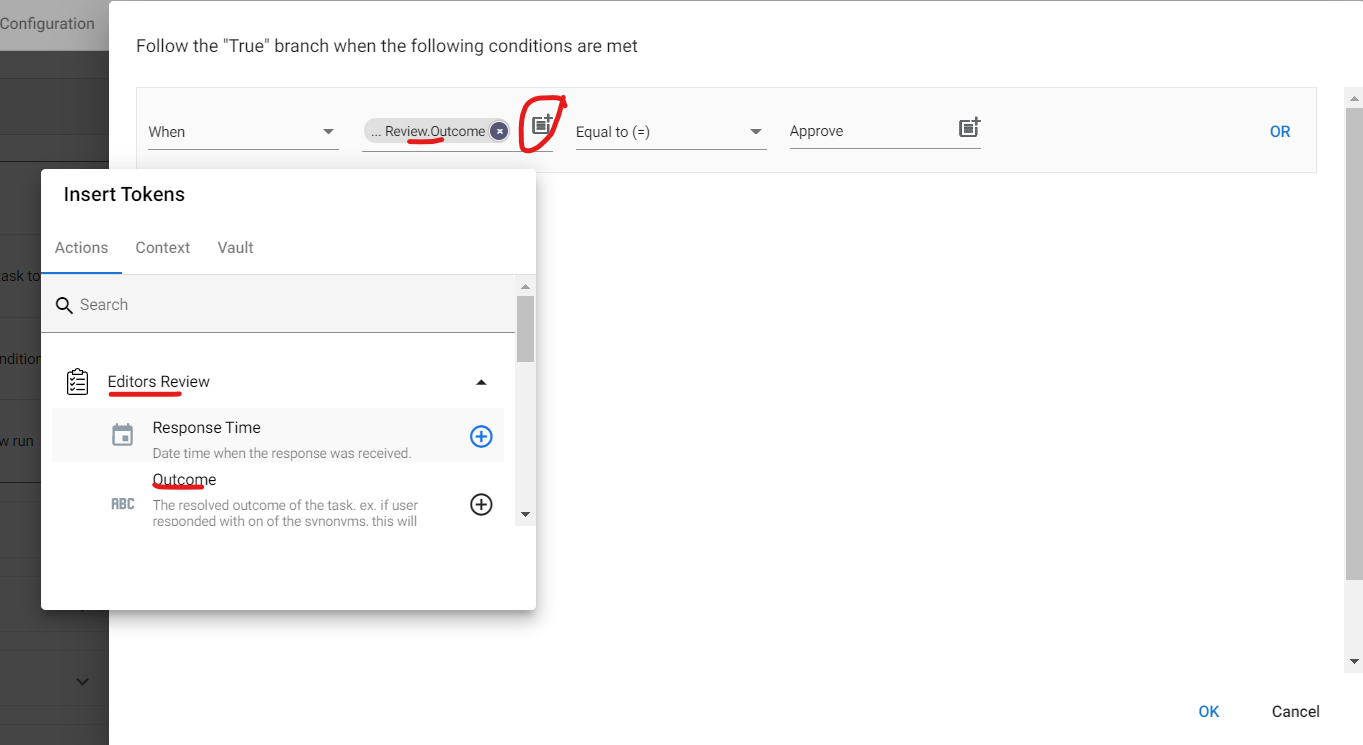
Configure by naming the step properly and setting the clause.
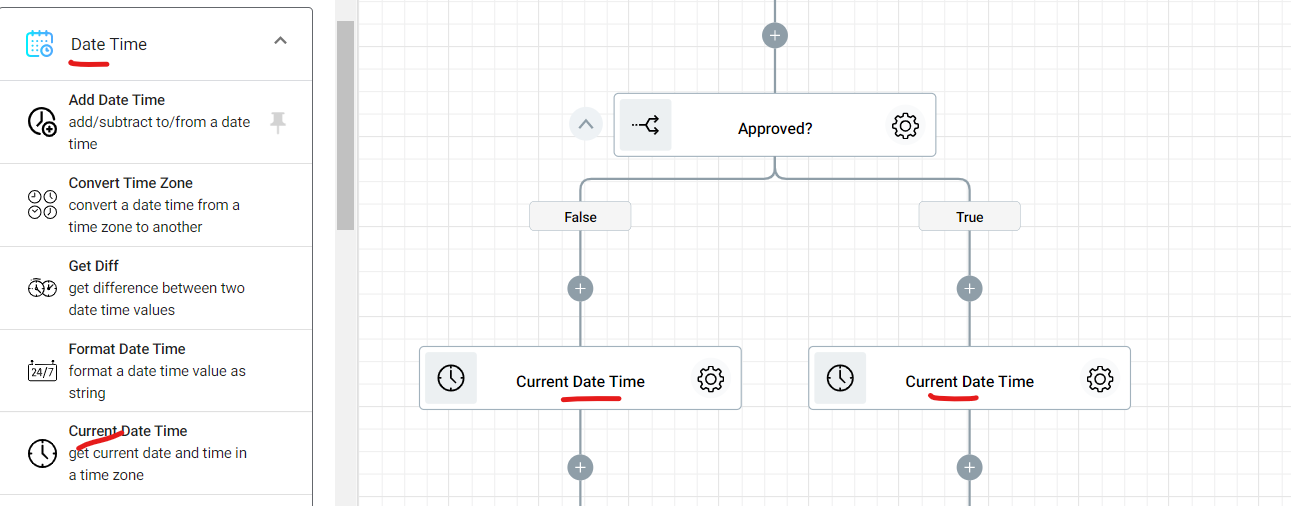
From the Designer panel, click Date Time, and then drag and drop Current Date Time to False and True branches.
False
Click Google Sheets from the Designer panel, and then drag and drop Add Row to the False branch. This step will log the rejection step of the Editor.
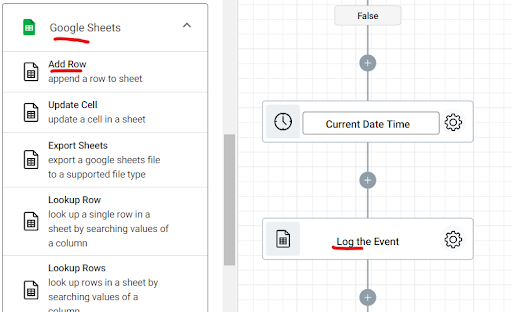
To configure this step, click the Settings icon. Name the step and set the Connection to the same Drive where the Blog Post Approval log sheet is.
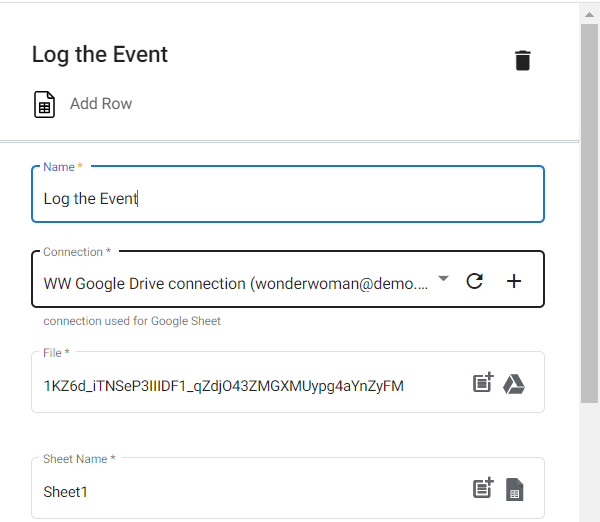
Just like with the previous steps, the File section should contain the id file of the Approval log sheet.
Scroll down and enable Has Header. Add all the columns within your log sheet.
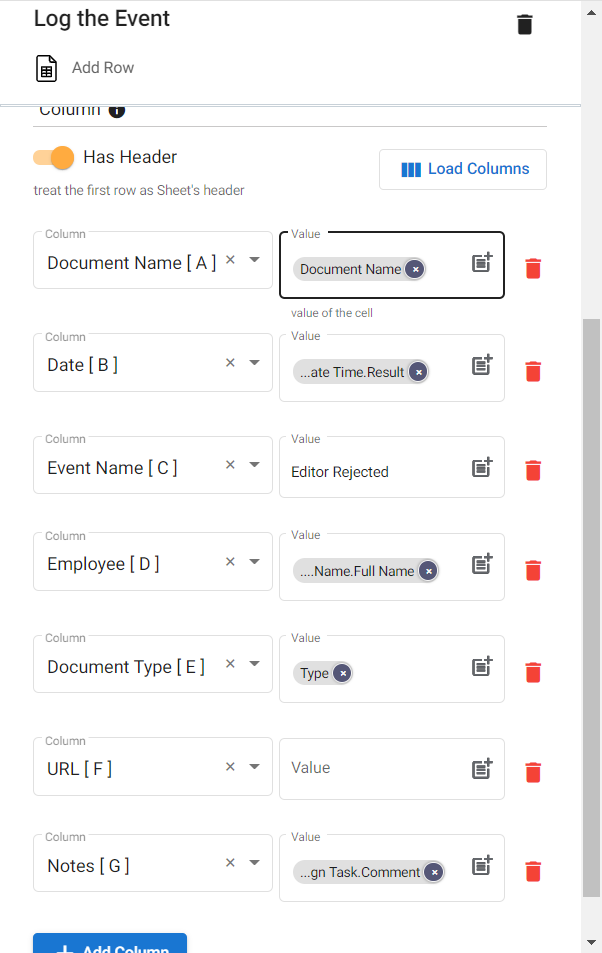
Configuring the value of each column.
Document Name[A]:
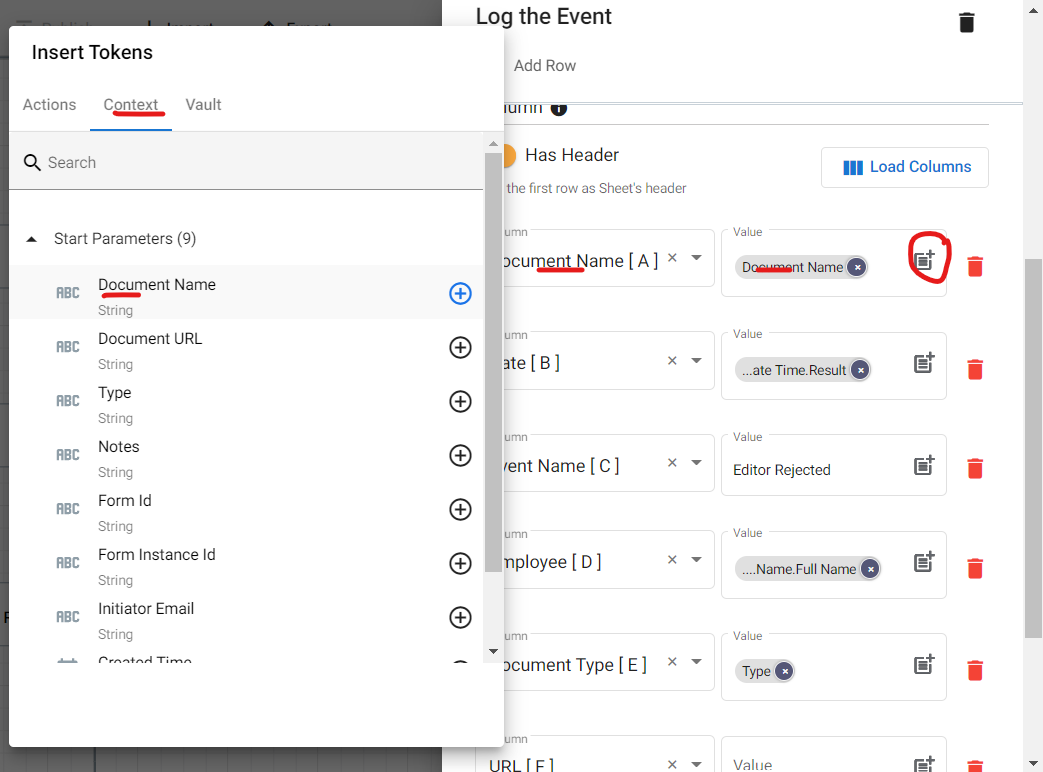
Date[B]:
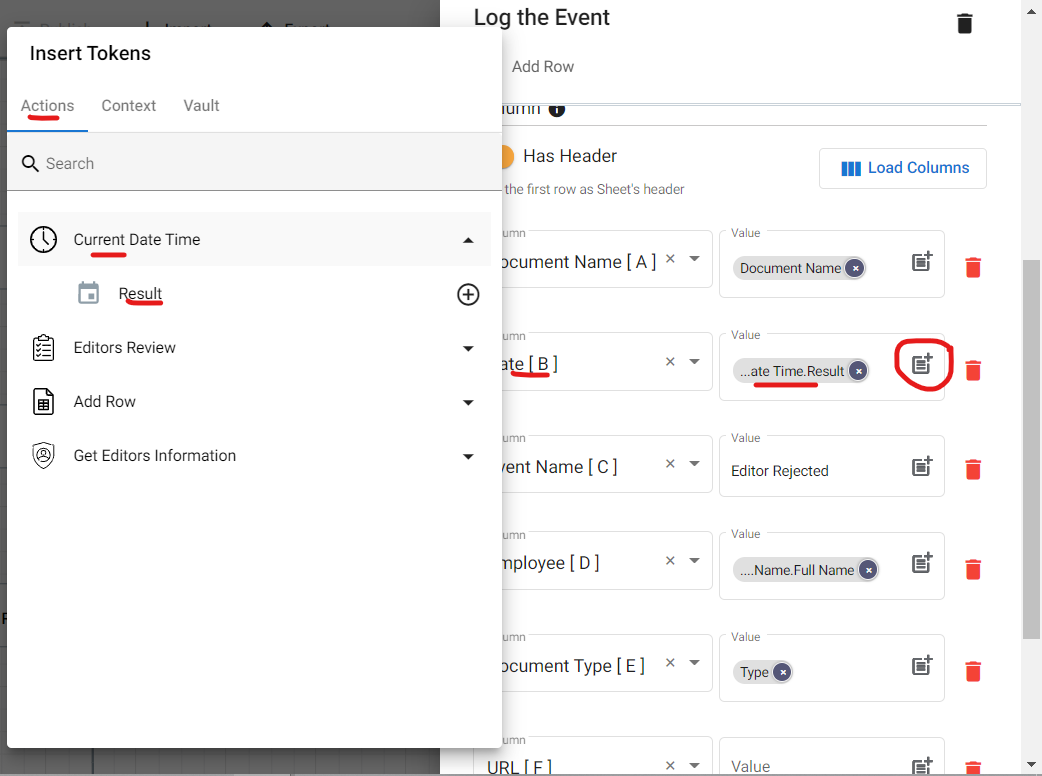
Event Name[C], type in “Editor Rejected”.

Employee[D]:

Document Type[E]:
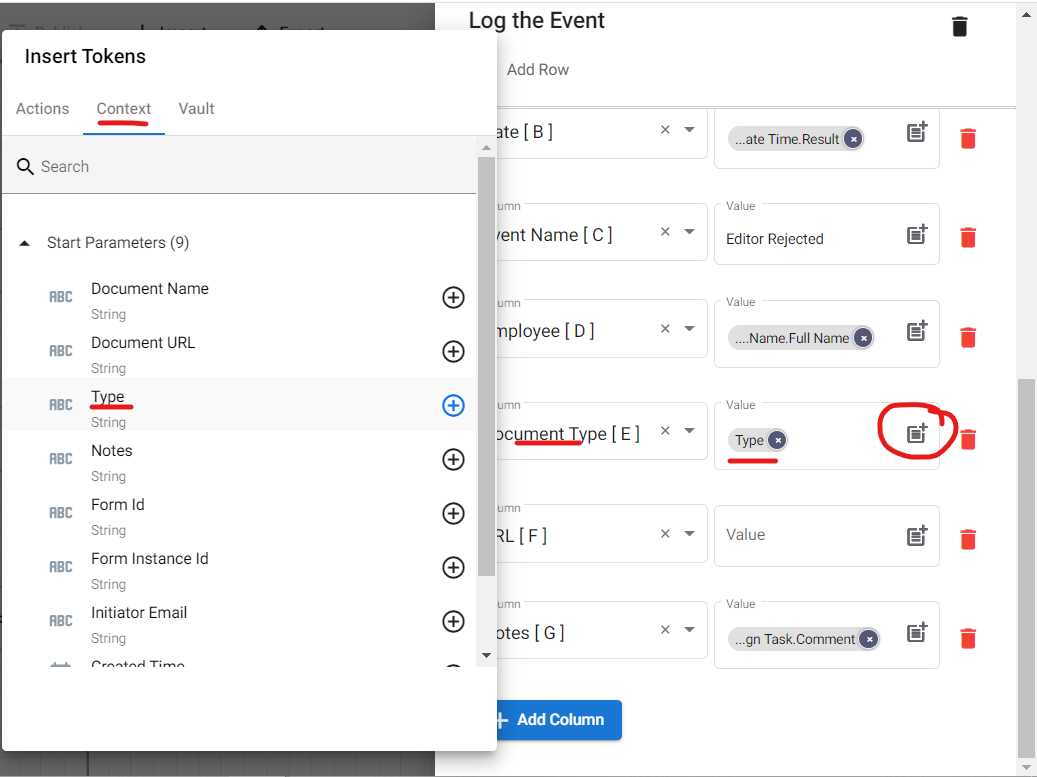
URL[F]:
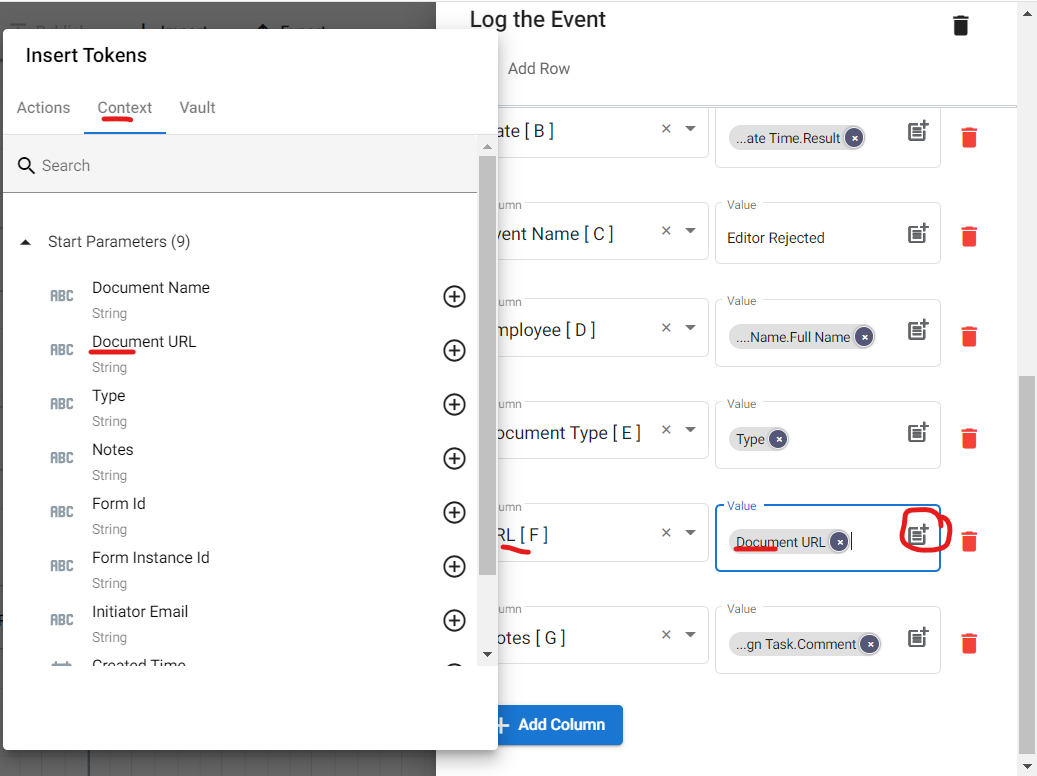
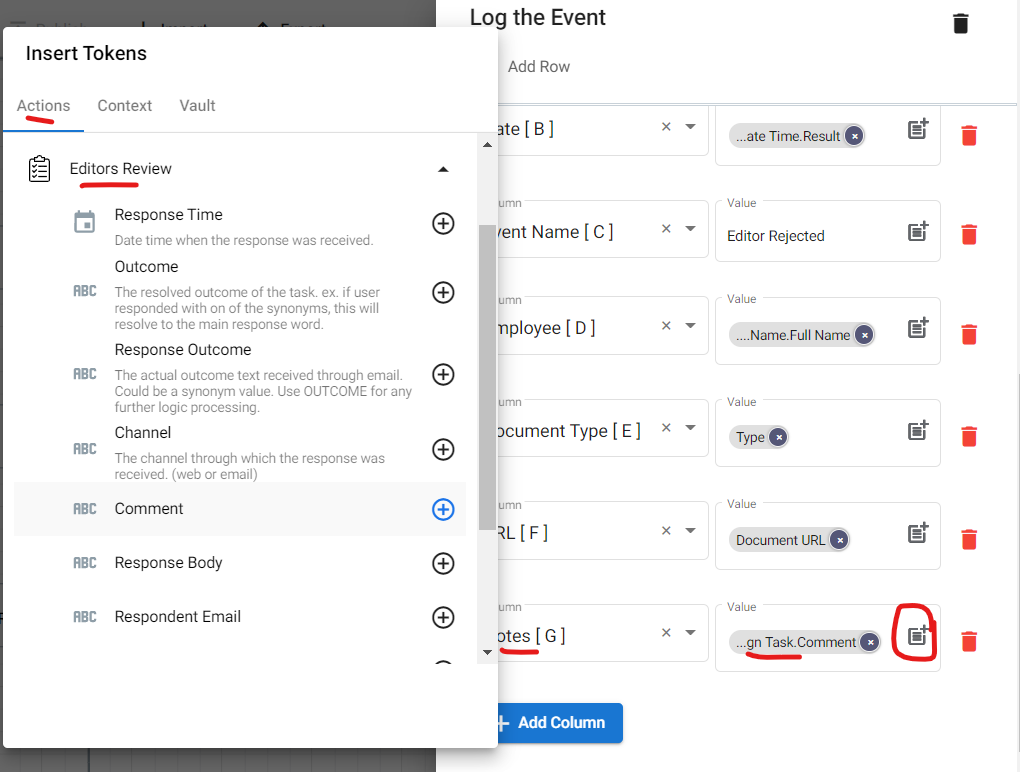
Notes[G]:
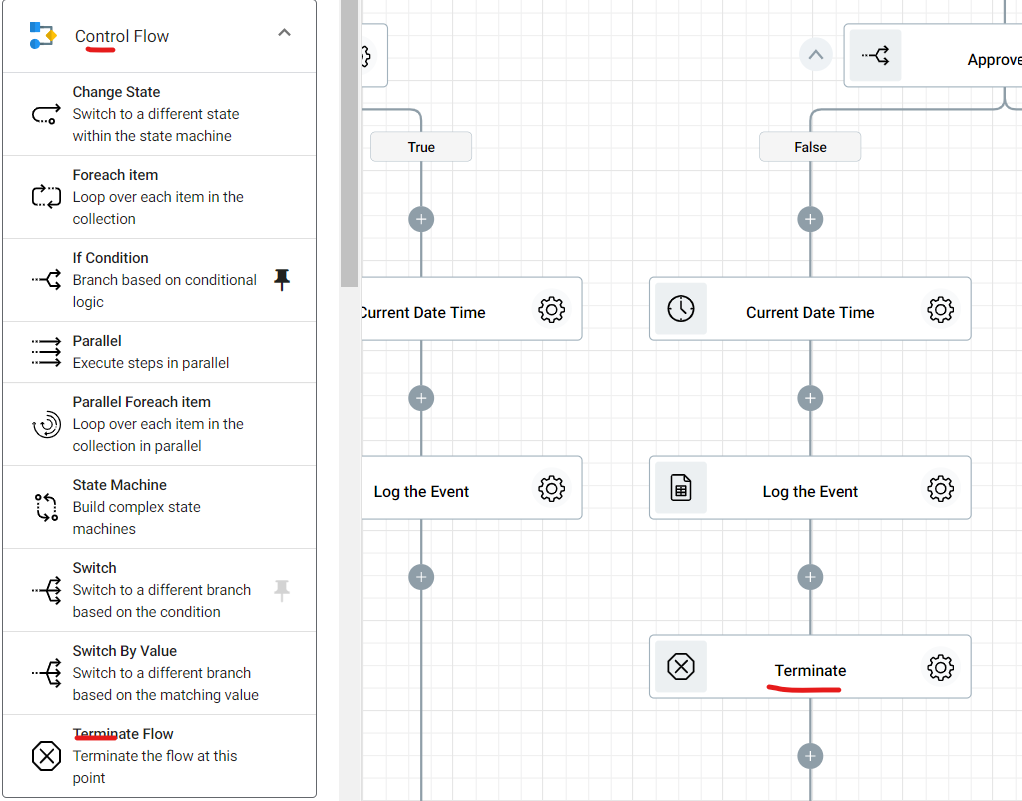
Going back to the Designer panel, click the Control Flow, and then drag and drop Terminate Flow.
True
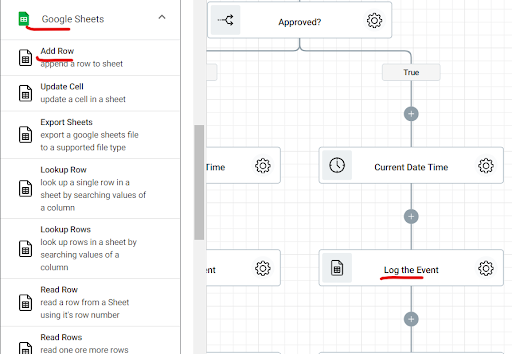
At the Designer panel, click Google Sheets and drag and drop Add Row.
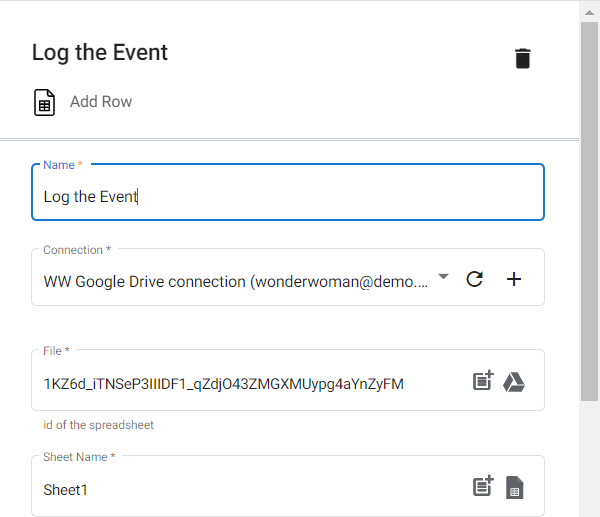
Configure the step by clicking the Settings icon. Assign a Connection(still the Google Drive where the Approval sheet is located.)
In the File section, retrieve the file id of the Blog Post Approval log sheet.
Add all the columns and configure their value.
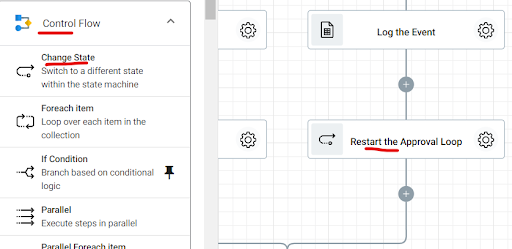
From the Designer panel again, click Control Flow, and drag and drop Change State.
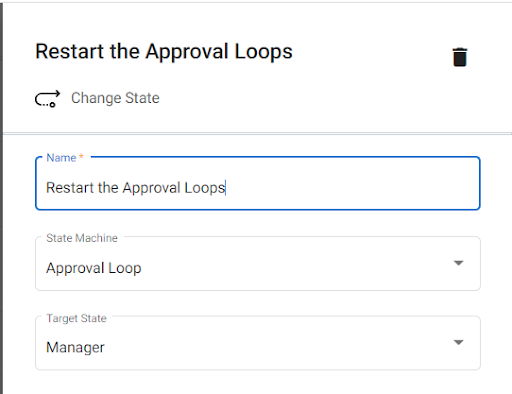
In configuring this step, go to Settings. Assign a name to this step, and then click the State Machine section and select Approval Loop. Lastly, assign the Target State as Manager. In this step, the Editor(writer) will check the document and implement the necessary edits. Once done, the Editor will approve the task and the edited document will be sent back to the Manager for checking.
Step #7:
Click Gmail from the Designer panel and drag and drop send email below the Manager, Chief Editor, and Editor branches. This step commences when both Manager and Chief Editor approve the document. An email will then be sent to the editor containing the approval message.

To configure this step, go to settings. Assign a name to the step.
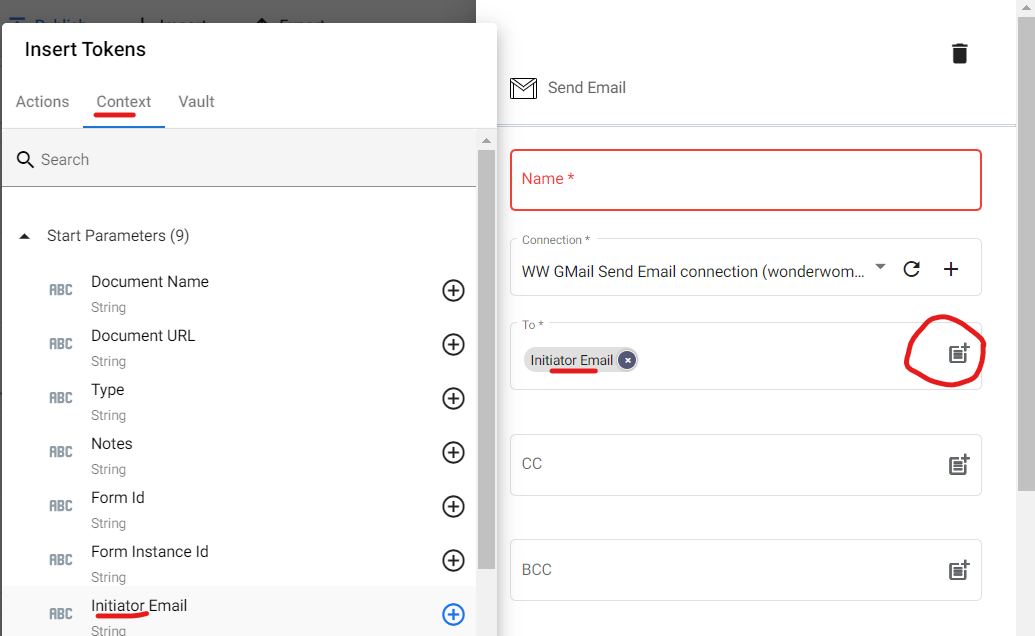
For the To section, click the parameter icon, the Context. From the dropdown list, select Initiator Email.
You can configure the Email subject by clicking the parameter icon followed by Context. From the list, select Document Name.
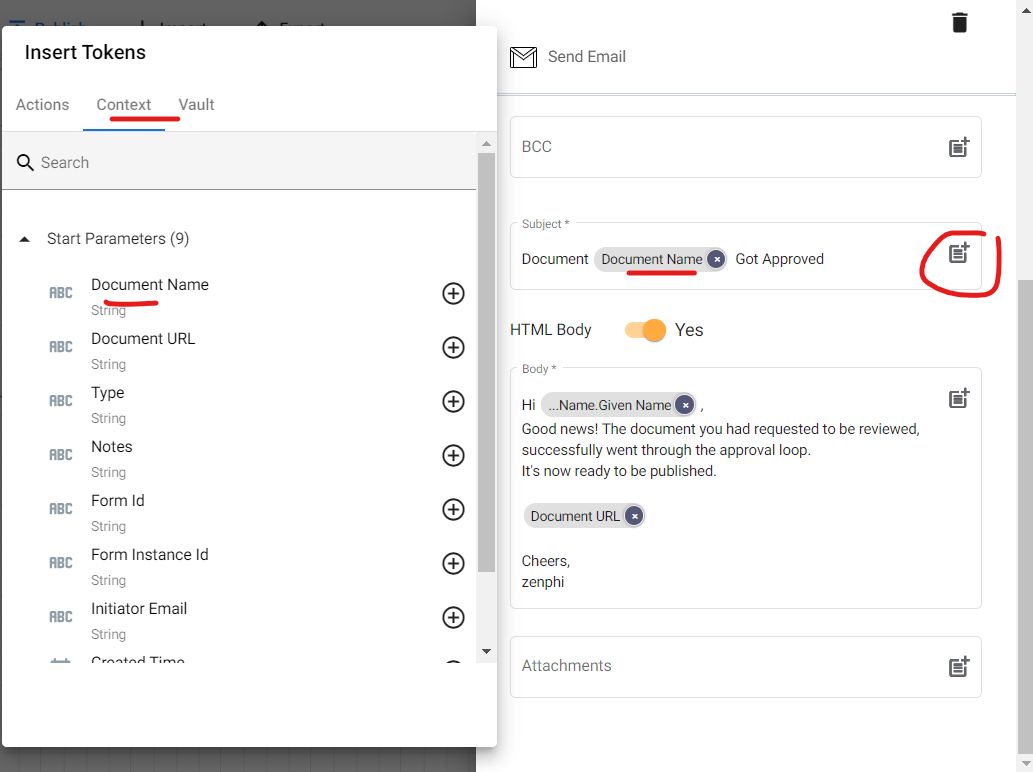
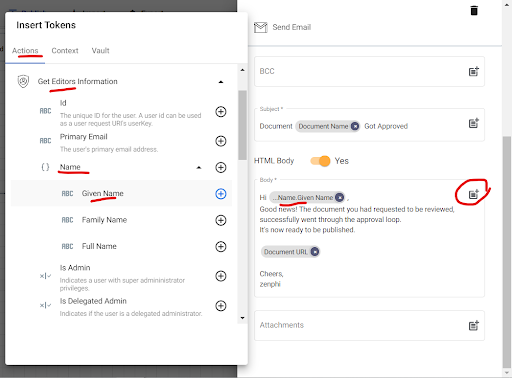
In configuring the Email body, click the parameter icon then Get Editor’s Information. From the dropdown, click Name and select Given Name.
Prev post
Next post

Ana from ZenphiAI Automation For Procurement , AI Document Processing , AI Enablement For Finance Teams , AI Enablement For Sales Teams , AI-Powered Workflows For HR , Approval Workflows , Operationalize AI For BusinessAI Workflow Automation, google workflow automation, Google Workspace, Workflow Automation Tools
Ten practical AI agent use cases that companies are already implementing — and that will define business process automation in 2026 and beyond. Real-world enterprise & SME examples.

Ana from ZenphiOperationalize AI For BusinessAI Workflow Automation, google workflow automation, Google Workspace, Workflow Automation Tools
We’ve compared the top 10 AI workflow automation tools in 2026, including their strengths, weaknesses, and best-fit use cases — with a special focus on how they support Google Workspace and beyond.
