Jira and Google Workspace are two tools that can help you get your tasks done. But sometimes, if you don’t properly integrate them, they can eat into your team’s time instead. So what is the best way to set up your Google Workspace and Jira automation workflow? And how do you use these tools to actually be more productive? In this article, I’ll share two ways to get the most out of Jira and Google Workspace. Specifically, we’ll review the automation of Jira with Google Sheets and Google Forms.
Google Workspace and Jira automation: A starting point
Jira is a tool for tracking issues and projects. It helps development teams coordinate and manage software releases.
Google Workspace is a cloud-based office suite that includes Google’s productivity and collaboration tools like Google Forms, Sheets, Slides, Calendar, and more.
To automate those two tools, we’ll use Zenphi. Zenphi is a no-code business process automation platform built explicitly for Google Workspace users. It enables you and everyone in your company to automate their processes without writing a single line of code.
If you don’t have a zenphi account yet – create one for free.
Automate Jira and Google Sheets
Jira is a great task management tool, but when it comes to generating reports, sometimes you want to use something familiar, like Google Sheets. However, doing it all manually can be a headache. With zenphi, you can automatically transfer all the Jira issues to Google Sheets and create reports from there.
Time to set up: 10 min
Step 1. Create a Space.
Create a Space – a home to your process automation – in a couple of clicks.
Step 2. Create Google Sheets.
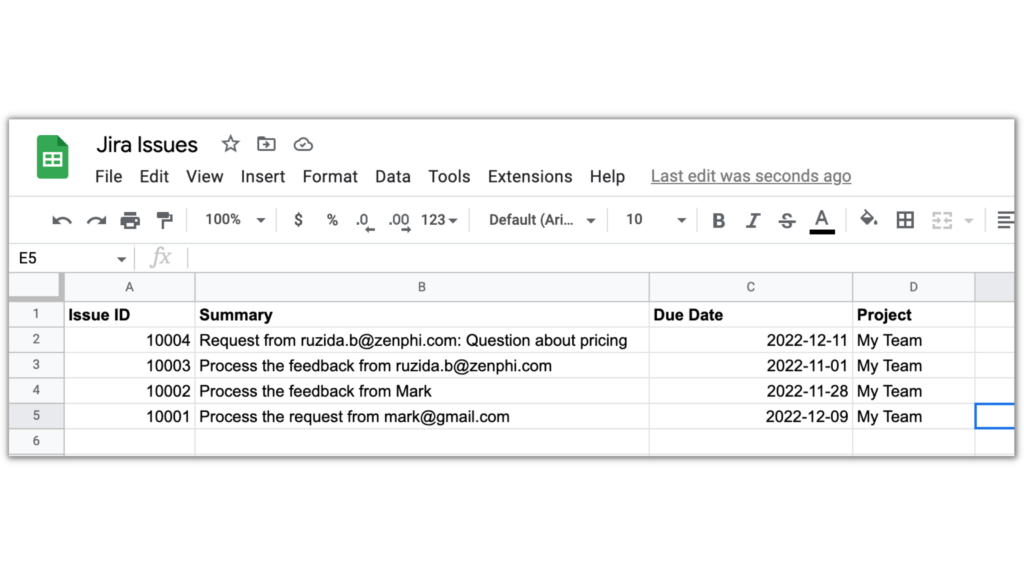
Create a sheet where you want to import your Jira Issues and map out all the required parameters. For example, Issue ID, Issue Due Date, Summary, Assignee, Project, etc.
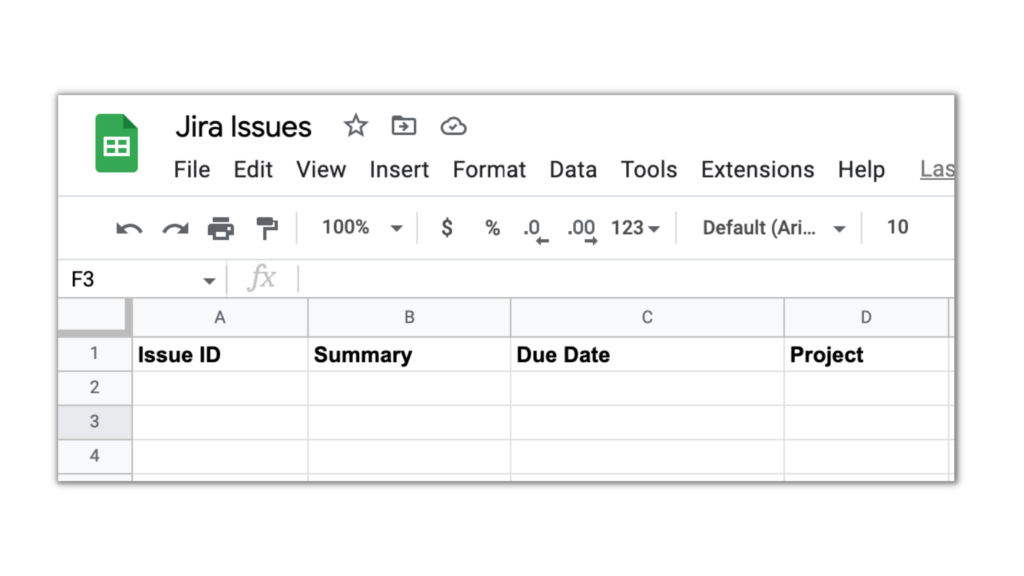
Step 3. Create a Jira Automation Flow.
Flow is your visual automation builder. Create a new one and choose a Scheduled Flow as a Trigger. It means that the automation will be launched on a set schedule. For instance, every day.
Now, you are in the Flow Designer. That’s where you’ll drag and drop the Actions – the automated steps of your process – to your Trigger.
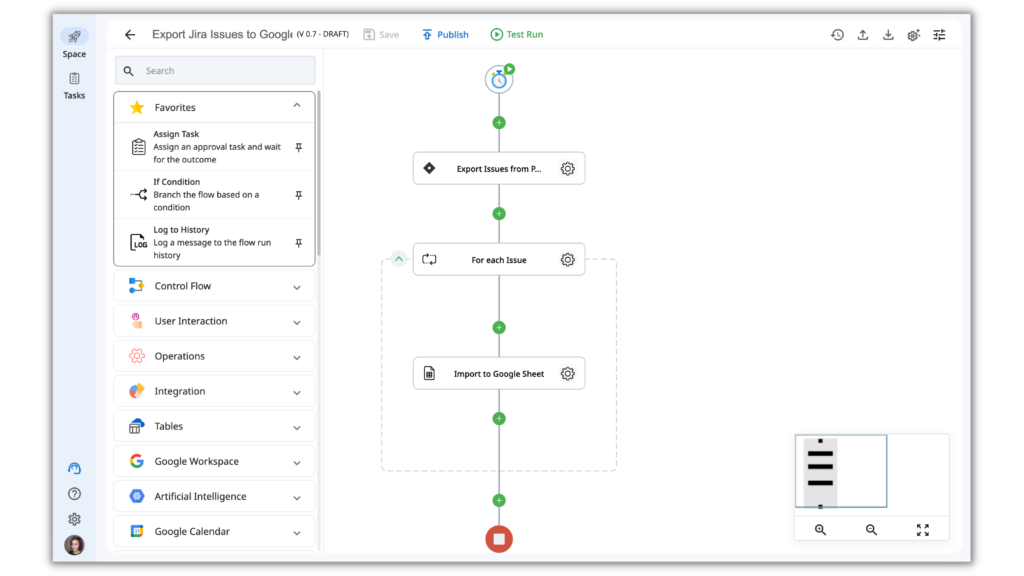
This Flow will read the Jira Issues that we indicate by conditions, and for each found Issue, it will generate a Row in the specified Google Sheet.
Let’s see how you configure each step of your Flow in more detail.
Set up the Trigger.
To do that, just click on the Trigger icon, and indicate the conditions from the right sidebar that appears. Let’s say that we want to export the Jira Issues every day.
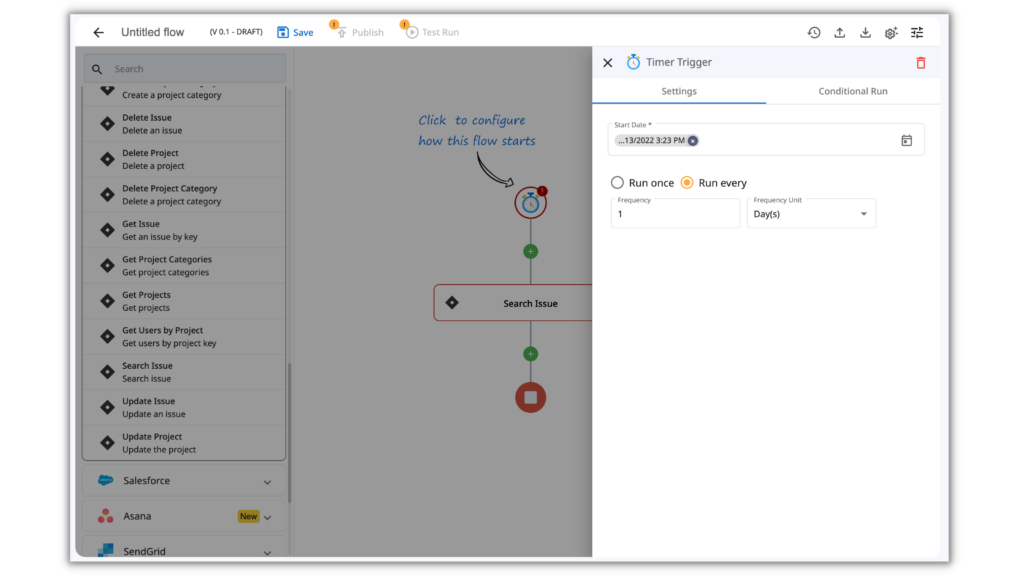
Drag and Drop the “Search Issue” action from the Jira section.
Click on the gear icon inside this action once you attach it. In the right sidebar that will appear, you’ll need to configure a few details.
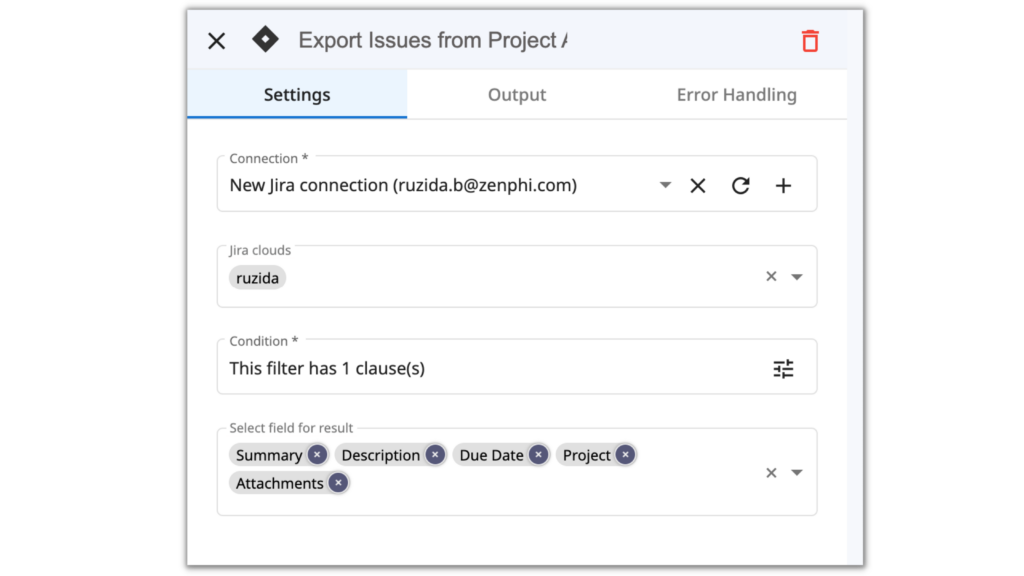
1. Jira Connection – connect your Jira account, so zenphi can find the Jira Issues. It’ll take you a few seconds and it’s absolutely secure.
2. Jira clouds – once you authorize the Jira account, zenphi will automatically show you the clouds that are connected to this account.
3. Condition – indicate the parameters of the Issues you want to export. It can be all the Issues from a specific Project or with the specific Due Date.
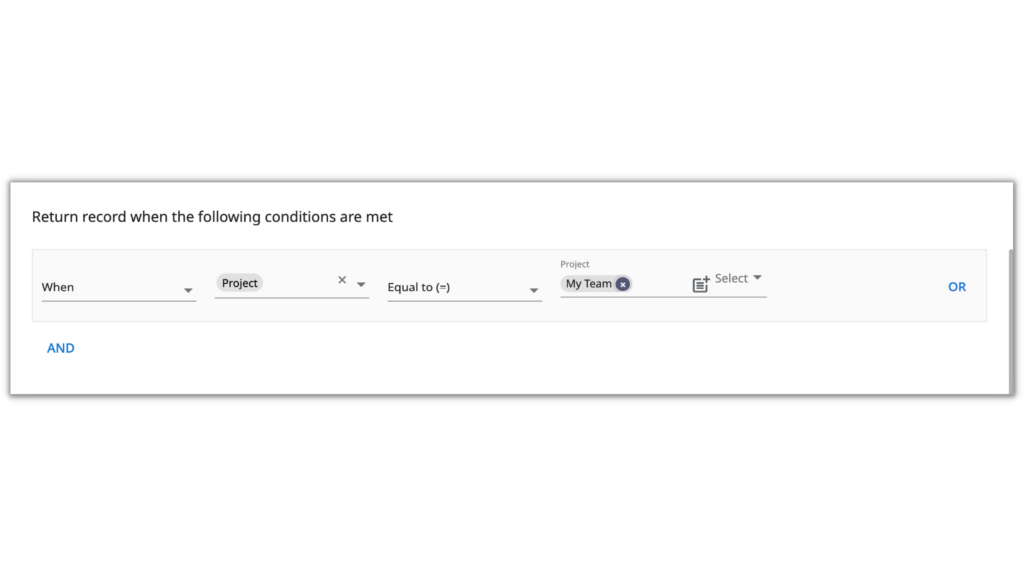
4. Select fields to return – indicate what Issues data you want to export.
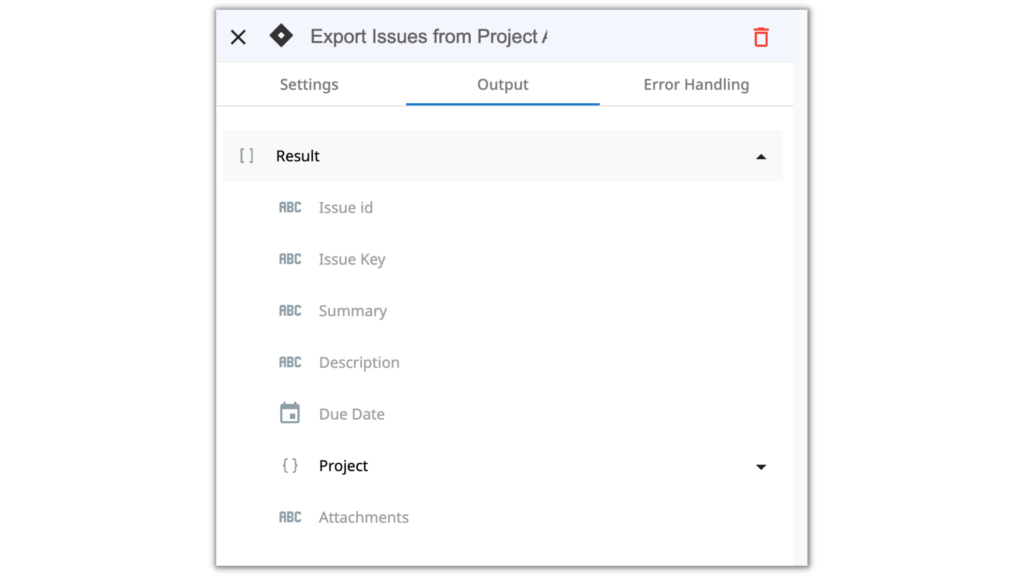
To check what data is going to be returned with this action, switch to the Output section. Later, you’ll be able to use this data in your further actions.
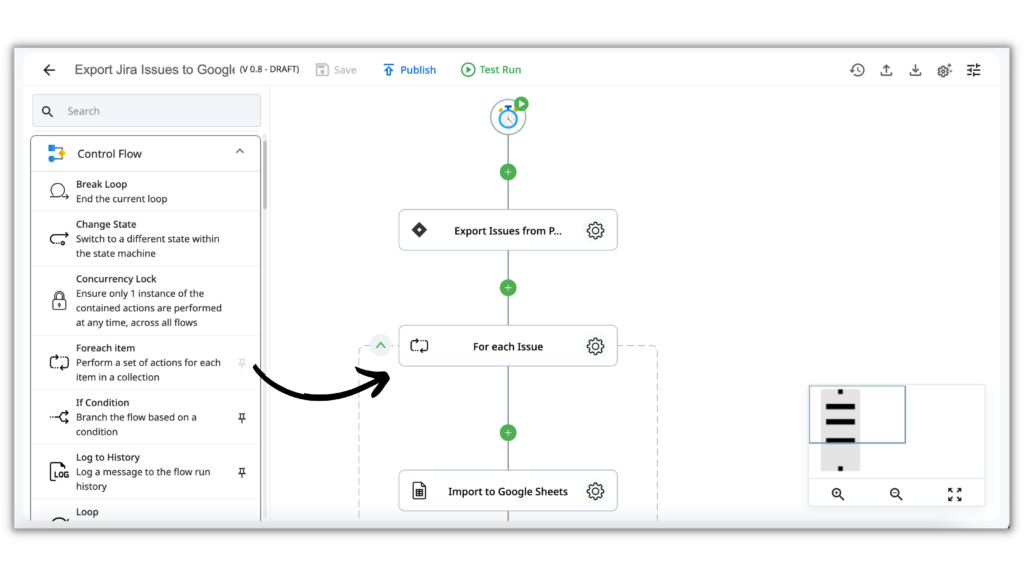
Drag and Drop the For each Item action from the Jira section
As we probably have multiple issues to export from Jira, zenphi will return the Collection of Issues. However, we need to put each Issue to the Google Sheet one-by-one. That’s why we use another zenphi action called For each Item. It will take the Collection of Issues and process each of them separately.
Again, click on the gear icon to set up this action. In the Collection fields, we need to indicate the Collection of the Jira Issues that were found with the previous Search Issue action. For that, we’ll use the Token Picker. With the Token Picker you can find the data that is coming from all the Actions and the Trigger in this Flow.
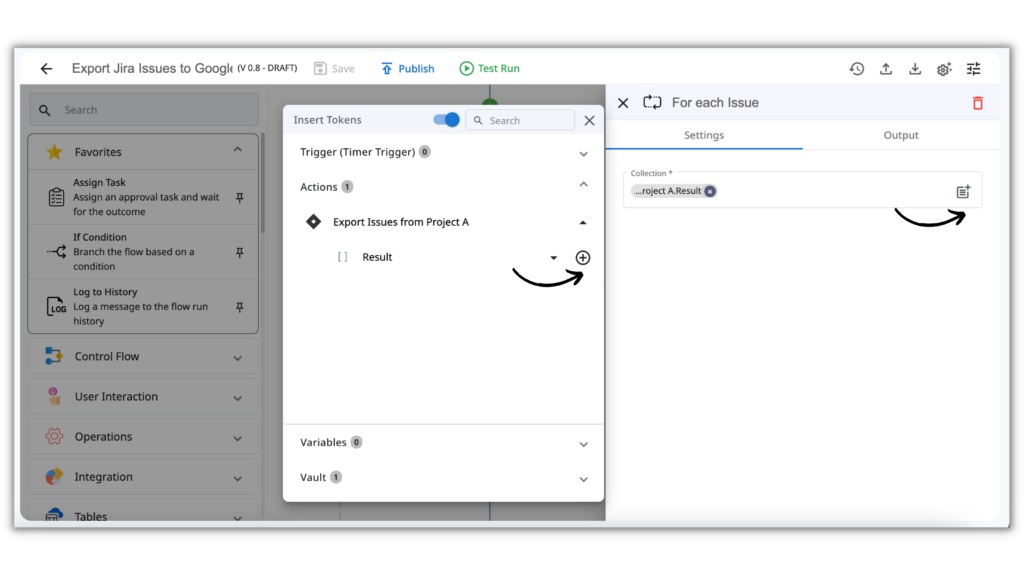
The Output of the Foreach Item Action will be the Jira Issues details that we’ll put to Google Sheet in the next action.
Drag and Drop the “Add Row” action from the Google Sheet section
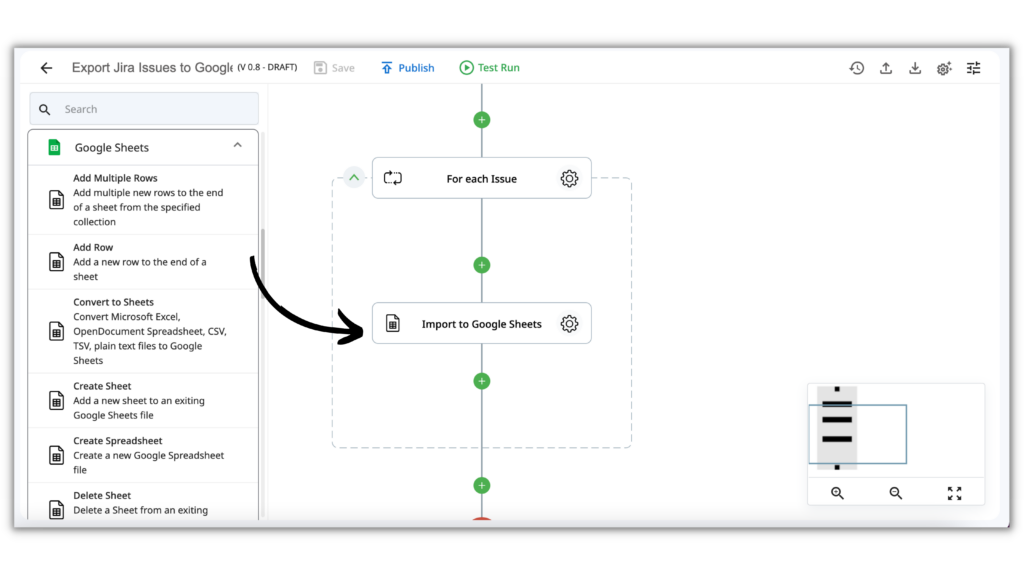
Here are the fields that we need to set here:
-
- Connection – Authorize your Google Sheet account.
- File – click on the Drive icon and find the file we created at Step 2.
- Sheet Name – click on the Sheet icon and choose the needed Sheet from the dropdown.
- Columns – click on the Load Columns button and zenphi will automatically read the columns you have in the chosen Sheet.
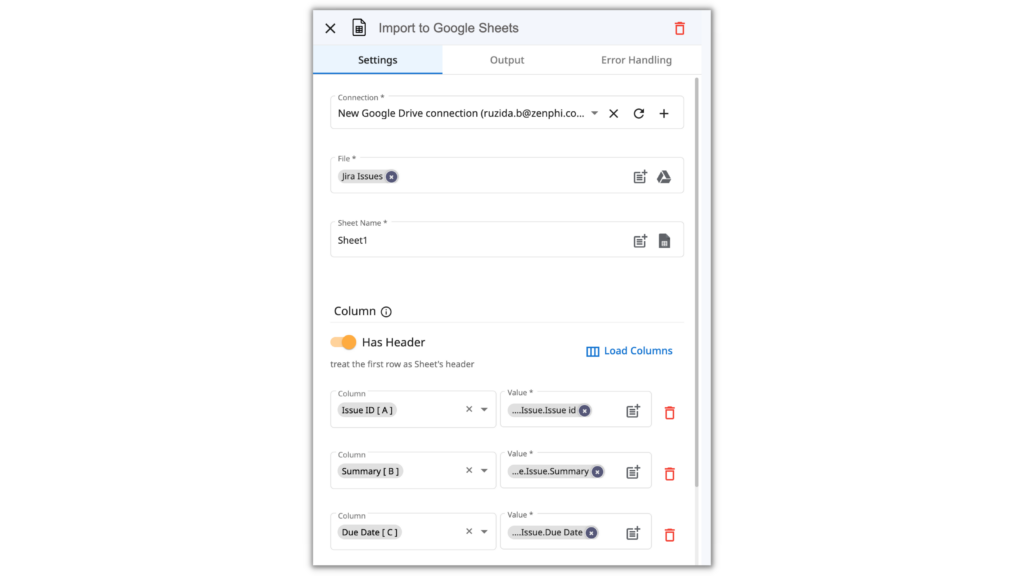
Now, we need to map out what data will be imported to each column. To do that, we’ll use the help of the Token Picker again.
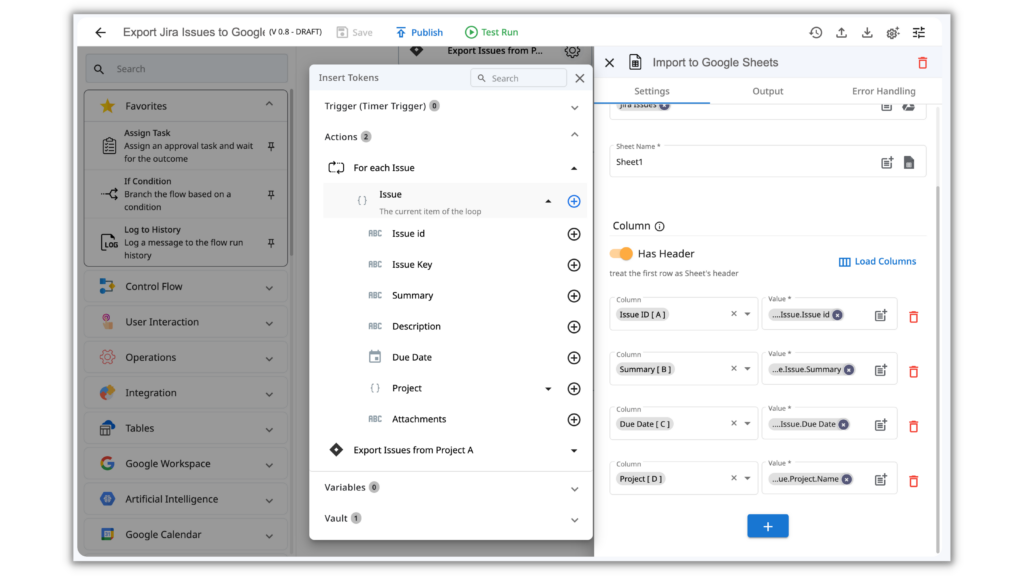
Click on the Token Picker icon in the Value fields, and choose the parameter from the Foreach Item Output. Do this for each Column Value.
Step 4. Test your Jira Automation Flow.
Our Flow is ready, and it’s never a bad idea to test the automation before launching it. Luckily, with Zenphi you can do it in two clicks. Firstly, Save your Flow. Then, click on a Test Run button and choose the “Start a new test instance” option.
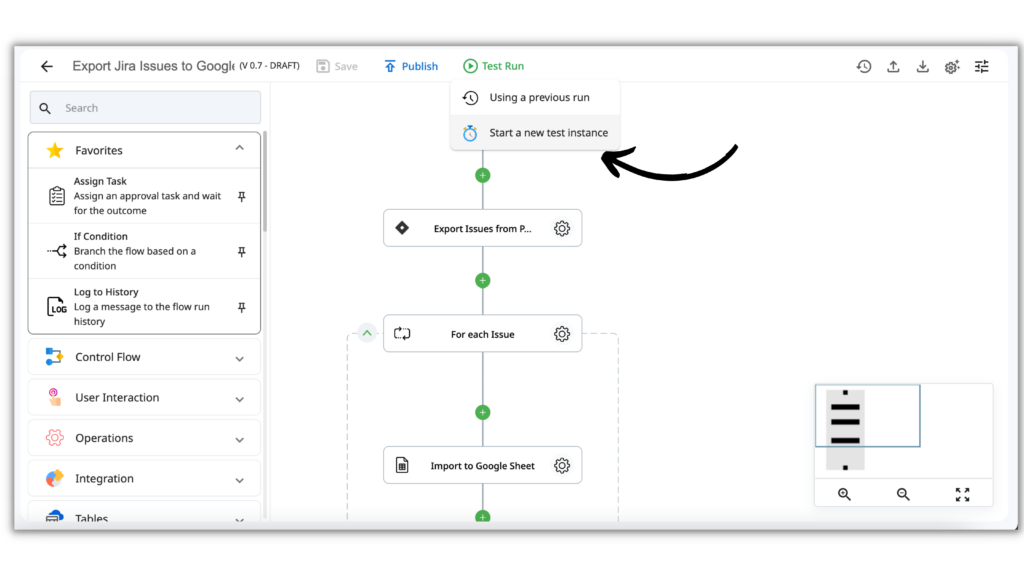
Once the test has started running, you’ll see how all the steps are processing from the left sidebar.
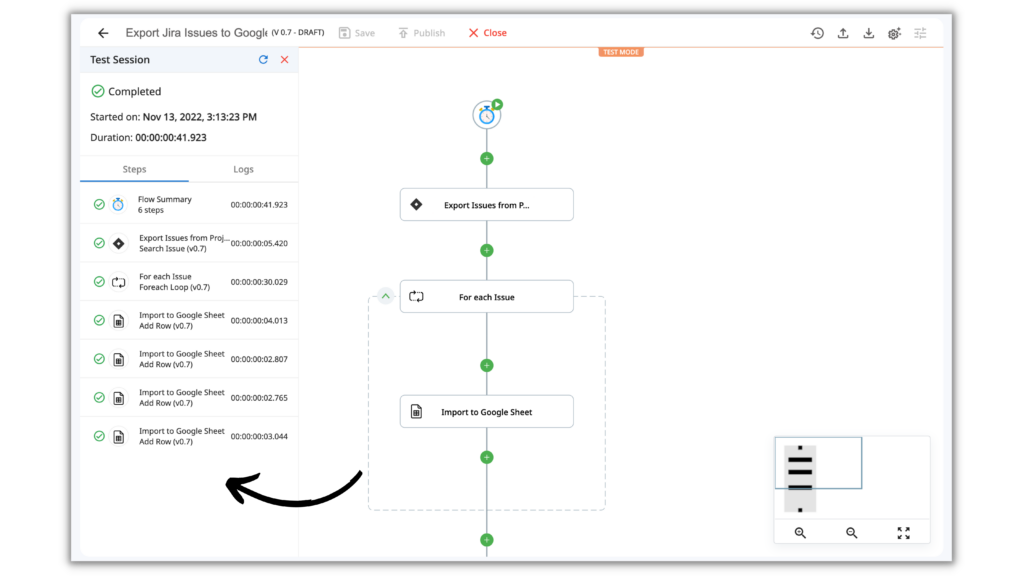
When the Test is complete, you should see all the Jira Issues in your Google Sheet.
Step 5. Publish.
When you are satisfied with the Test Results, Publish your Flow. Once it’s published, you’ll get all the needed Jira Issues right into your Google Sheets once a day.
Pro Tip for Jira Automation
With zenphi you can go even further, and send the Google Sheet report to your teammates using Send Email action, share access to this File, or even automatically create Google Slides presentation with the data from the Google Sheet.
Automate Jira and Google Forms
Google Forms is a tool that allows users to collect data online quickly and easily, with a simple user interface and advanced editor functions. With zenphi, you can automatically create and update Jira Issues when Google Forms Workflow Automation is submitted.
It’s can be especially useful in a few cases:
Automate Customer Support queries
All customer support queries can be easily added straight to your Jira board without extra layers of tools. Moreover, zenphi will route the support query to the right team, assign it to the right person, and automatically put the right priority according to the conditions you set.
Alternatively, your customer support managers can initiate the Jira Issue from the Google Form. As a result, it can prevent errors in the Issue descriptions, and save you some money, as you don’t have to create a Jira account for all your Support team members.
Automate Internal Support queries
The support queries can come not only from the customers, but from the business users as well. The cost and overhead of providing Jira access to the entire organization and providing ongoing maintenance and training can be too high. That’s when it’s worth automating Jira with Google Forms. Let’s learn how you can do that in zenphi.
Time to set up: 10 min
Step 1. Create a Space.
Create a Space – a home to your process automation – in a couple of clicks.
Step 2. Create Google Form.
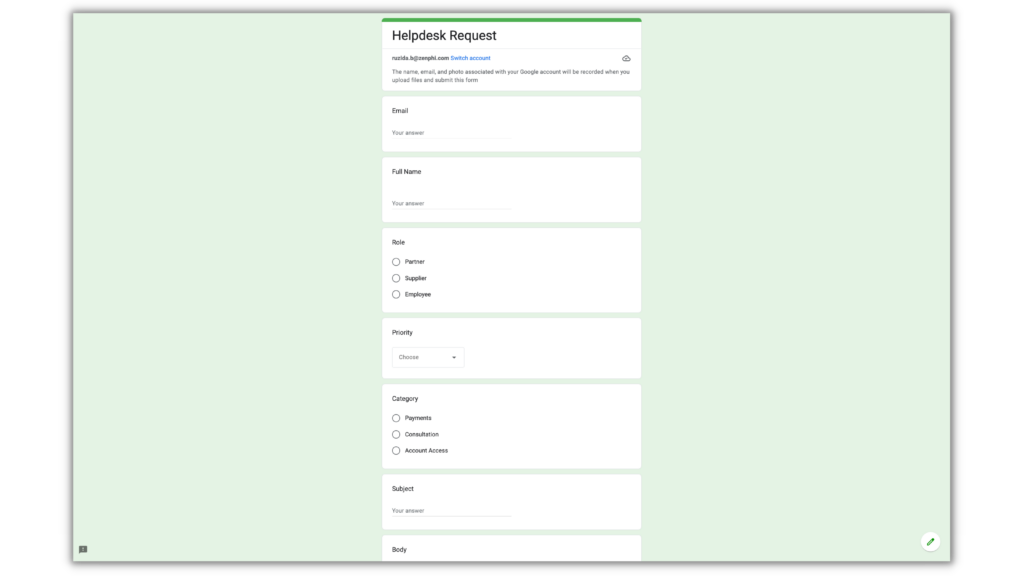
Create a Google Form with all the necessary information you want to collect. For example, requester email, name, role, issue priority, issue topic, etc.
Step 3. Create a Jira Automation Flow.
Flow is your visual automation builder. Create a new one and choose a Google Form Submission as a Trigger. It means that everytime someone submits a specific Google Form the Flow starts running.
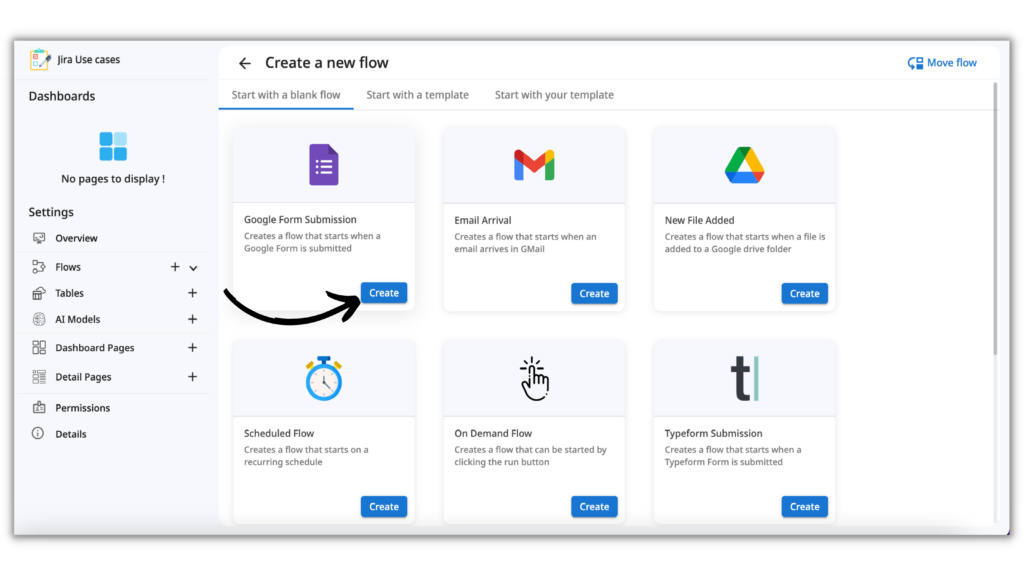
Now, you are in the Flow Designer. That’s where you’ll drag and drop the Actions – the automated steps of your process – to your Trigger.
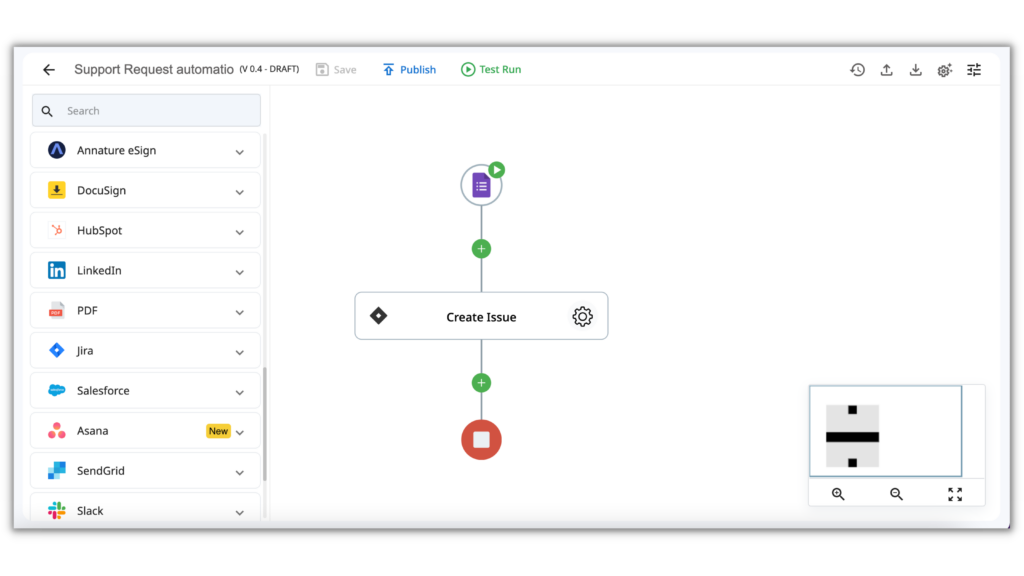
This Flow will read the answers from the Google Form that has just been submitted, and generate a Jira issue for each.
Let’s see how you configure each step of your Flow in more detail.
Set up the Trigger.
To do that, just click on the Trigger icon, and indicate the conditions from the right sidebar that appears.
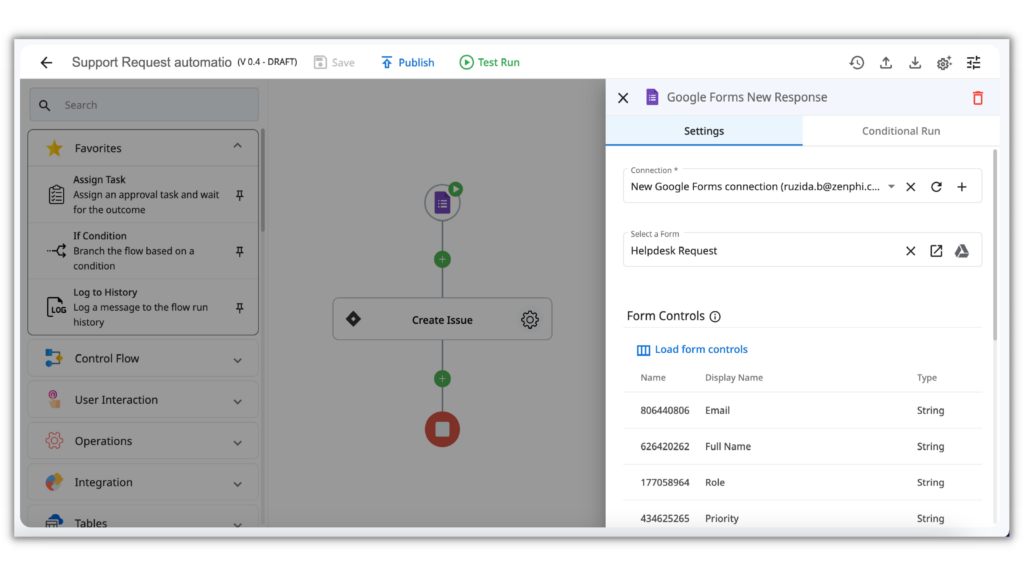
Here are the fields that we need to set here:
-
- Connection – Authorize your Google Form account. It takes a few seconds and it’s absolutely secure.
- Select a Form – click on the Drive icon and find the Form we created at Step 2.
Click on the Load Form Controls button to see what data will be transferred with the Trigger further within the Flow.
Drag and Drop the “Create Issue” action from the Jira section.
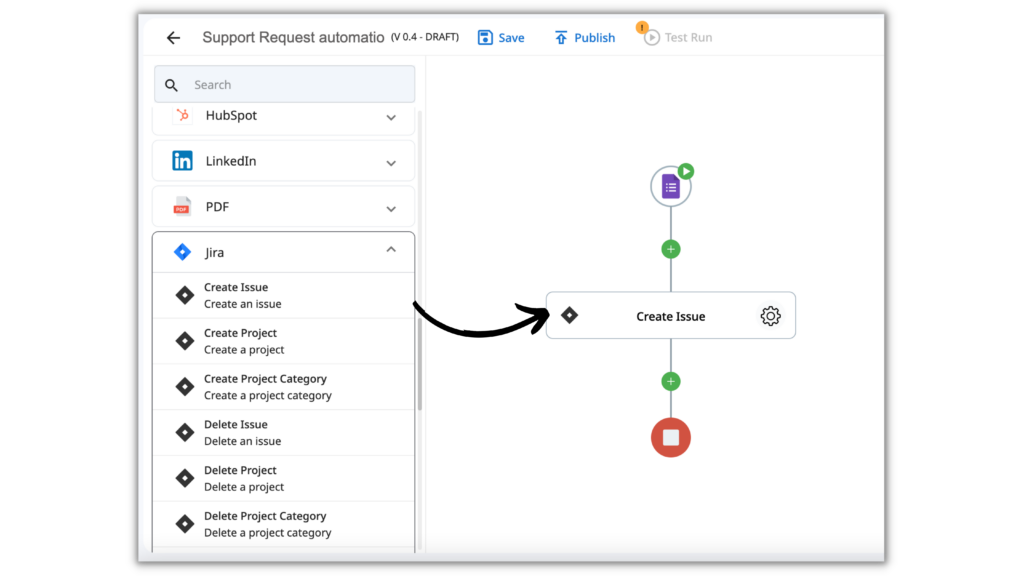
Here are the fields that we need to set here:
-
- Connection – Authorize your Jira account or choose the account from the dropdown.
- Jira clouds – once you authorize the Jira account, Zenphi will automatically show you the clouds that are connected to this account.
- Jira Projects – where do you want to create the Issue.
- Issue Type: Epic or Task
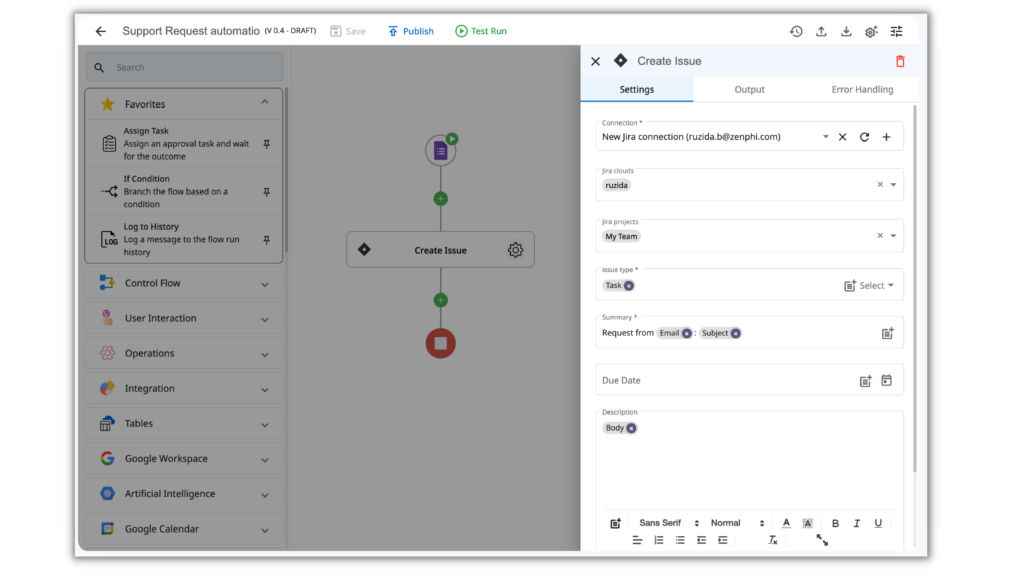
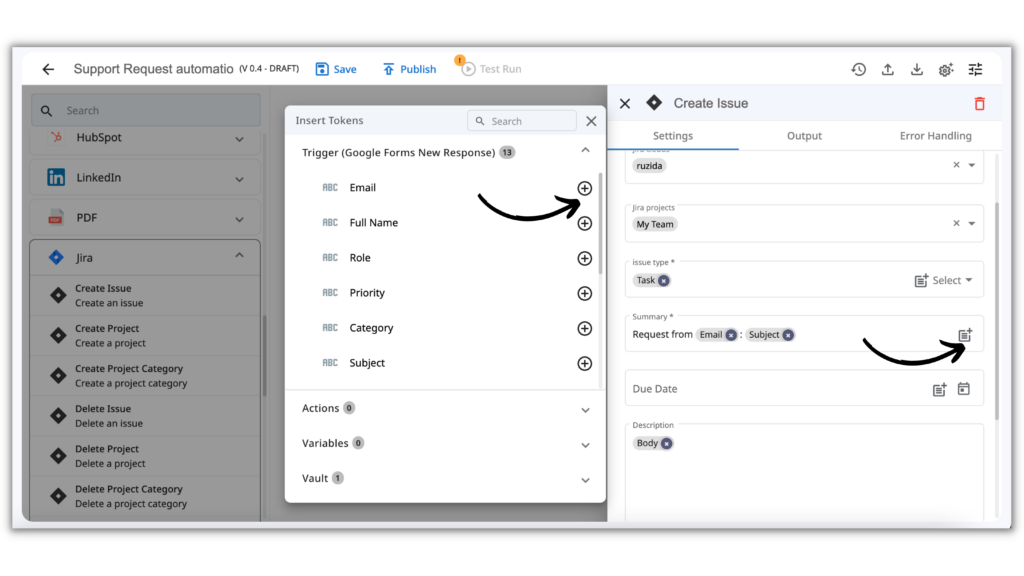
In the next fields, we need to put the answers from the Google Submission that were found with the Trigger. For that, we’ll use the Token Picker. With the Token Picker you can find the data that is coming from all the Actions and the Trigger in this Flow.
-
- Summary – the title of your Issue
- Due Date
- Description
- Attachments – choose from a Token Picker
Step 4. Test your Jira Automation Flow.
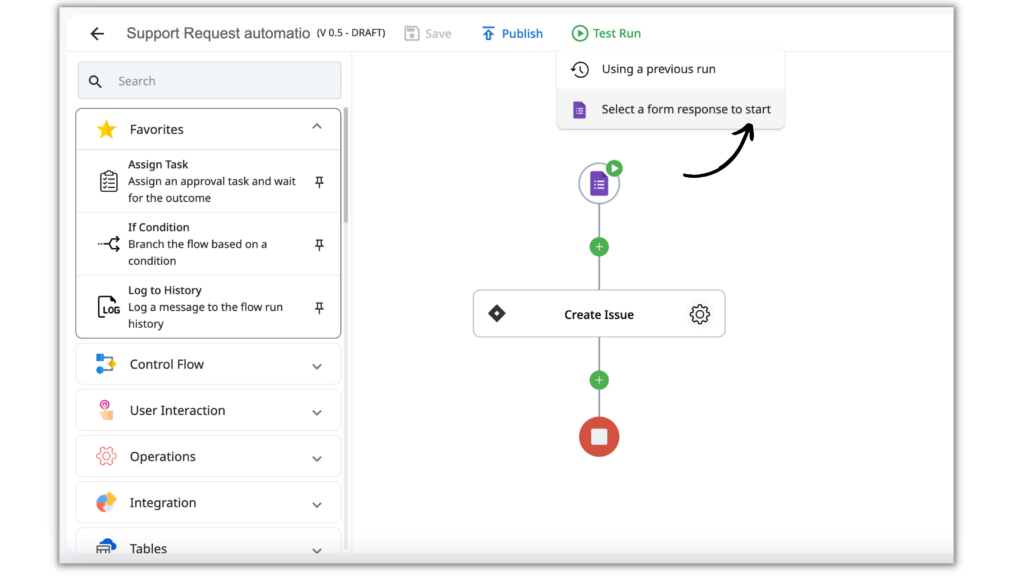
Our Flow is ready, and it’s never a bad idea to test the automation before launching it. Luckily, with Zenphi you can do it in two clicks. Firstly, Save your Flow. Then, click on a Test Run button and choose the “Select a form response to start” option. Make sure, that you have at least one response in this Google Form.
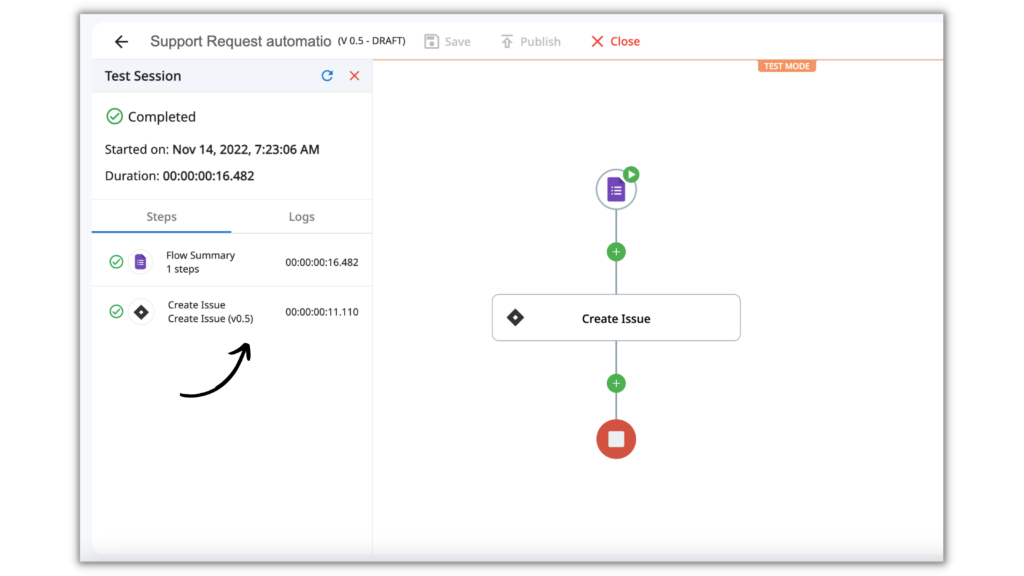
Once the test has started running, you’ll see how all the steps are processing from the left sidebar.
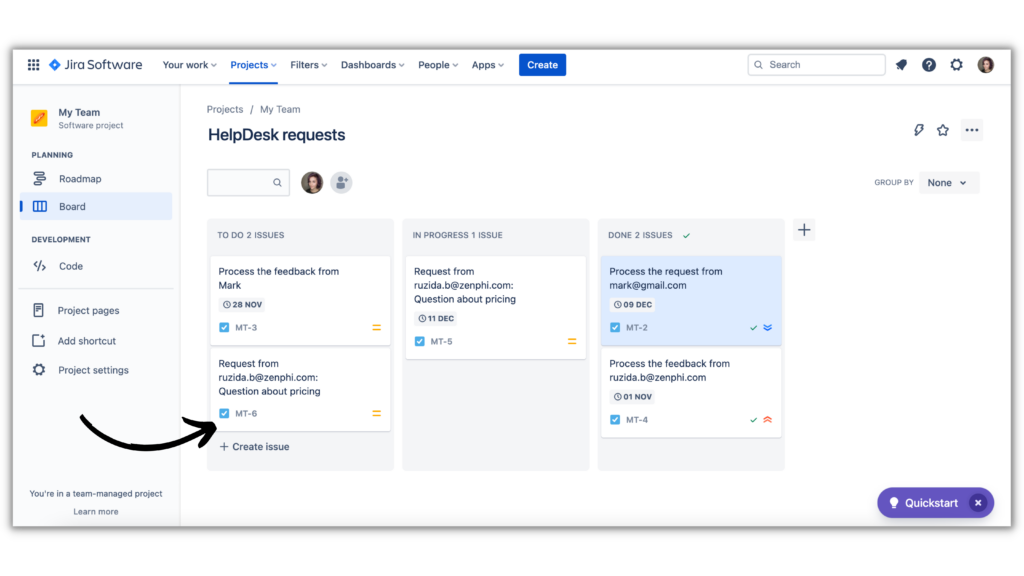
When the Test is complete, you should see the newly created Jira Issue in your board.
Step 5. Publish.
When you are satisfied with the Test Results, Publish your Flow. Once it’s published, you’ll get the Jira Issue created each time someone submits a Google Form.
Pro Tip for Jira Automation
With zenphi you can go even further, and automatically add a Google Sheet Row for each created Jira Issue. Or instead of using Google Form, you can start your Flow from the Typeform submission or Email arrival. The only limit is your imagination!
Conclusion
In this article, we’ve learned how easily you can automate Jira workflows:
- Automatically creating Google Sheet report with Jira Issues;
- Automatically creating Jira Issues after Google Form Submission.
The beauty of these automations is that you save the time for your team to do meaningful work, instead of copypasting data from one place to another. Moreover, you save money on extra Jira subscriptions allowing anyone in your organization to initiate Issues right from the Google Workspace tools.
Related Article

5 Google Forms Automation Scenarios To Streamline Your Workflows
In this article, we will explore 5 Google Forms automation scenarios that can help you save time and increase your efficiency.


