
Do you know what happens when you automate online consent forms within Google for Education platform? You give parents and guardians a faster and easier method to sign a consent form. The sooner the signed consent forms come in, the more time you have to devote to planning the activity. Parent(s) consent forms have been around ever since I can remember. Consent forms are one way to explain to all parties involved the details of the activity. Whether inter-school competitions, a class tour, sports activities, or any other extracurricular events involving minors, teachers need to be very careful. A signed consent form helps protect the school administration and teachers from any misunderstandings and potential lawsuits. It also ensures that all parties involved understand the details of the activity and what it entails, especially the parents and guardians.
Online Consent Forms in Remote Learning
Remote learning with Google workspace for Education is one of the methods schools are adapting to keep up with COVID-19. And even when learning from home, consent forms are still important. It is because with the digital age comes new challenges and threats. Nowadays, the way we use students’ data also requires consent, especially the minor ones coming from their parents or guardians. If you plan to publish some of their personal information or involve them as subjects in an online research project, their parents and guardians need to know and agree with it through written consent. Today, the use of someone’s data in any way without their knowledge or consent can lead to unwanted lawsuits. Even more so for minors without their parents’ or guardians’ consent.
What is included in a consent form?
Every consent form, including parental ones, must have the following details:
- A clear description detailing the activity and why parental consent is being sought.
- The complete name and contact information of the parent/guardian.
- The name and contact information of the teacher.
- A portion that acknowledges the receipt of information.
- Another portion for the signature of the parent/guardian and the teacher.
Why Automate Online Consent Forms?
The traditional manner of sending and retrieving consent forms was tedious. How many times did you lose your consent form or forgot to bring it back to the teacher when you were a kid? Surely, each of us has done so a couple of times in the past. And now that most schools are adapting to the new normal, obtaining parental consent has also taken new challenges:
Prevents Any Type of Loss
There may be no more instances of accidentally spilling drinks, but forms can still get lost even in a remote learning setting. With over 30 students in one class alone, manually sending a consent form to each parent is time-consuming. It also poses a huge window of error that might miss one or two email addresses.
When you automate online consent forms, you can ensure that every parent and/or guardian receives the form in their inbox.
Removes Manual Data Entry
As mentioned earlier, dealing with consent can be tedious. Every teacher must take intricate care that all the important details are filled in by the parents and guardians. And this can lead to a lot of unnecessary back and forths, as well as more time spent doing data entry.
Tedious data entry can be easily dealt with when you automate your online consent forms within Google Workspace for Education. Tasks such as logging data from Google Forms to Sheets automatically are just one of the many things you can do with Google workflow automation.
Reduce paper Usage
Consent forms are one of those things that are heavy in paper usage. Schools around the globe buy rims and rims of bond papers for their activities, including drafting and creating forms. And although they try to recycle, it is still a cause of wastage.
But when you fully digitize and automate online consent forms on Google Workspace for Education, you are leading a sustainable system. Going paperless allows you to save on time and resources, and the best highlight, your school is going green.
How to Automate Online Consent Forms Within Google Workspace for Education
One of the easiest ways to automate online consent forms is using a drag-and-drop workflow automation platform such as zenphi. zenphi is built within Google for Google. This means that as a workflow automation platform, zenphi is very dedicated to connecting Google Apps in seamless automated workflows within Google Workspace and all its editions.
How to Use zenphi to Automate Online Consent Forms
One way of learning how to understand a new challenge is jumping right into it, and zenphi is no different. When you understand your Google workflow in and out, it is easier to understand how each zenphi action functions. Still interested in learning how to automate online consent forms within Google Workspace for Education? Read on. . .
Create a Folder
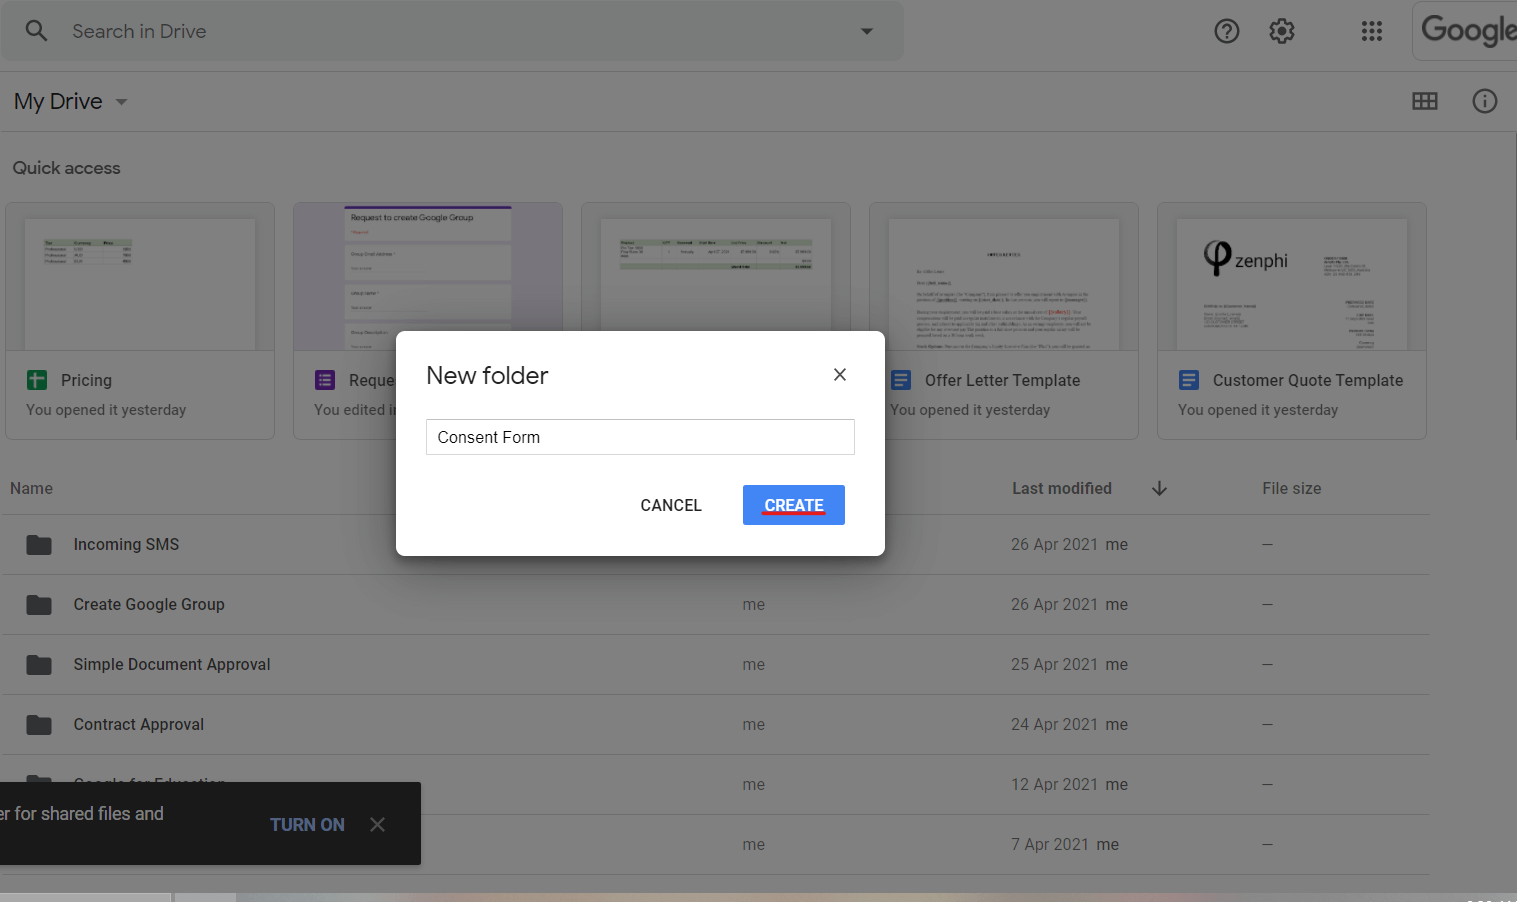
Assuming that you already have a Google for Education account, go to your Drive and create a folder. This is where you will store all the files and documents needed for this automated flow you are going to build.
Create Your Online Form Template
Within the folder, create a form template using Docs. Make sure that the elements of a consent form are present.
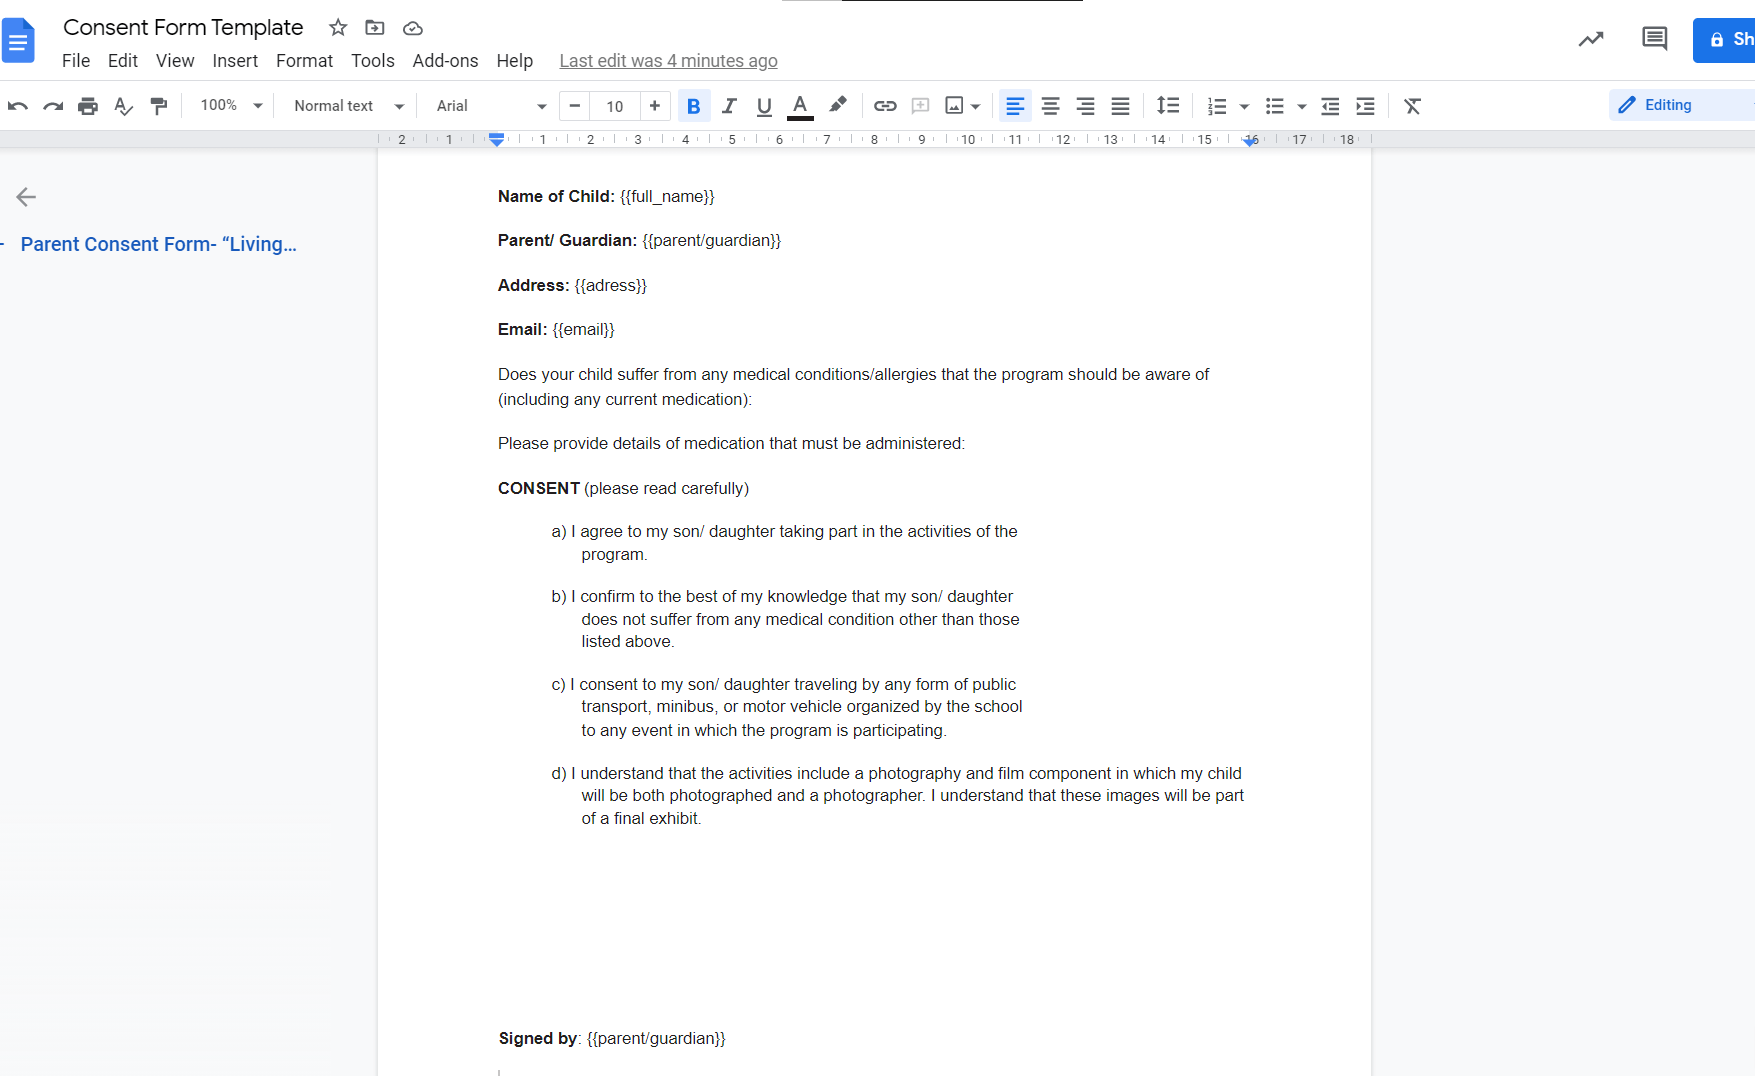
Inside the curly parenthesis are the areas the automation will automatically populate with data. As mentioned earlier, you can cut a good amount of manual data entry when you automate online forms within Google for Education.
List of Student Information
Now that we have our consent template, let’s move on to creating a list of student information in Google Sheets. If you already have a spreadsheet of your students’ information make sure that it is in Google Sheets. Your list should include the following information:
- Student Name
- Parent/Guardian
- Parent/Guardian Email
- Address
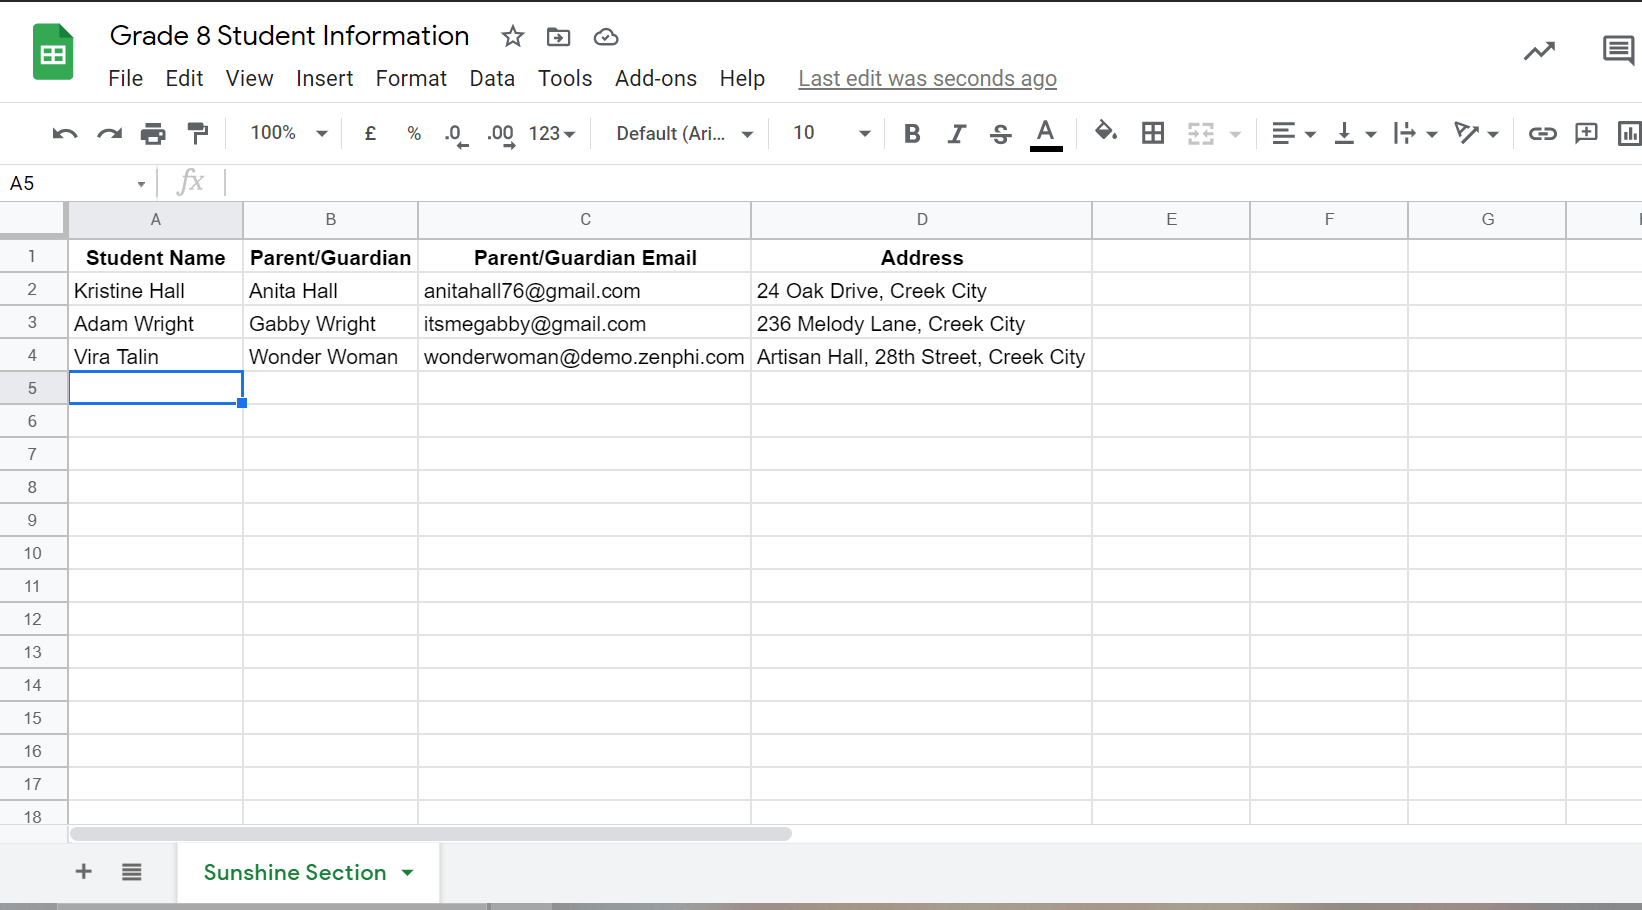
Note that you can change what information you want to include in your online consent forms.
Create a Sub-folder for the Generated Consent Forms
We need to create a sub-folder to store all the generated consent forms for each student.

Create Your Flow Within zenphi
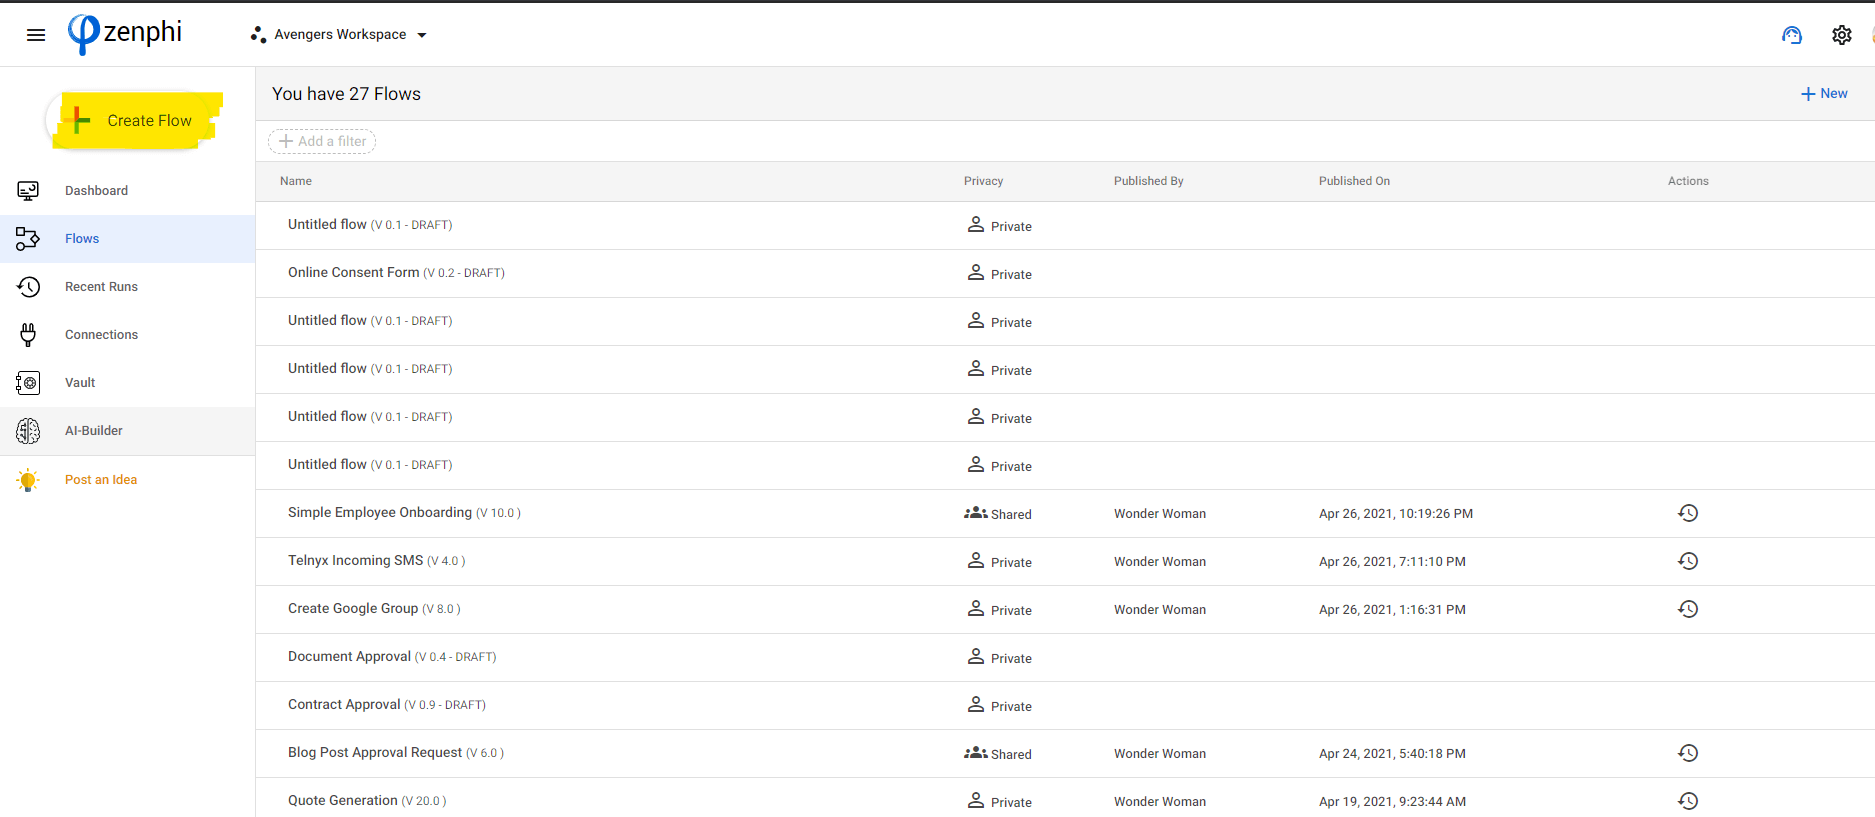
Now that we have all the necessary documents in one folder, it is time to head to the next step. Log in to your zenphi account and create a new flow. If you haven’t tried zenphi yet, simply signup for a free account. In your dashboard, click the “Create Flow” button.
Choose the Trigger Action
Once we hit the Create Flow button, we will arrive at the next stage where we will need to choose the trigger action. In this instance where we are going to automate online consent forms, let us choose Manual Flow.
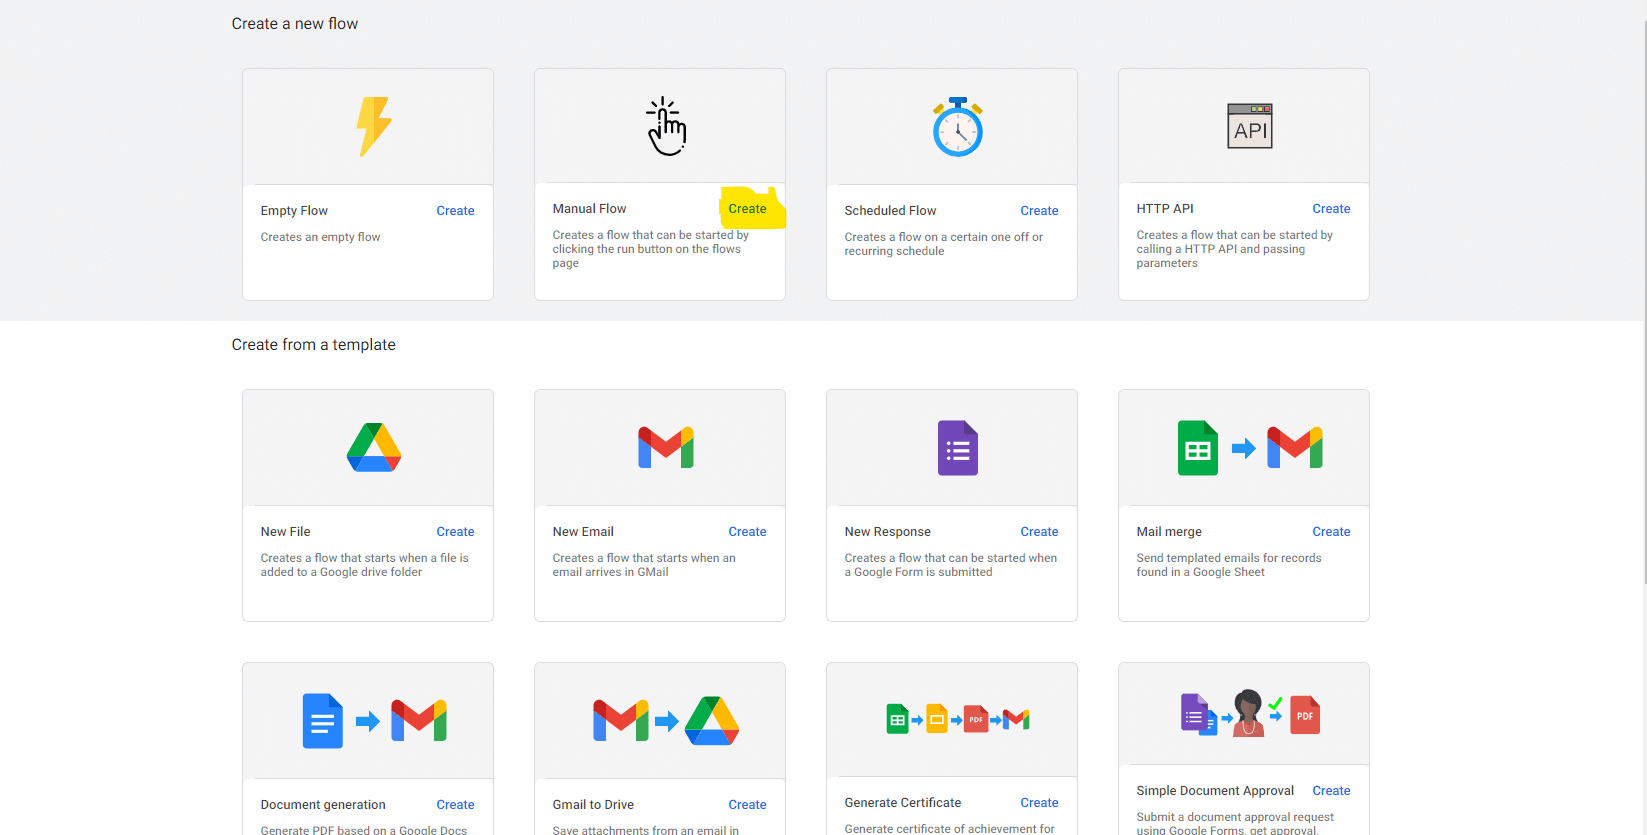
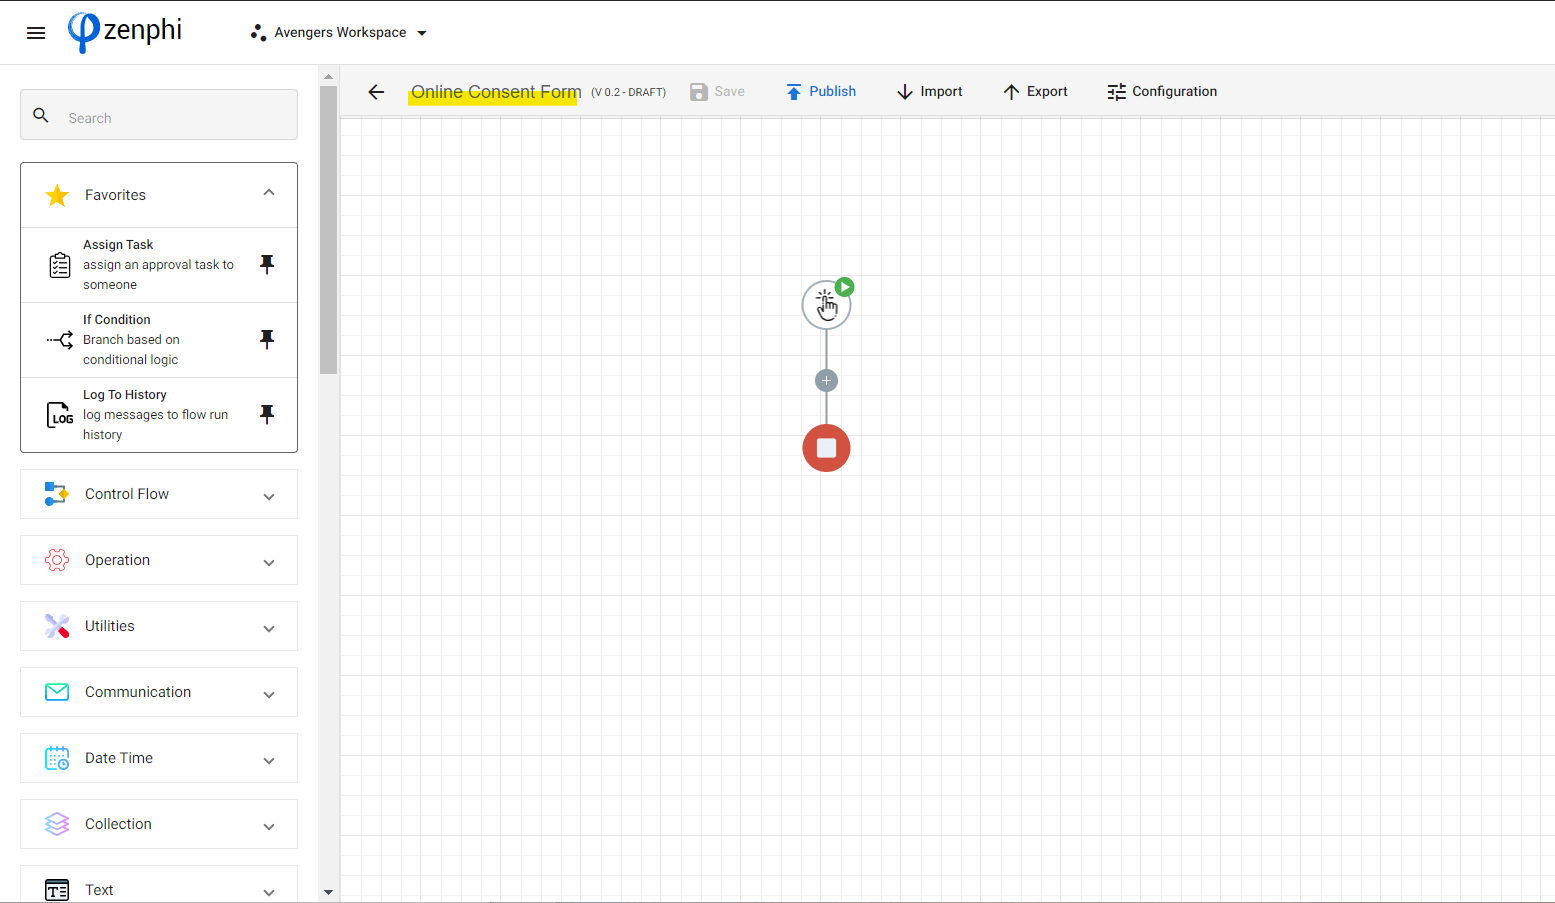
Hit Create and we will arrive at the empty flow where we are going to drag and drop all the subsequent actions of our “automate online consent forms” exercise.
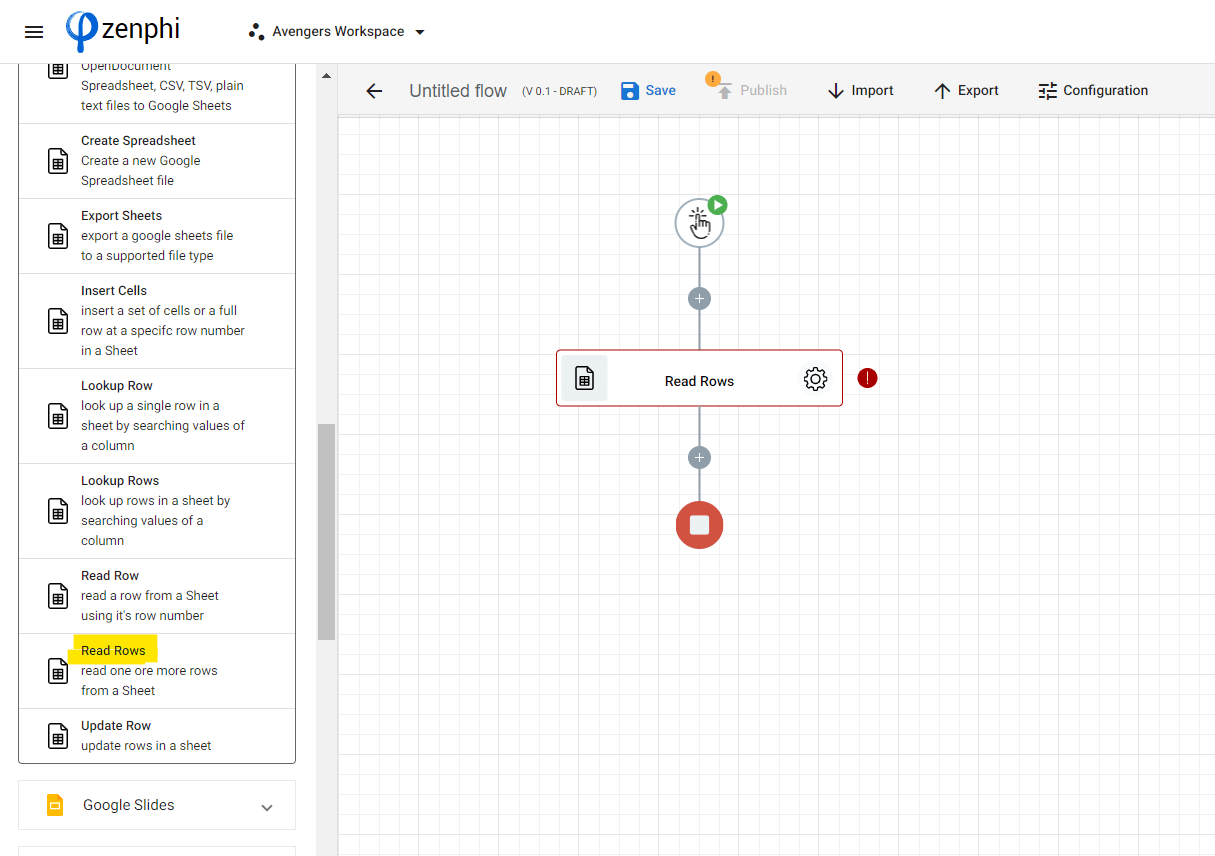
Drag Read Rows Action into Your “Automate Online Consent Forms” Flow
In the designer panel, click the Sheets icon. From the selection, drag and drop the Read Rows action into the empty flow. We also need to configure this action so it functions correctly. To do that, click the gear button.
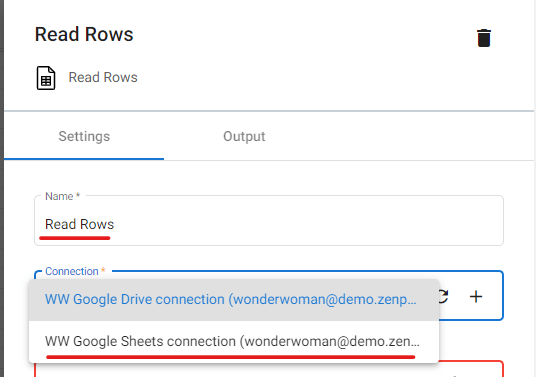
The Name field is pre-filled but we can rename it for our naming convention.
We will select the Google Workspace account for the Connection field that houses the documents we prepared earlier.
At the File field, we are going to click the Google Drive icon and then select the spreadsheet containing the students’ information.
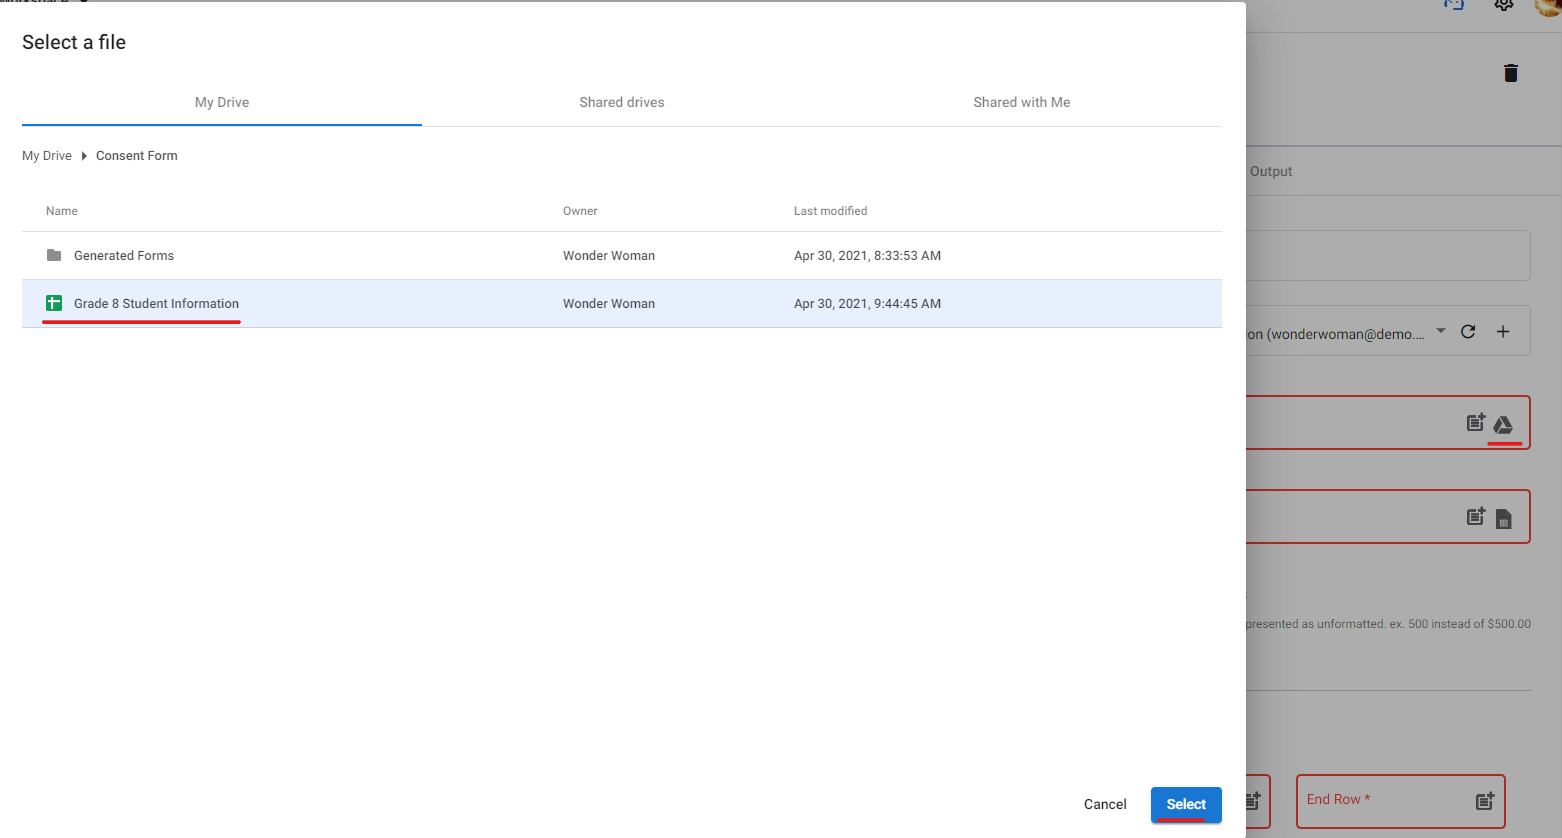
Let’s make sure we are pointing to the right sheet in the Sheet Name field.

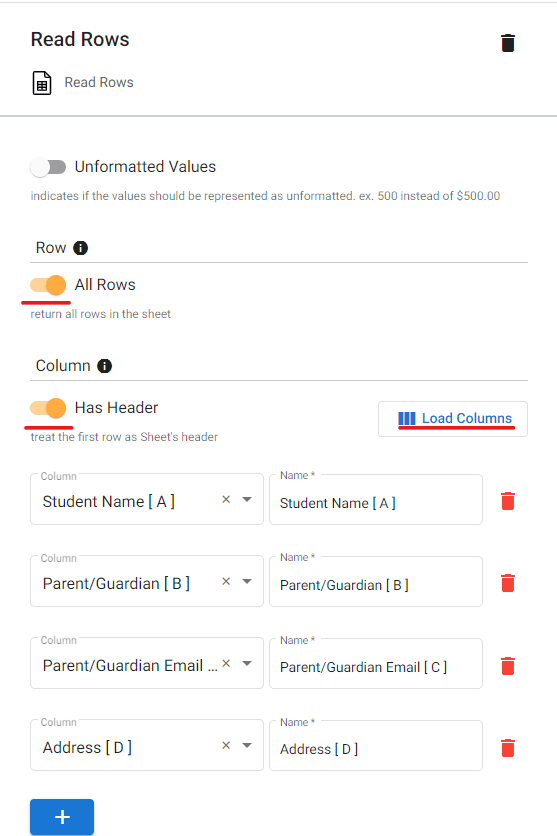
Scroll down a little further and we arrive at the Rows section. We will enable the All Rows button to ensure that all rows in our spreadsheet can be retrieved when we need to.
While enabling the Has Header button treats the first row of our spreadsheet as headers. And Enabling the Load Columns buttons will load up all the columns in our spreadsheet as well as their values.
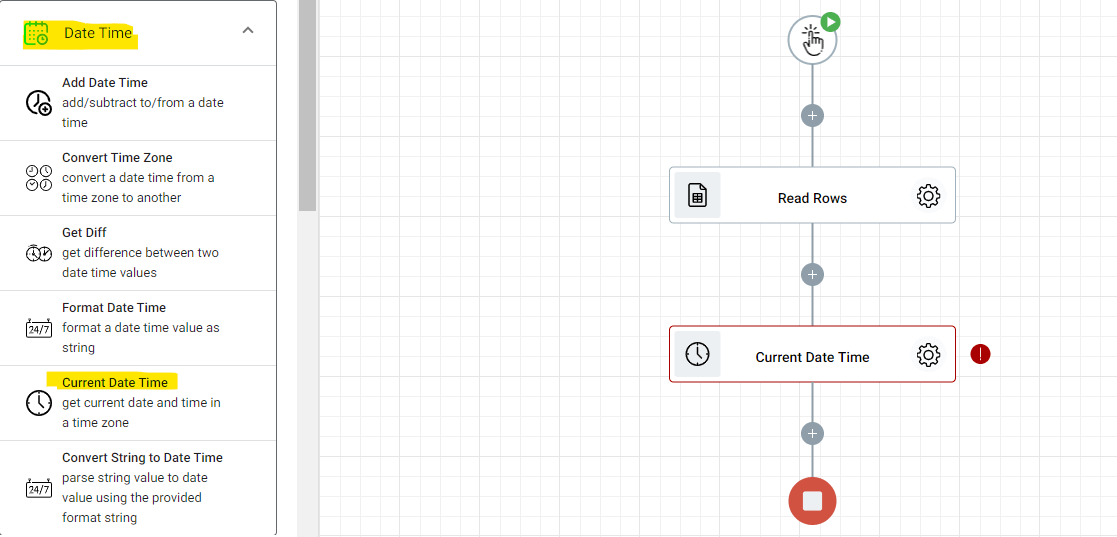
Add Current Date Time in Our Automate Online Consent Forms Flow
Adding the Current Date Time action into our Automate Online Consent Form will automatically log the current time/date when the form was generated.
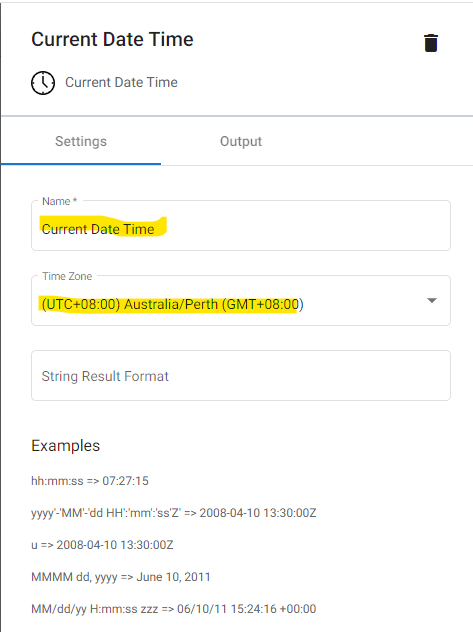
Now, let’s configure this action. We left the name field as it is. As for the Time Zone, we are going to select our local time. This part depends on your choice.
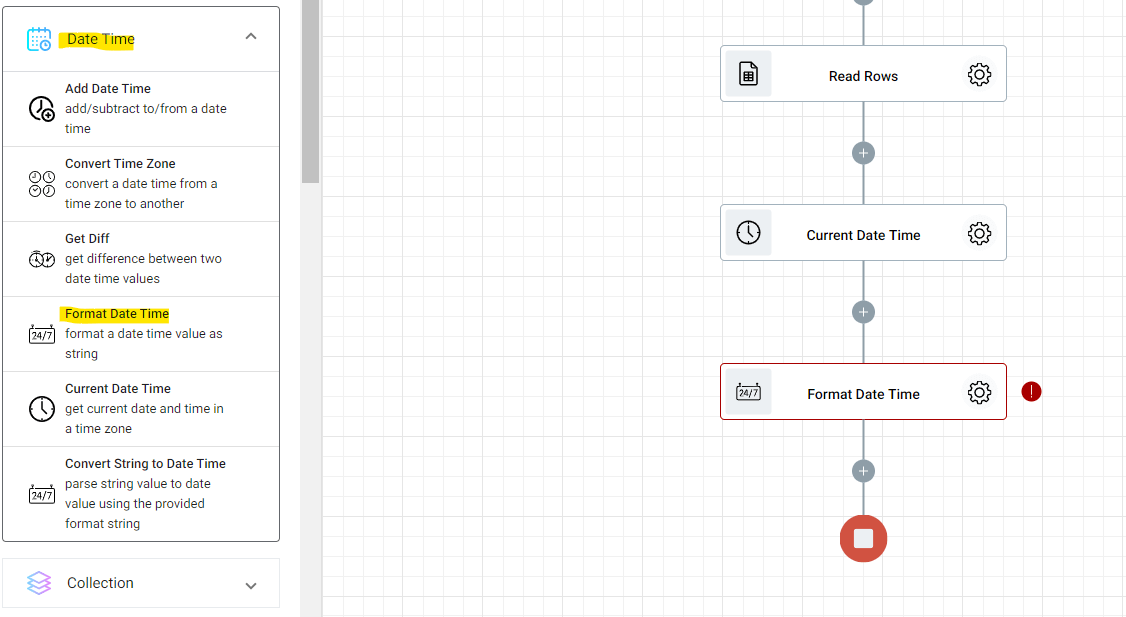
Add Format Date Time into the Automate Online Consent Forms Flow
The next action to build our Automate Online Consent Forms is Format Date Time. This action will automatically format the Date Time value that’s going to be logged onto your form.
To configure this action, click the gear button. The same with Current Date Time, we can choose to leave the Name field as it is.
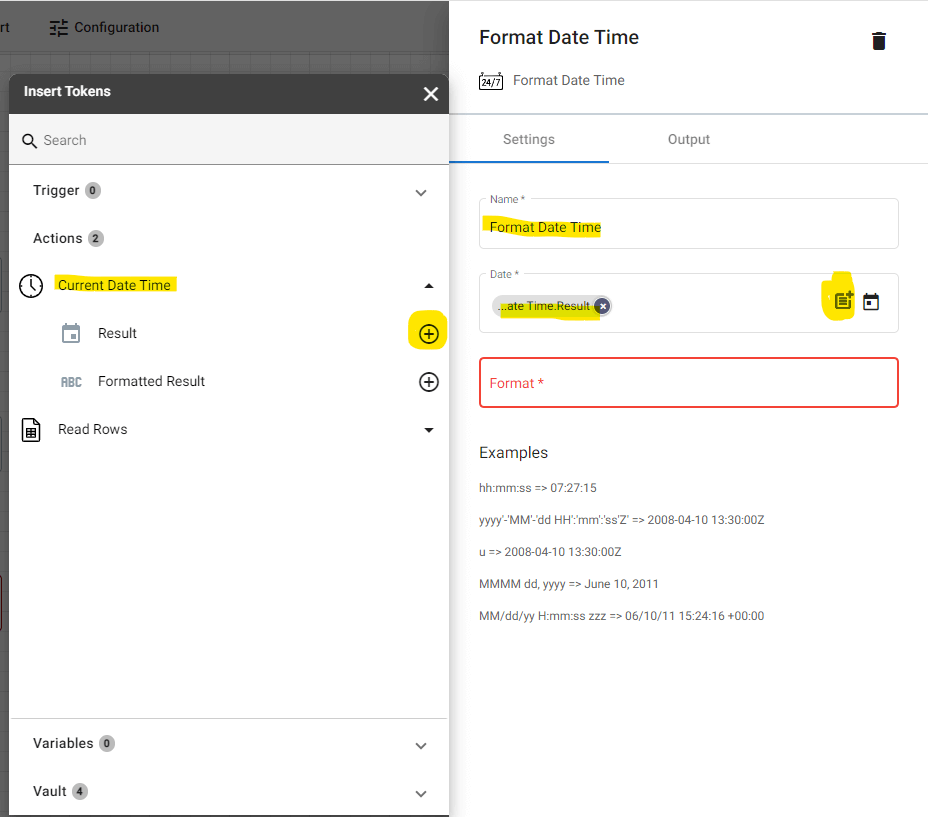
As for the Date field, click the parameter icon. In the token, click the Current Date Time and add Result.
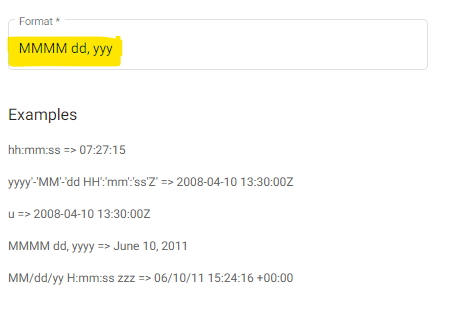
And for the Format field, input the Date Time format you prefer. Use the examples below as a guide.
Add Foreach item to Automate Online Consent Forms Flow
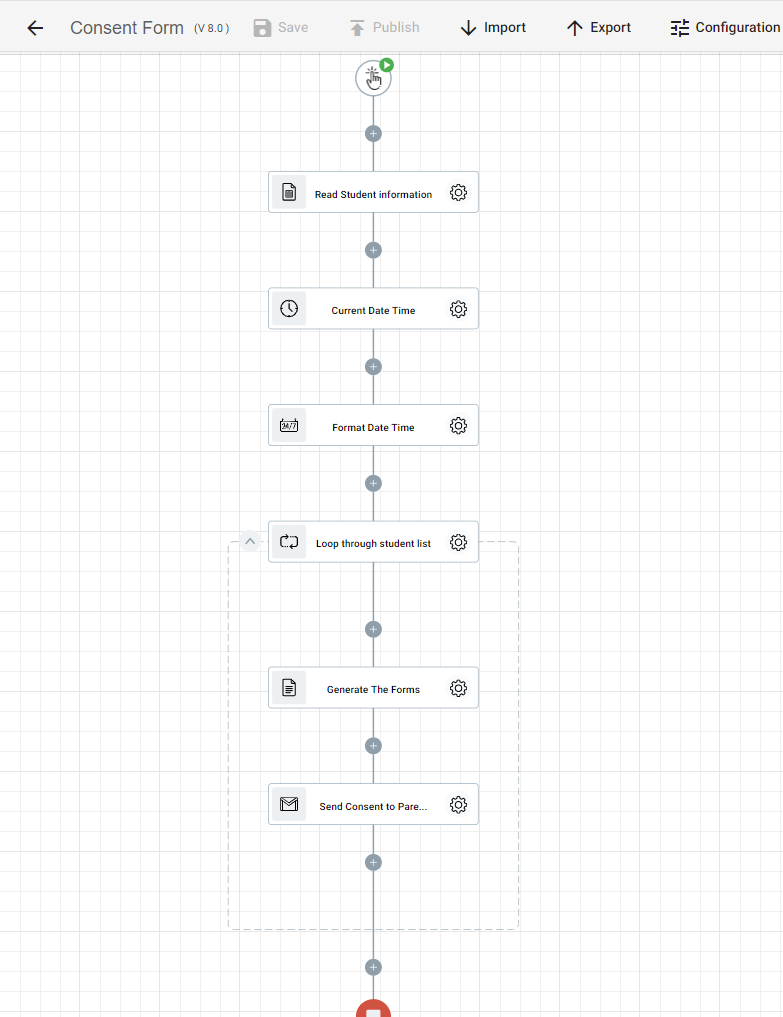
The Foreach item under Control Flow in the Designer panel ensures that the automated flow goes through each item in a collection. Since we are using it to populate our consent forms, Foreach item will go through each item in each row of our spreadsheet. This means excluding the Header part, each row of our Student Information spreadsheet is one form.
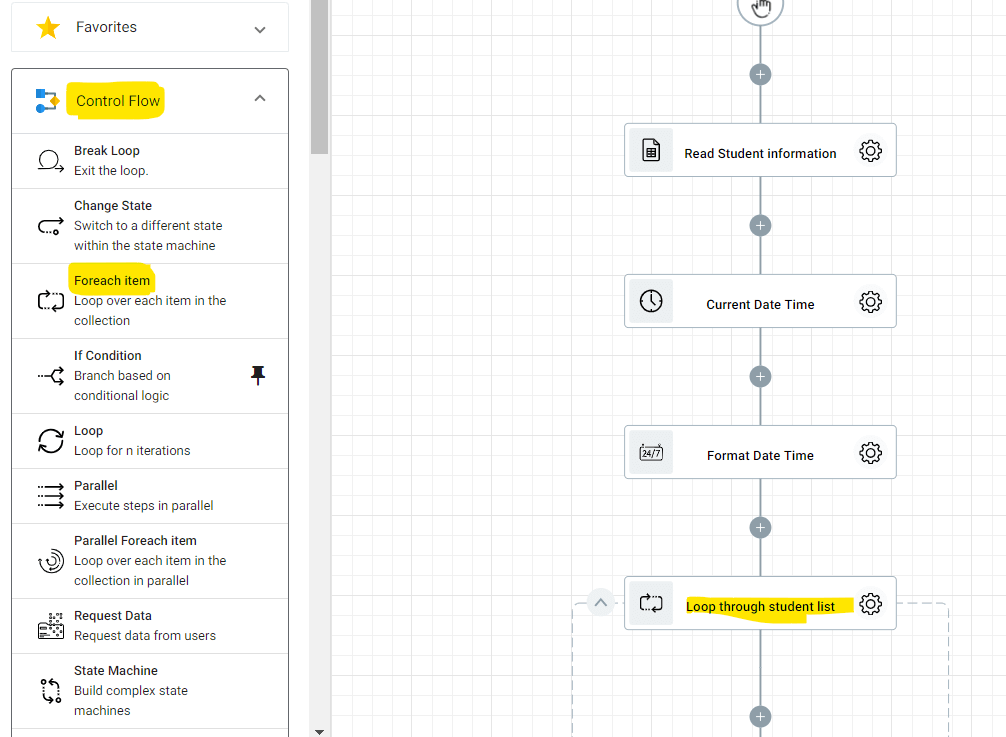
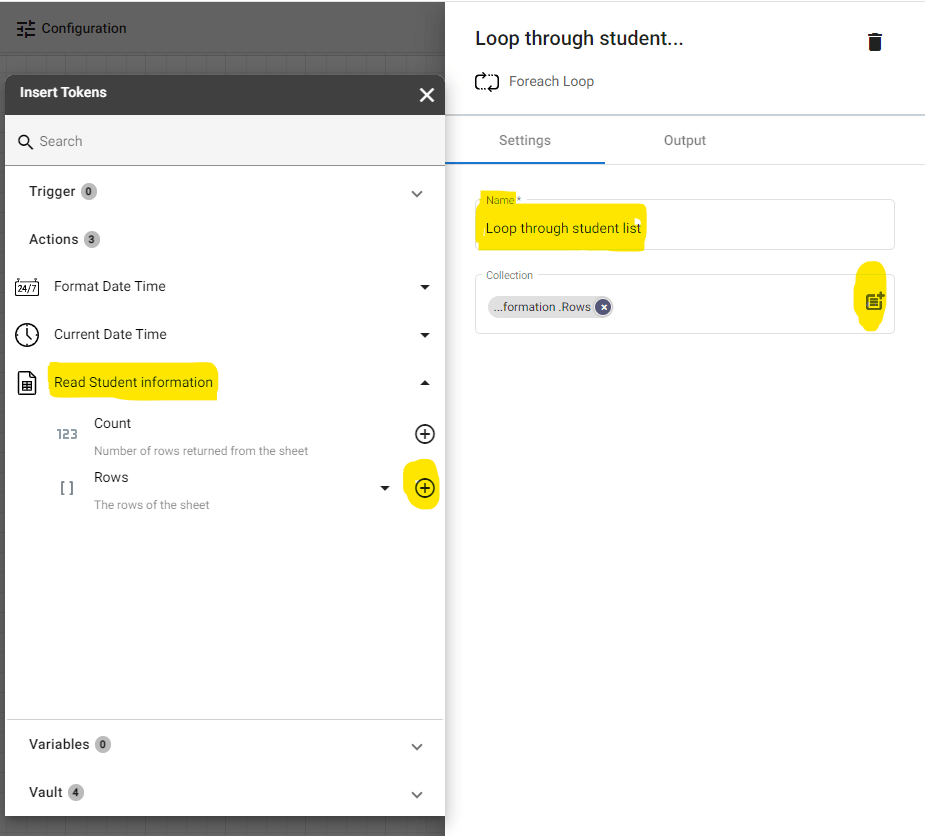
Next, we are going to click the gear button to configure this action. The Name field is already pre-filled just like the rest of the actions in zenphi but we are going to assign a new name to it for the sake of naming convention. You can name the steps any way you want.
In the Collection field, click the parameter icon. When the token panel shows, click Read Student information and select Rows.
Drag and drop Generate Document Action into the Flow
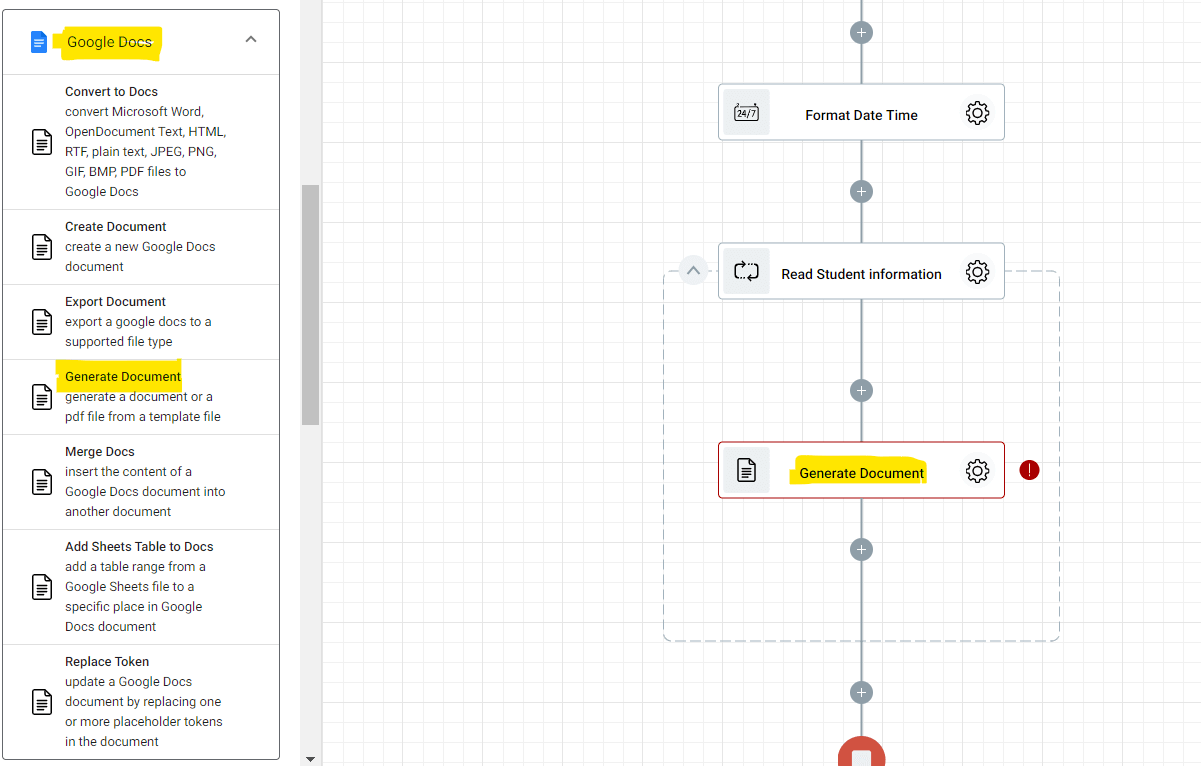
Following the Foreach item, the next zenphi action is Generate Document under Google Docs. We are going to make sure to drag and drop this action within the faint dash lines surrounding the Foreach item action. It signals the flow that the Generate Document action is part of the loop.
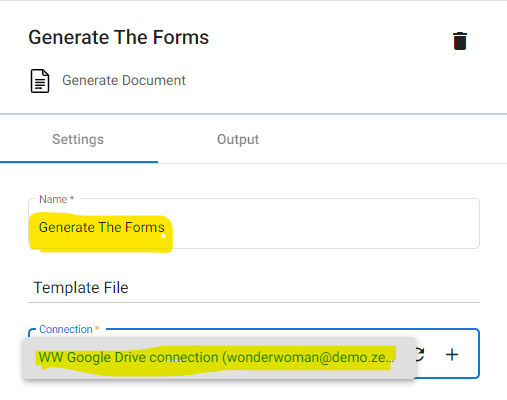
To configure this action, let’s click the gear button. In the Name field, we changed the name into “Generate the Forms” to easily identify what the action is for. For the Connection field, click the dropdown button and select the Drive account housing the Consent Form template from earlier.
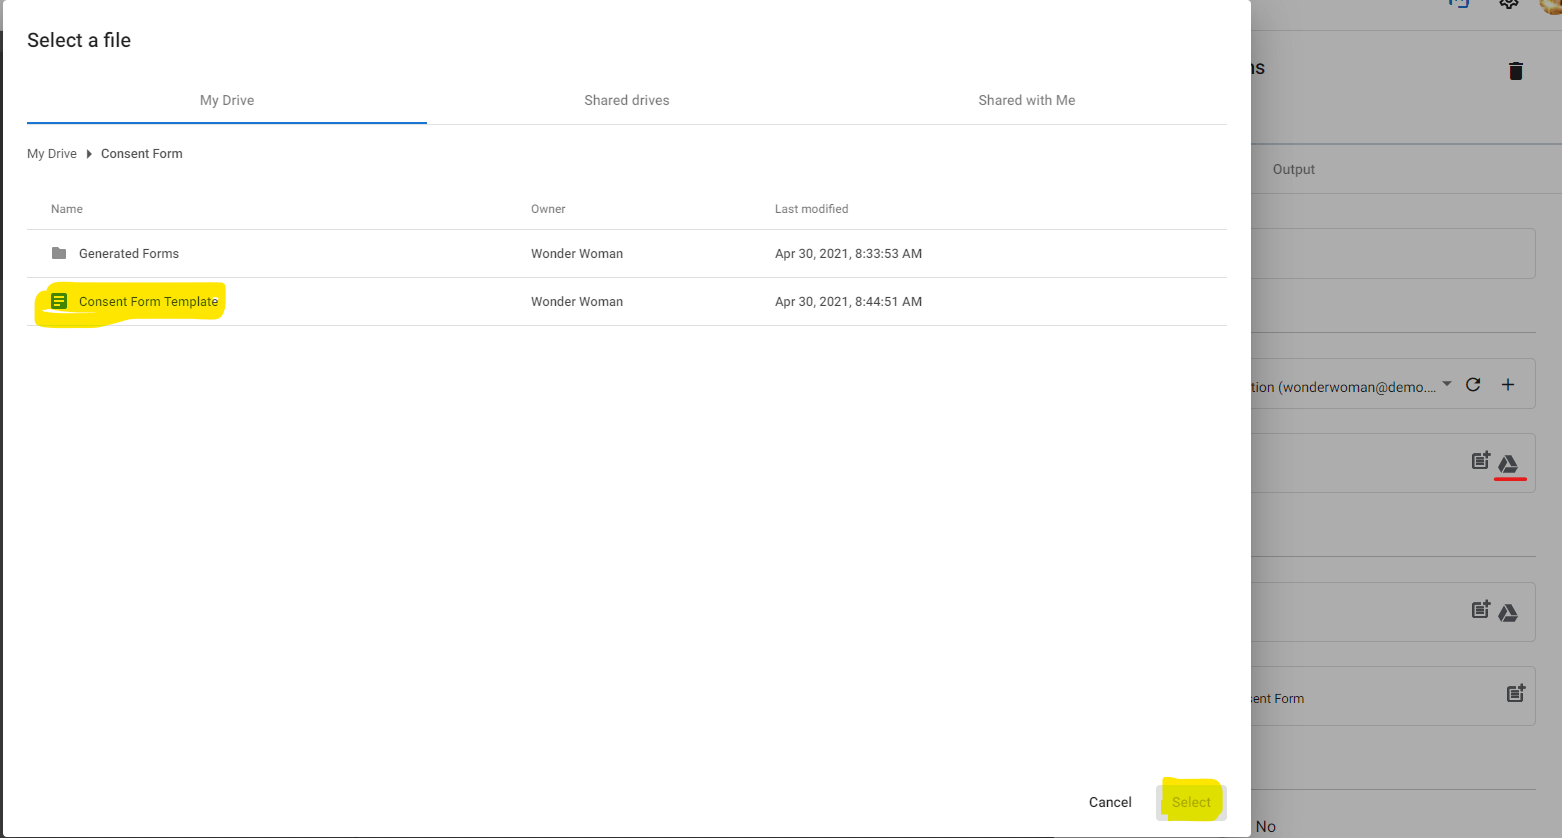
In the Template field, click the Drive icon and select the Consent Form template.
Destination File
In the Destination Folder, click again the Drive icon and select the sub-folder we created earlier to store all the consent forms we are going to generate.
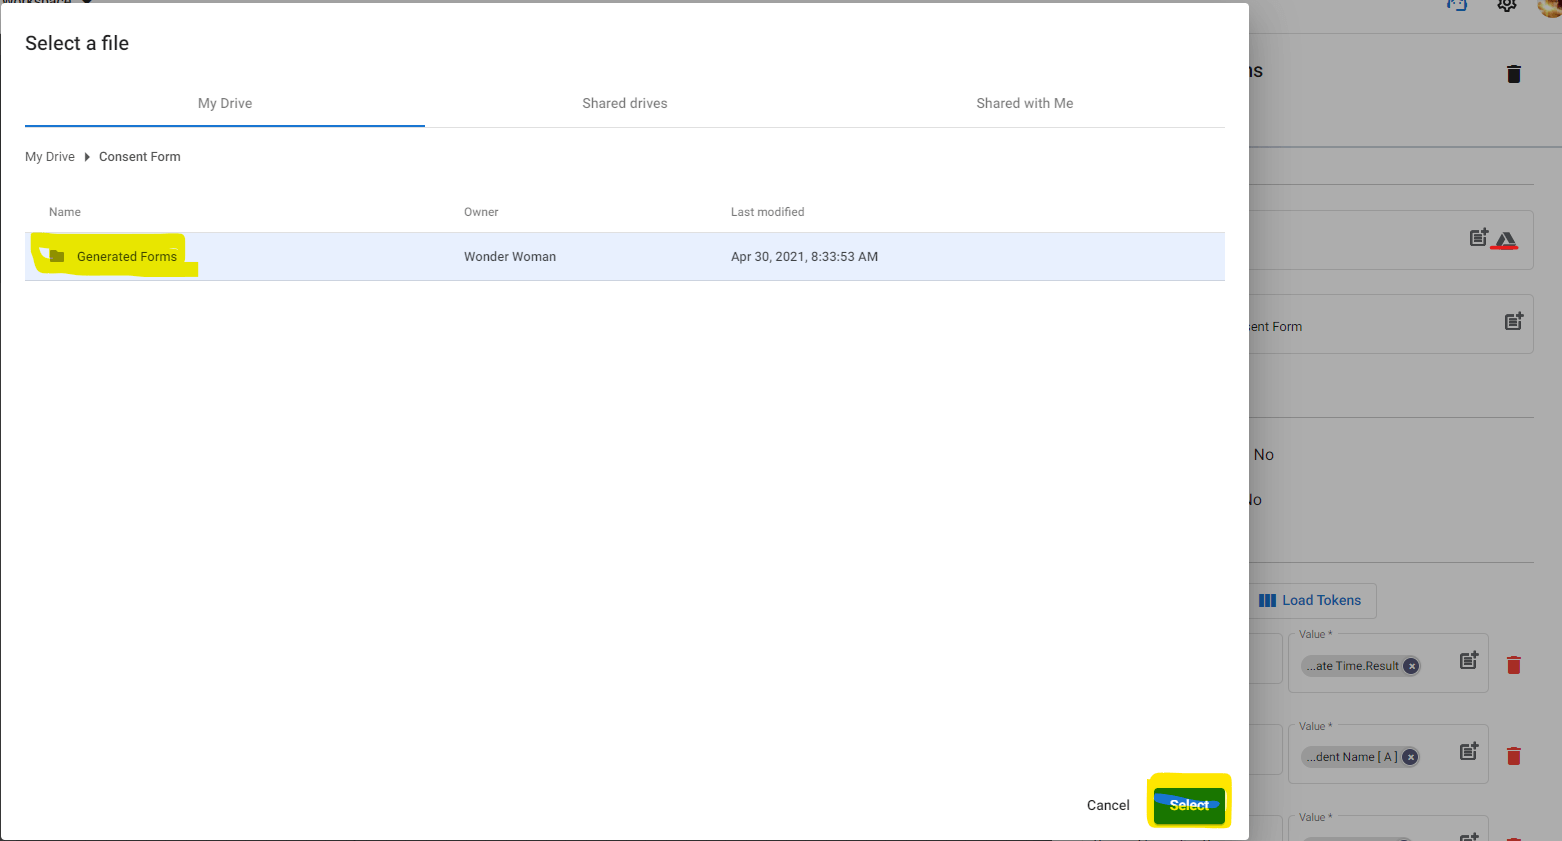
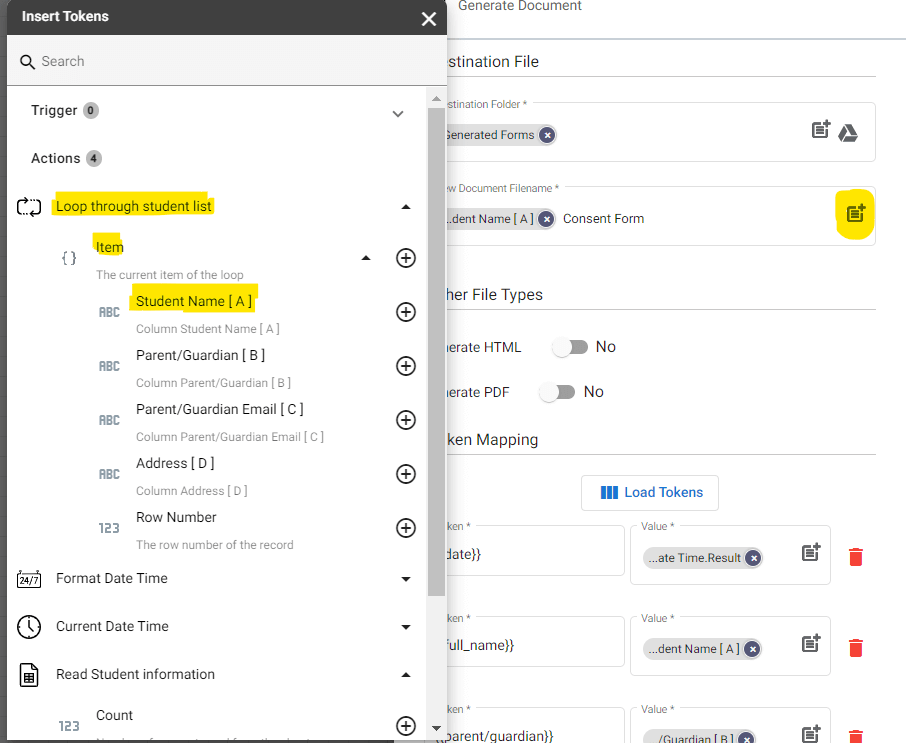
Configure the new name of the generated form in the New Document Filename field. We simply assigned the student’s name to the consent form.
Start by clicking the parameter icon, and when the token panel slides in, click Loop through student list. And then select Student Name[A]. This makes it easier for you to identify what consent form is assigned to each student without having to open each document.
Token Mapping
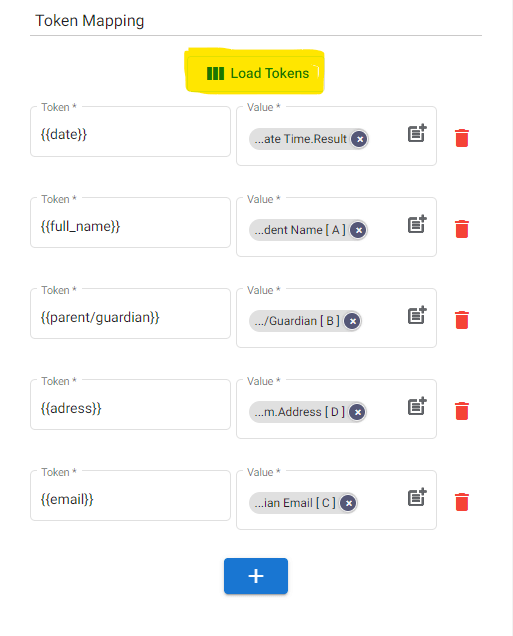
This part of the Generate Document action ensures that the flow loads the right information into the right field. If you remember from the Consent Form template we created earlier, some areas have curly parentheses i.e. {{}}.
We are going to click the Load Tokens button to automatically load the areas with curly parenthesis and their corresponding values.
Add Send Email to Automate Online Consent Forms Flow
The final step in our “Automate Online Consent Forms” flow is the Send Email action under Gmail. We also need to make sure that we drag and drop this action within the loop, the same as Generate Document action. When we do this, every Consent Form we generate for each student, an email will be automatically sent to their parent’s or guardian’s email.
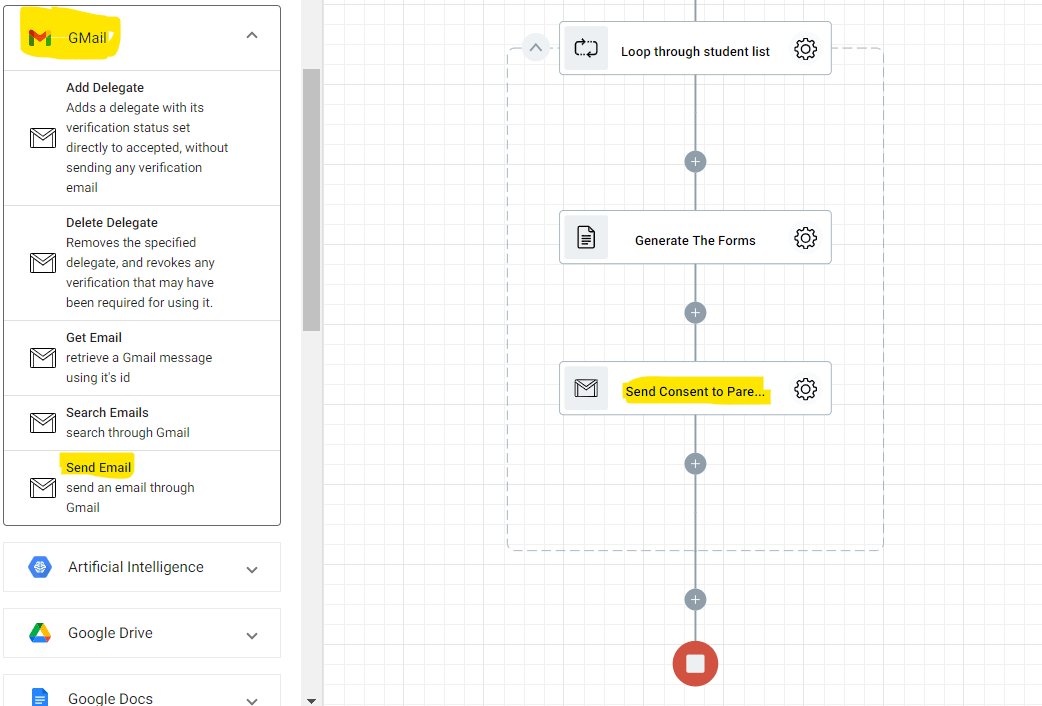
Let’s configure this action by clicking the gear button. In the Connection field, we are going to choose the Gmail account to send the consent forms.
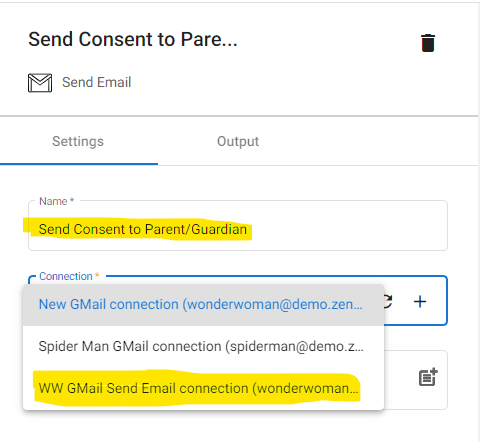
Scroll down to the To field, and then click the parameter icon to configure this part. In the Tokens panel, click the Loop through student list, and under Item, select Parent/Guardian Email[C].
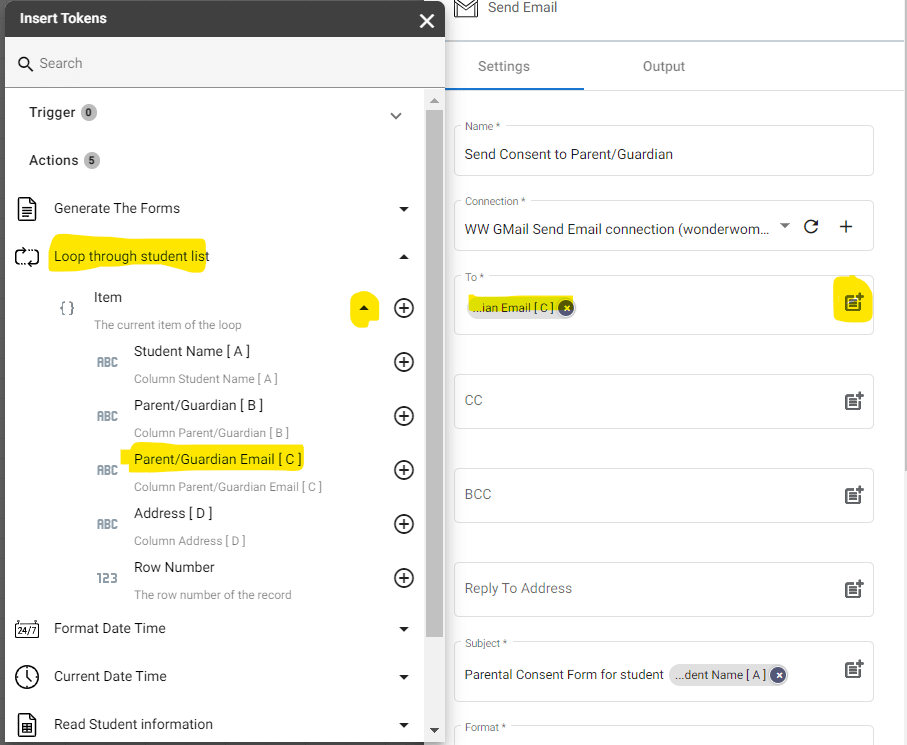
Scroll down a bit further to the Subject field. Start by clicking the parameter icon. And when the token panel slides out, click Loop through student list and select Student Name[A]. You can also directly input the subject line according to your preference.
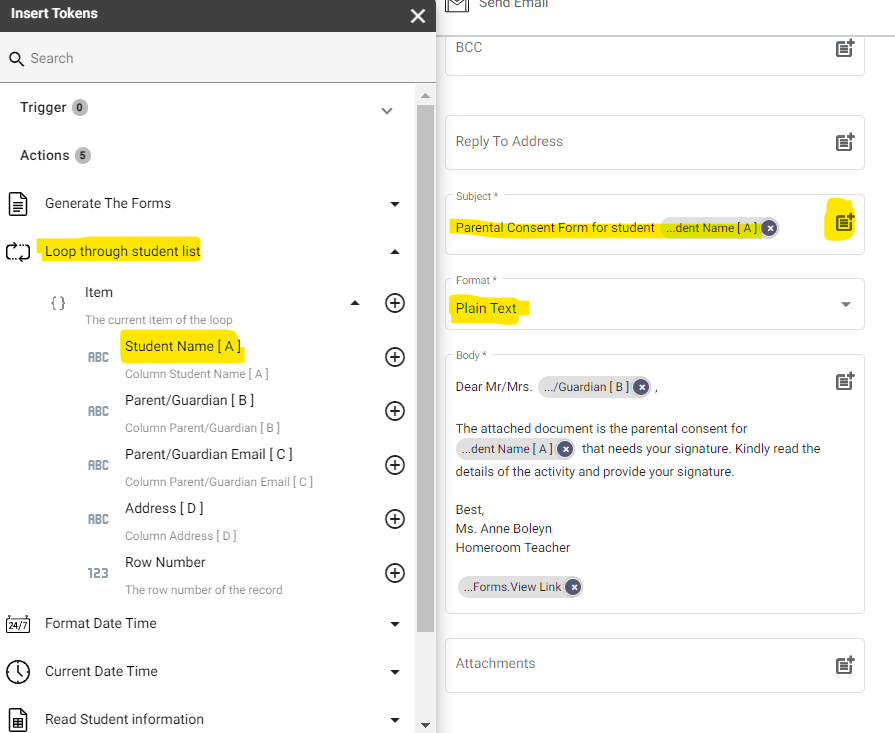
In the body, we already know how to insert the Parent/Guardian[B] and Student Name[A] values, so let’s pay attention to how to include the link of the generated consent form in the email.
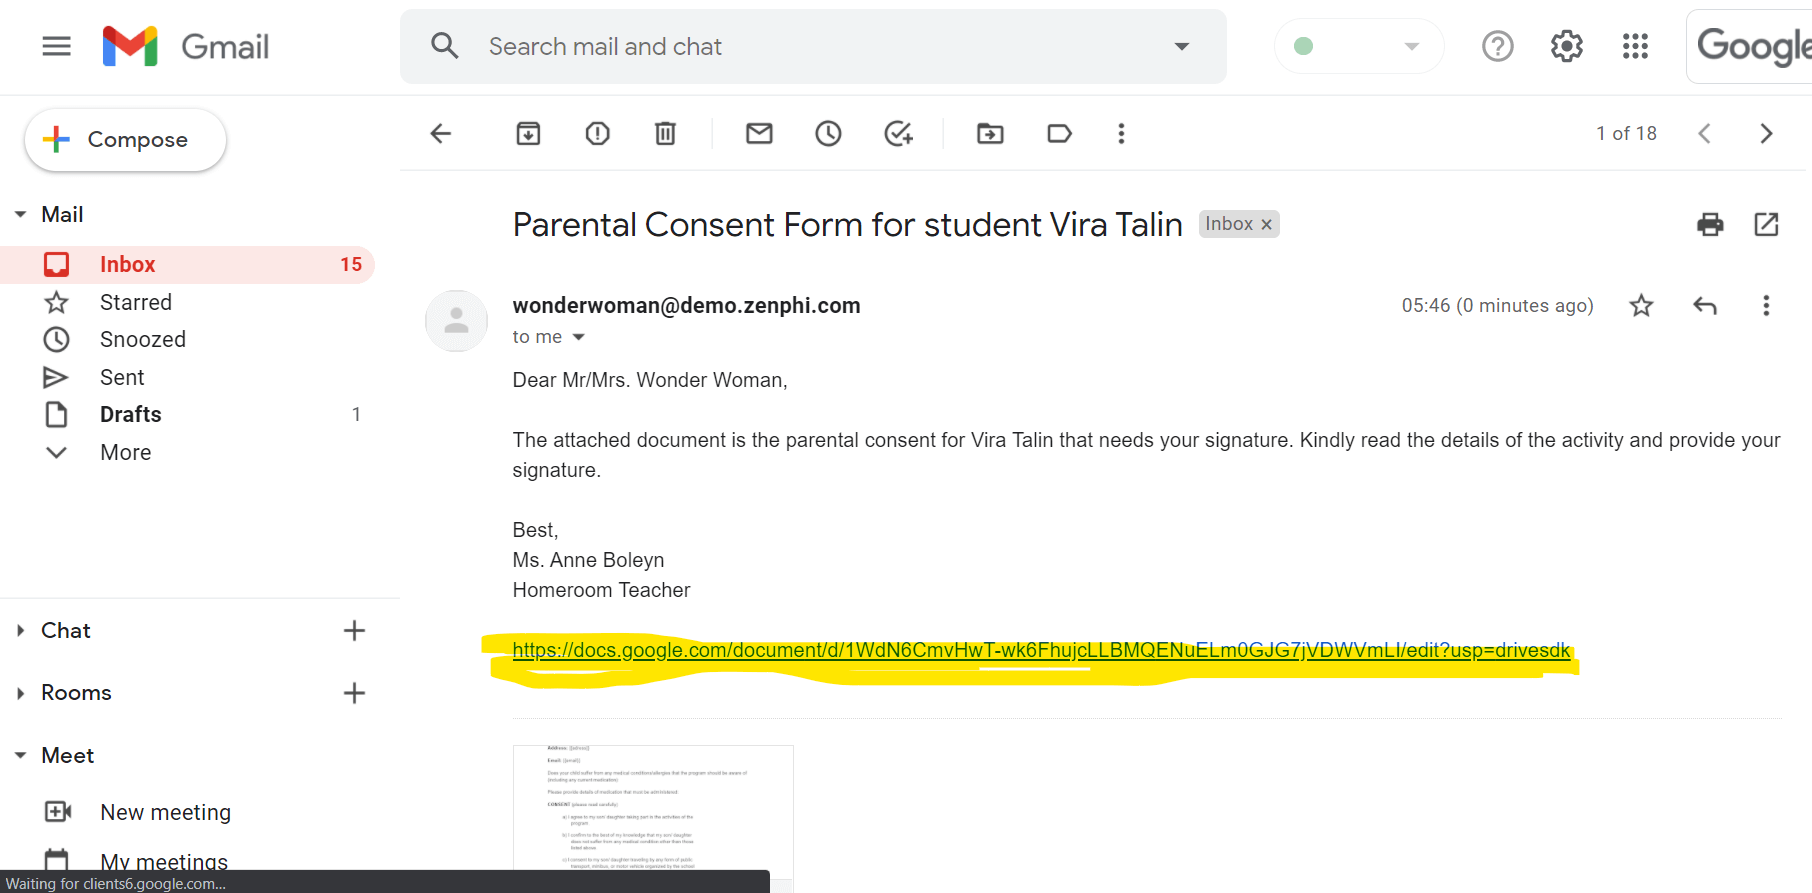
This way, the parents and guardians of the students need only to access the Google Docs links included in the email and they can read and sign the consent form.
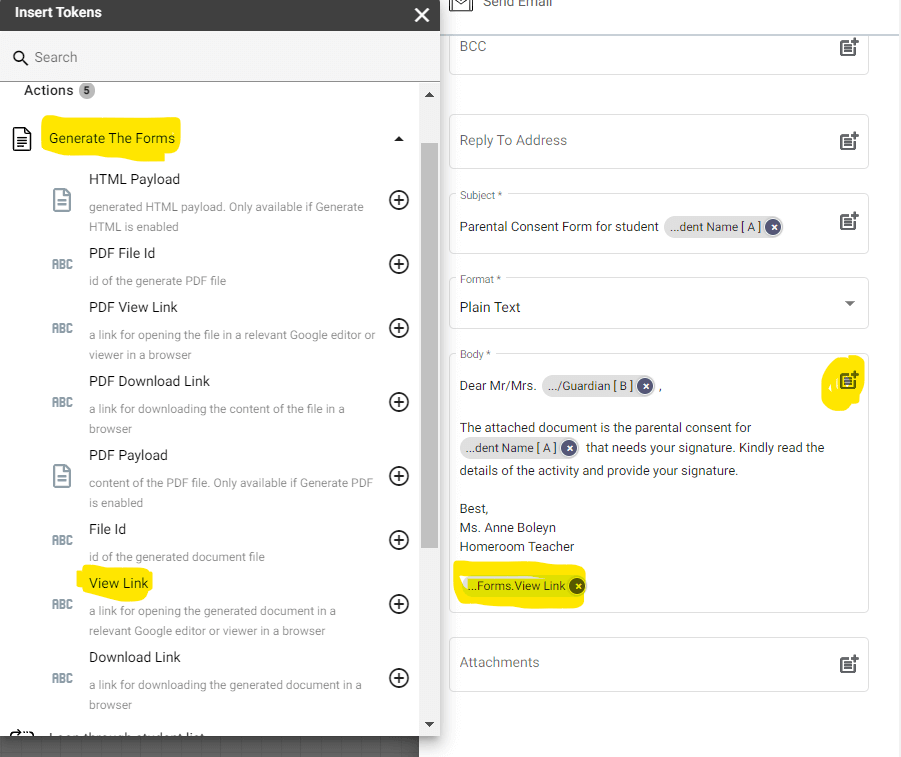
We are going to click the parameter icon inside the Body field and then head to Generate the Forms. Lastly, select the View Link.
Finished Product of our Automate Online Consent Forms
Once we Save and Publish our flow, it will look like this:
And if we run this flow, the automated email containing the consent form will look like this:
Conclusion
Automating your online consent forms within Google Workspace for Education using zenphi is easier than you think. Think about all the time and effort you and your teachers can save when you automate the rest of your workflows. Not to mention being able to focus on teaching instead of getting bogged down by mundane data entry. Another plus when you automate your Google for Education with zenphi is the special offerings and discounts.

