AI-Powered Workflows For HR , Automating Marketing With AI , Automation In Education , Google Forms Automation , How-To , Operationalize AI For Business , Zenphi Use Cases By Industry Or Role
A detailed step-by-step guide on how to send email after Google Form submit with dynamic content based on the responses you collected from your Google Form. No Apps Script required.
Table of Contents
Google Forms: Send Email Upon New Submission use cases
In many cases you’d need so send a custom email upon a Google Forms response submission. The most popular uses cases are related to marketing and product communication. Just to list a few:
- Registration Confirmation: Send an email to users confirming their registration for an event, webinar, or workshop after they submit a registration form.
- Lead Generation: When someone fills out a lead generation form on your website, automatically send them a follow-up email thanking them for their interest and providing more information about your products or services.
- Application Submission Confirmation: If you use Google Forms for job applications, scholarship applications, or other types of submissions, automatically send an email to applicants confirming that their application has been received.
- Feedback Acknowledgment: Send a thank-you email to users who provide feedback through a Google Form, acknowledging their input and providing information on how their feedback will be used.
- Order Confirmation: If you use Google Forms for order forms or service requests, automatically send customers a confirmation email with details of their order or request.
- Survey Response Acknowledgment: Send a confirmation email to users who complete a survey, thanking them for their participation and providing any relevant follow-up information.
- Subscription Confirmation: Allow users to subscribe to newsletters or updates through a Google Form and automatically send them a confirmation email confirming their subscription and providing information on what to expect.
Options to automate sending email after Google Form submit
The challenging part about the process is not just sending out email but sourcing dynamic content within it. You’d want to add a first name and last name, for example. Or, if we’re talking order confirmation, you’ need to attach an actual order in PDF to the email.
There are not so many options to do it.
- Use Zapier. You definitely can use Zapier or Make (ex-Integromat) to automate the process. It can be pretty expensive, though, if you have to send out over 100 emails a month (as these tools charge you per one run)
- Hire a Google developer who would use Apps Script to code this automation from scratch. It’s a good option, but might be lengthy, expensive, and in case you need to change something afterwards, would demand more of your resources.
- Use Zenphi — the #1 Google Workspace automation tool. With Zenphi you can build this automation in 5 minutes, and implement changes anytime without spending more resources. Zenphi is very cost-efficient, and doesn’t demand any coding skills. In this tutorial we’ll explain how to automate email send after Google Form submit using Zenphi.
Zenphi is the leading Google Workspace workflows automation tool that allows to automate Google Forms and build Gmail automations seamlessly. Book a call with our automation expert to get a product guidance.
In this article we will guide you through the process of sending emails on Form submissions automatically using Zenphi.
Step 1: Select a trigger
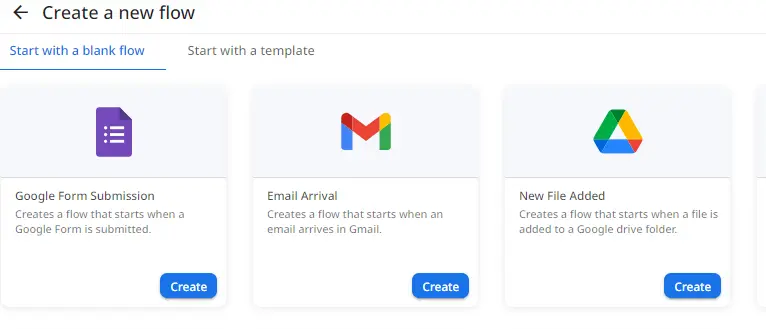
Start with creating a free Zenphi account. Register here. Once registered, you can start building your first automated flow. In Zenphi, a ‘flow’ represents an automated workflow. It consists of triggers, like Google Form submissions, and subsequent actions or steps. We can begin this process by selecting the Google Form submission trigger to kick off our flow.
Let’s see. Our goal is to send personalized emails based on a Google Forms submission. In our case, we need to use an automatic trigger: every time a Google Forms submission happen, we need the automated flow to begin. In terms of personalization, we want to add to every email our customer’s first name and the product they purchased.
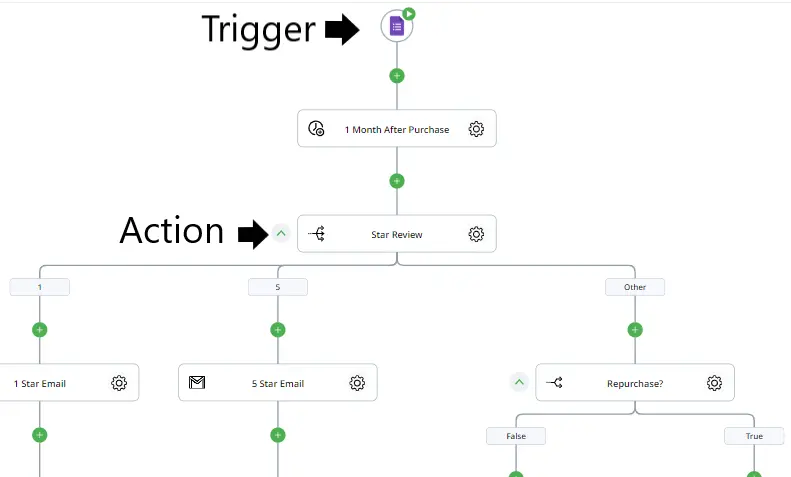
Also, we would be asking how our customers rate us. And based on the rating they provided, we would send them three different email copy: for unhappy customers, for very happy customers and for everyone in between.
This is the overview of our final setup.
Step 2: Connect Zenphi To Your Google Forms
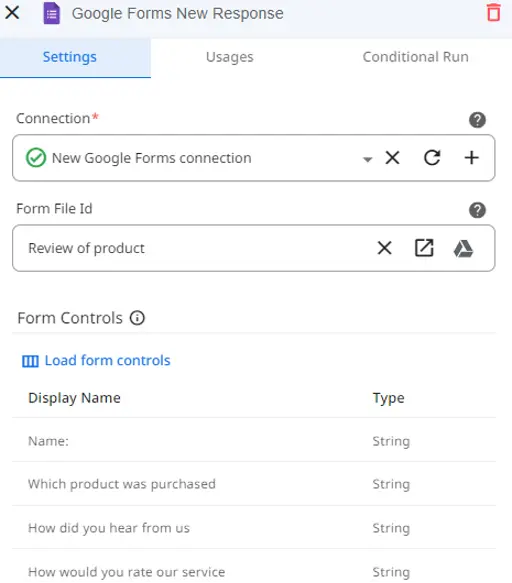
First, establish a connection between Zenphi and your Google Form. This grants Zenphi access to form responses, essential for our automation process. Once connected, you can access form controls and types, enabling dynamic data usage in subsequent actions.
As demonstrated above, once the connection is successfully established, you can access the Form Controls for the selected Google Form by clicking on the ‘Load form controls’ button. This will allow you to use Form Controls values as dynamic values in your subsequent email.
In our example, we’re using a customer feedback form with the following questions:
— Which product was purchased?
— How did you hear from us?
— How would you rate our service?
— Would be be eager to purchase again?
Among others, we have a customer Name in the form. All these values would be used as dynamic values in our email.
Step 3: Customize based on the rating
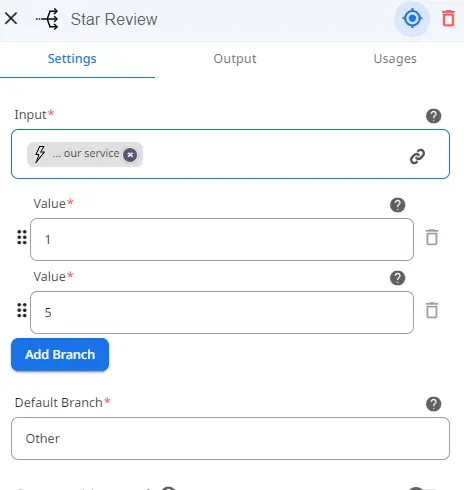
As we want to customize email responses based on review ratings, we’ll use Switch by Value action in Zenphi — it will created branches based on the rating provided.
If the value responded isn’t indicated explicitly in one of the branches it will automatically go to the default branch, in this case anything from 2-stars to 4-stars.
Step 4: Craft Personalized Emails
Next, let’s craft custom emails using the ‘Send Email (Gmail)‘ action in Zenphi.
a) Create a connection to your Gmail account.
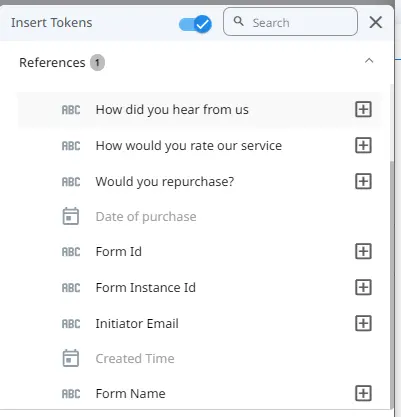
b) Then use Token Picker to personalize emails with dynamic data from Google Form response.
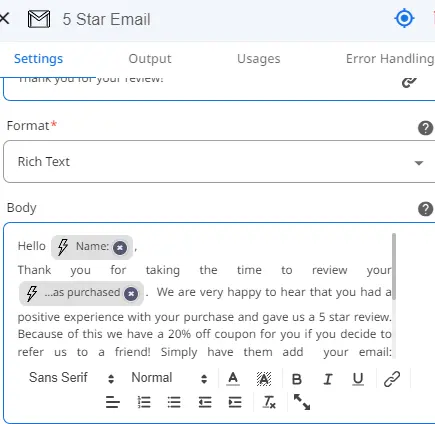
In this example we have added person’s name and purchased product information to give each email a personalized touch for each recipient.
As agreed, we also decided to create different emails for 1 star reviews, 5 star reviews and for anything in between. This way we can customize the body with the information we want each person to receive depending on their response.
In this example we have created a copy for a negative review. After creating a separate copy for an excellent review (5 start), we further filter out any reviews that don’t fall into these two categories.
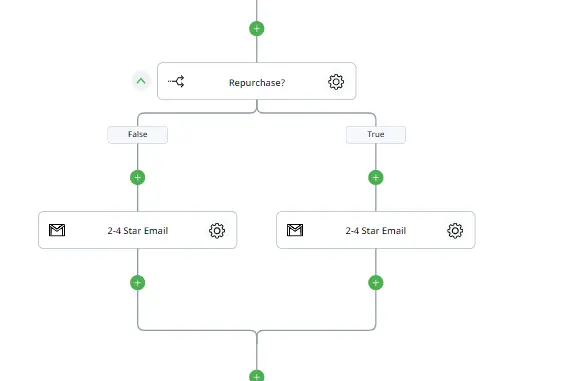
And here’s one more amazing thing! We can also add further customization based on repurchase intent. Let’s add ‘If Condition‘ action before generating the emails inside of the default branch —it will filter responses based on the customer’s desire to make a repurchase. This is how you set it up in Zenphi:
You can also use Zenphi AI Models to generate an email automatically based on the sentiment analysis.
Step 5: Customize And Test
Once your Zenphi flow is set, make sure to save it and publish. It will now execute automatically with each Google Form submission. You can test it live with submitting a Google Form response yourself. Also, you can do the pre-publication test in Zenphi by running a test flow.
Check out the YouTube video below where we recreate the automation described above: send email after Google Form submit (no Apps Script needed!)
Video Tutorial
Watch this YouTube video to recreate the same flow in Zenphi
Need a more refined automation that involves Google Form submits and Gmail response? Book a call with one of our automation experts, and let us build a custom flow for you at no charge!

